ESPHome Compiles for Minutes? Offload the Build to a Faster Machine
You click Install and you wait. A minute, two, sometimes five. And when you have ten devices and want to run them all through after a new ESPHome release lands, that's your afternoon gone.
Most people accept it as the price of running Home Assistant on a small box - I did for years. Yet ESPHome has a ready-made official answer for exactly this: you can offload the compile over the network to a machine that has the horsepower, and your configuration stays right where it is.
Device Builder on both ends - the app in Home Assistant as the weak side and the ESPHome desktop app as the fast one. If you don't know ESPHome at all, start with my introductory article.
Why it's actually so slow
This is worth explaining, because it determines what helps and what doesn't.
When you click Install, no finished firmware is transferred anywhere. Your YAML is turned into a C++ project, which is then compiled in full together with the framework - that is, with ESP-IDF: an operating system, a network stack, drivers and crypto libraries. Hundreds of translation units, linked at the end into a single binary image. The Device Builder README: "Compiling ESPHome firmware is CPU-heavy, especially for ESP-IDF targets."
And that's precisely why a faster disk or more RAM won't help. Compiling C++ is pure computation: the processor reads a few dozen kilobytes of source and then computes for a long time. The disk is nearly idle and the compiler asks for little memory. What decides is single-core performance and how many cores you can run in parallel - exactly what a Raspberry Pi or the ARM chip in a NAS doesn't have compared to a desktop. The ESPHome documentation puts it plainly: "Compiling firmware is the slowest thing the Device Builder does, and on a small host such as a Home Assistant Green or a Raspberry Pi a single build can take several minutes."
How much it actually saves
I couldn't find this number anywhere, so here's my own measurement.
I run ESPHome as an app in Home Assistant on my own NAS - fine for everyday smart-home duty, but nobody's going to be impressed by its horsepower. Compiling a single device there takes many minutes. The same build on a Mac Mini M4 Pro is a matter of seconds to tens of seconds.
So it isn't a third faster, it's a change of order of magnitude. And it changes how you work: when a build takes minutes, you start rationing your attempts. You notice it most on a bulk update - ten devices times five minutes is an hour of waiting, ten times twenty seconds is a coffee break.
How it works: who does what
The README describes the principle in one precise sentence: "The firmware bytes still install from the original dashboard; only the build runs elsewhere." So nothing moves elsewhere - not your configuration, not the devices, not the main dashboard. Only the expensive part goes.
Here's what it looks like on the fast machine doing the compiling:
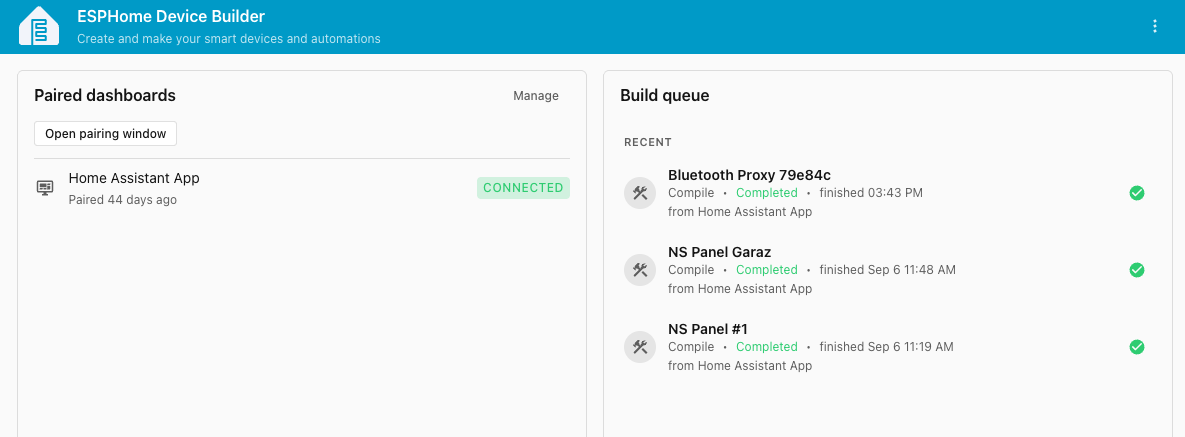
On the left is the Paired dashboards panel with a single entry, Home Assistant App, showing "Paired 44 days ago" and a green CONNECTED badge - the pairing holds by itself and survives restarts on both sides. On the right is the Build queue with three completed compilations, each carrying the line from Home Assistant App.
And that line is the whole proof. The job was requested in Home Assistant, that's where I clicked Install, that's where the YAML lives - but the compilation ran here, on the Mac. The firmware then installed from Home Assistant as if nothing had happened.
Two roles, both under Settings on the respective dashboard:
| Role | Who has it | What it does |
|---|---|---|
| Build server | the fast machine | Accepts pairing, compiles, and returns finished images. The desktop app and standalone installs have it on out of the box |
| Send builds | the weak one (Home Assistant) | Delegates the compile. The Home Assistant app is deliberately in this mode only, because per the README "it doesn't accept inbound build jobs without opt-in, which is the sensible default for a typically-shared host" |
A single dashboard can play both roles at once, or it can be narrowed down to serve purely as a build machine - see headless mode.
Remote build covers every install type - OTA and USB alike. For a serial install, per the README, "the receiver compiles the full bootloader / partitions / firmware image set and ships it back; the USB flash itself still runs on the sending host, since that's where the device is plugged in." So the compile happens on the fast machine and the actual talking to the serial line happens wherever the device is plugged in - I cover that procedure here.
Pairing step by step
Four steps and one trap you'll reliably fall into, so I'll put it up front:
Pairing requests window must be open beforehandThe receiving side refuses every request that arrives while its Pairing requests screen isn't open. It isn't a confirmation step at the end - it's a prerequisite. The documentation lists it as step 2, in the middle of the list, which is why people read it as "and here you just confirm it". The README nails it with "Step 2 is the prerequisite, not the wrap-up."
So open it before you click Pair on the other side, and leave it open until you're done.
You can tell the window is open by the green Open badge and the countdown showing how much time you have left:
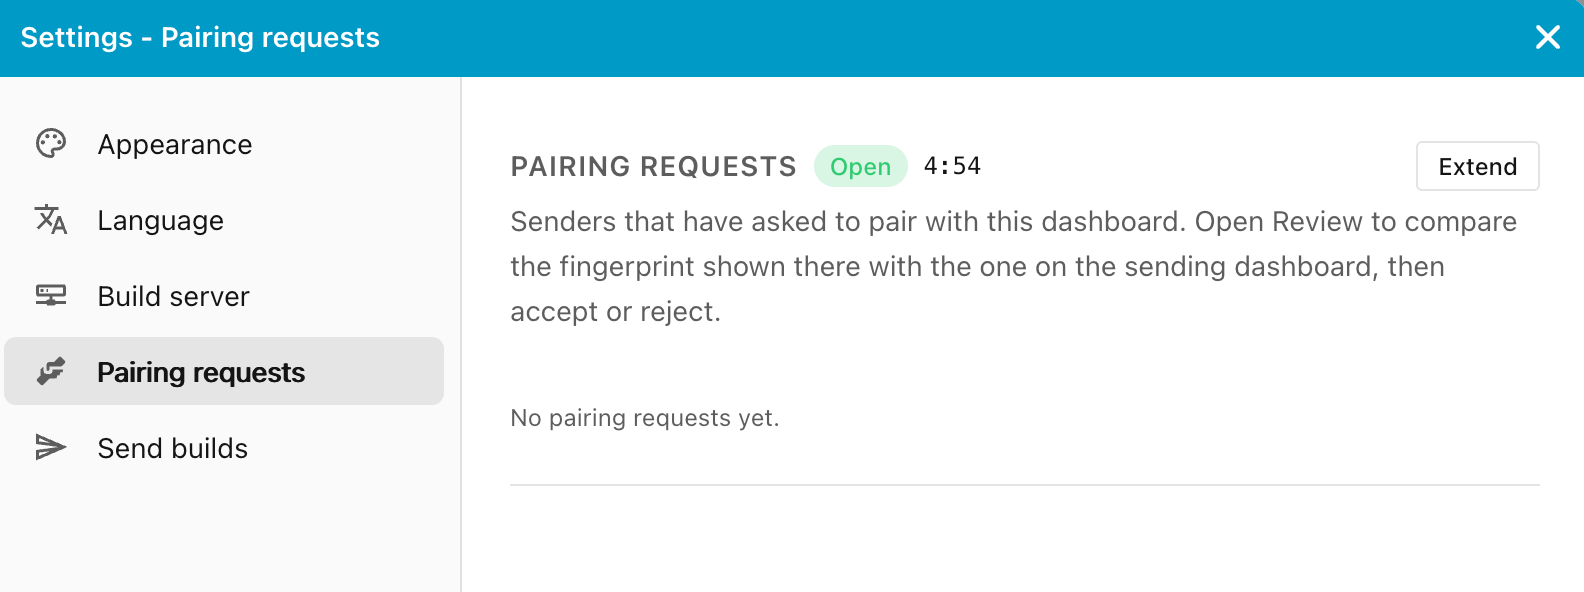
The window closes on its own once the countdown runs out. If you don't finish pairing in time - say because you're running between two computers in different rooms - the Extend button pushes the countdown back and you don't have to start over. The pane spells out what's expected of you: "Senders that have asked to pair with this dashboard. Open Review to compare the fingerprint shown there with the one on the sending dashboard, then accept or reject."
Device Builder settings list Build server, Pairing requests and Send builds among others in the left column - the exact menu varies slightly with the machine's role. The first three steps happen in those:
- On the fast machine, go to Settings → Build server and turn on the Enable remote build toggle
- In the same place, switch to Settings → Pairing requests and leave that screen open (from the main screen you can also get there with the Open pairing window button in the Paired dashboards panel)
- In Home Assistant, go to Settings → Send builds. A receiver on the same subnet shows up in the
Known dashboardslist by itself over mDNS - find it there and pair. If it isn't there because it sits behind another subnet, a VLAN or a container network, use thePair with a build serverbutton and enter its hostname and port by hand - Back on the fast machine, the open screen shows the request. Click Review, compare the fingerprint against the one the sending side displays - they must match - and confirm with Accept
That fingerprint is the main security control of the whole pairing. The receiver shows it in its own Settings → Build server, under THIS DASHBOARD'S BUILD SERVER IDENTITY as Identity fingerprint (SHA-256), rendered as a row of emoji - precisely so it can be read out loud to another person. If you'd rather compare numbers, expand Show hex bytes. The app doesn't waste words on why it matters: "Read it back to the operator pairing from the other side; it's the only way to detect a man-in-the-middle on first connection."
After the first build the receiver keeps a cache, so a second install of the same device doesn't start from scratch - which is exactly why a repeat build is faster still than the first one. How long that cache is kept is governed by Cache retention in the same settings pane; out of the box it's 24 hours of inactivity, after which the disk space is reclaimed.
Next to the fingerprint you'll also find Dashboard ID, Pairing address (hostname and port 6055) and a Rotate identity button that invalidates the fingerprint - handy when you're not sure who you showed it to and when. Once paired, the wire is Noise-encrypted.
Read this before enabling the build server role anywhere other than your own machine at home. The Enable remote build toggle says it plainly: "Lets other dashboards on your network compile their YAML here. A paired peer can run arbitrary code on this machine; only pair with dashboards you'd give ssh access to."
An ESPHome compile isn't just translation - a configuration can pull in external components and build scripts. A paired sender therefore has effective power to run arbitrary code on the build machine. Only pair dashboards you'd hand SSH access to, and don't enable the build server role on a machine you share with someone else. That's exactly why the Home Assistant app ships as a sender only and you have to turn receiving on by hand.
From then on, Install on any device is automatically routed to the paired machine as soon as it's online, and the dialog shows a Building on {name} sub-line. When the receiver is busy, Device Builder per the README "queues the install behind the in-flight work rather than silently building locally" - so it waits instead of quietly dumping you back onto a local compile. For a one-off there's the Build locally instead link, and you can turn it off under Settings → Send builds → Auto-route installs to remote build.
Headless mode: --remote-build-only
When a machine's only job is lending its CPU, it doesn't have to offer a dashboard at all:
esphome-device-builder --remote-build-only /var/lib/esphome-builder
Keep that directory - it holds the server's identity and build state, so deleting it also loses your pairing. On first run it prints a fingerprint and a one-time pairing key to the console.
Pairing then works differently: in Home Assistant go to Settings → Send builds → Pair with a build server, enter the hostname and peer-link port (6055 by default) and continue. The dialog detects it's a headless server and offers a pairing-key field - copy the key from the console and send. If you don't pair before the window expires, just re-run the server. The --allow-pairing-source <IP> option additionally restricts which address may pair.
Version match: what happens on a mismatch
Do both machines need the same ESPHome version? No, and it's handled more elegantly than you'd expect. The interface tells you outright how it works on a paired build server - on my Mac it reads "Build server runs ESPHome 2026.8.0; your builds use 2026.8.2 automatically". So it's your side's version that decides, not whichever one the build server has installed.
The behaviour is configurable under Settings → Send builds via ESPHome version match. Out of the box it sits at Allow any release-line mismatch (default), explained as "Route to any paired build server regardless of its ESPHome version." - so send the build anywhere, version regardless. Stricter options are available too; the project documentation describes them as four policies, any, release, exact and exact_required, where the last one refuses to build rather than falling back to a local compile. That's useful when you emphatically don't want the compile quietly returning to the weak server.
When the versions do differ, ESPHome prints Core config or version changed, cleaning build files... on the next compile and cleans the build directory itself. So you lose the incremental build and pay for a full compile - and that's all. Toolchain packages aren't removed, so they don't get re-downloaded.
The same settings pane has an Include this machine in the build pool toggle, off by default. Turn it on and the dashboard starts compiling as well - but only when every paired build server is busy. A single build still goes to an idle remote machine first, so this doesn't undo your offloading. It makes sense when you're updating a lot of devices at once.
Flashing is a different discipline from compiling: an ESPHome instance older than 2025.10 that uses password authentication cannot get firmware into a device already running 2026.1 or later, regardless of where the compile happened. I cover it in the ESPHome article.
When it doesn't work
Remote build is deliberately a local-network feature. When it doesn't work, it's almost always one of these.
It isn't designed for a VPN. The README is unusually blunt: running the peer link across a VPN, Tailscale or any slow link is "best effort: it may work, but the timing assumptions favor LAN-class throughput, slow links aren't a design target, and issues that only reproduce over a slow link won't be pursued." If you want to compile on a machine elsewhere in the world, reach for Download firmware binary instead - a finished binary makes no timing assumptions. I describe it in the flashing article.
The machines can't see each other. Discovery runs over mDNS, so the first suspects are a different subnet without a reflector, a container without host networking, and a firewall blocking 5353/udp. Watch out for two specifics:
- The peer-link port only lands in the mDNS record once the Build server role is enabled. Until you flip that toggle, the dashboard shows up in
Known dashboardsbut can't be paired with - The Home Assistant app doesn't advertise itself on the network at all, so two Home Assistant instances won't find each other. Use the
Pair with a build serverbutton in thePair with another dashboardsection below the list
Before you go hunting for a bug in the interface, run esphome-device-builder-discover on the sending side - it prints what it sees on the network, including the peer-link port and fingerprint. If even the CLI can't see it, mDNS isn't getting through.
There's a reverse proxy in between. The peer link is a WebSocket at /remote-build/peer-link over TCP port 6055. A proxy or firewall on that path has to allow WebSocket upgrades - otherwise the connection never establishes, even when the machines otherwise see each other.
And one thing that suggests itself and is nonetheless wrong: don't forward port 6055 to the internet. If you want to compile on a machine at the office, download the finished image instead.
Verdict
Remote build is the one ESPHome feature I wish I'd known about first. For years I waited out compiles assuming nothing could be done - and it turned out to be two toggles and one emoji comparison.
Two things matter most about it: the difference is an order of magnitude, not a percentage, and there's still only one configuration - the fast machine holds no copy of your YAML, so there's nothing that could drift. If your Home Assistant runs on a Raspberry Pi, on a Green or on a NAS and you have any desktop machine around, this is the best effort-to-time-saved ratio you'll find in ESPHome.
Related Articles
- ESPHome - Smart Device from ESP32 in Minutes
- Flashing ESPHome Firmware over USB: First Install and Rescuing a Locked Device
- Raspberry Pi 5 / 4 / 3
- Home Assistant Green
Sources
- ESPHome Device Builder: Send builds to another dashboard - roles, pairing, headless mode, port and version matching
- ESPHome: Installing ESPHome - the Building on a Faster Machine section
- ESPHome Desktop releases - packages for macOS, Windows and Linux
Did this guide help you?
I write these guides in my spare time and keep them up to date. If one saved you time, you can chip in.
One-off, by card or Apple Pay. You can change the amount on the next page.
Would rather not send money? Buy the parts through my product links. The price is the same for you and it helps too.