Music Assistant - Comprehensive Music Server for Smart Home
Music Assistant is a modern, open-source music server that transforms your Home Assistant into a full-featured music center. If you've ever dreamed of having all your music sources - from Spotify through Apple Music to local files - in one place with the ability to stream to any device in your home, then Music Assistant is exactly what you're looking for.
The 2.9 "Discover Your Sound" release brings a redesigned Discover page with personal recommendations, audio analysis for smart fades and sonic search, Sendspin lighting visualizers, and smart playlists!
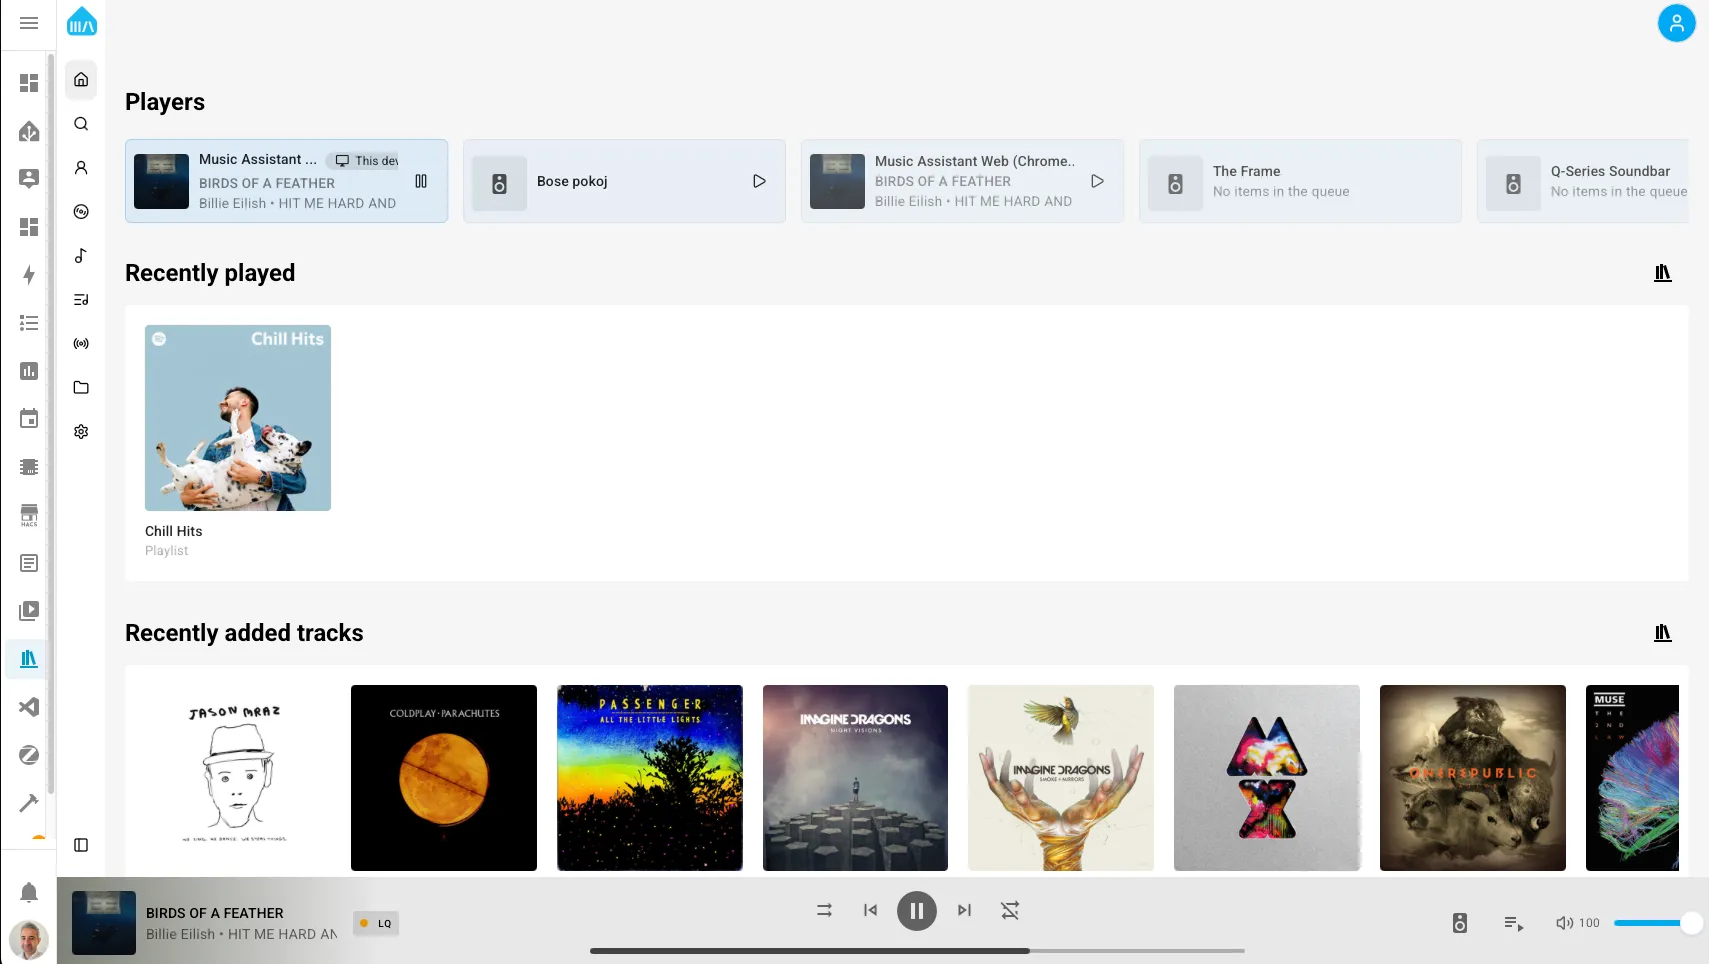
What Music Assistant Can Do
Centralized Music Library
Music Assistant creates a unified library from all your music sources:
- Streaming services: Spotify, Apple Music, Tidal, Deezer, Qobuz, YouTube Music
- Home servers: Plex, Jellyfin, Subsonic
- Local files: MP3, FLAC, WAV and other formats from NAS or local storage
- Internet radio: Radio Browser, TuneIn, Radio Paradise
- Podcasts: iTunes Podcast Search, RSS feeds, gPodder, Audiobookshelf, Podcast Index, BBC Sounds, Dl.fm, ARD Audiothek
- Live concerts: Phish.in, Nugs.net
- More: Internet Archive, Niconico (Japanese platform)
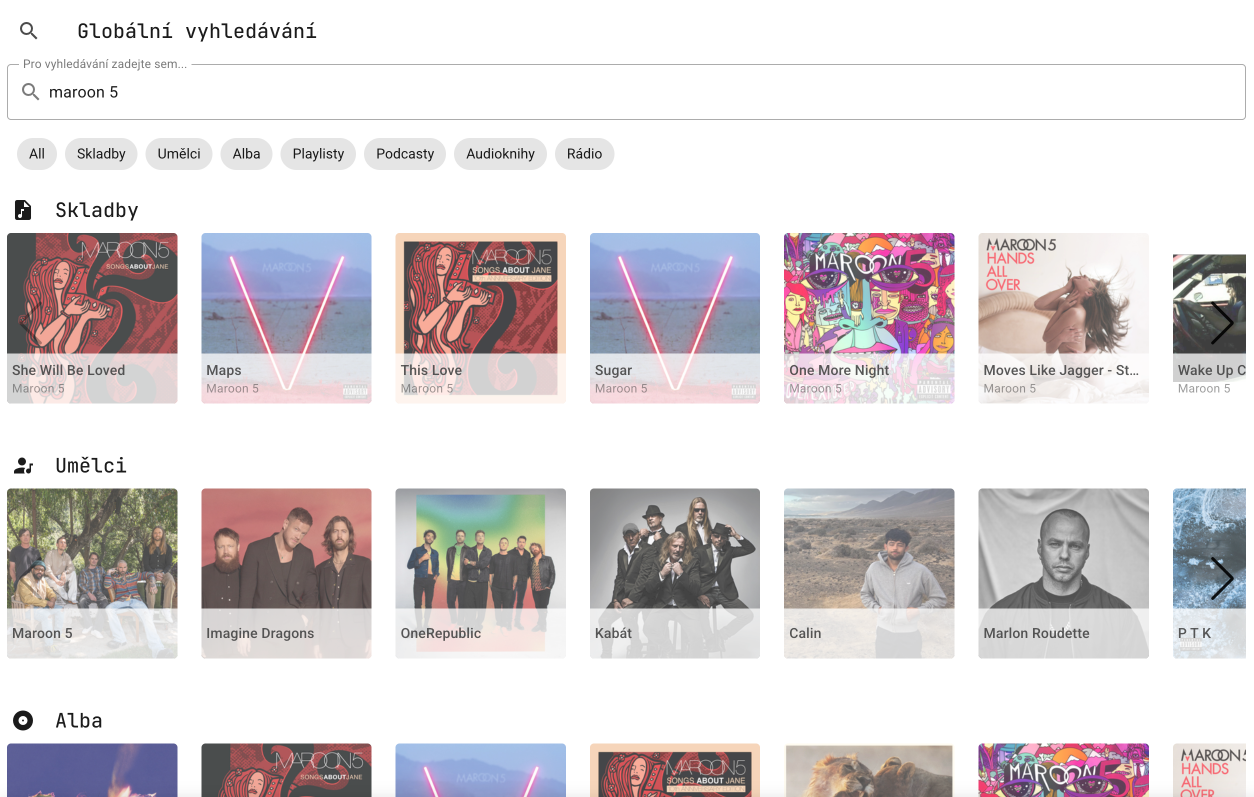
When you have the same track on Spotify and in local files, Music Assistant automatically links them. This means you can create a playlist and Music Assistant will choose the best source for playback based on availability and quality.
Wide Player Support
Music Assistant can stream to virtually any modern and smart audio device:
- Sendspin - new open protocol for multi-room audio with perfect synchronization (see below)
- AirPlay / AirPlay 2 - Apple HomePod, AirPlay speakers with synchronization support
- Google Cast - Chromecast Audio, Google Nest speakers
- Sonos - entire Sonos speaker family
- DLNA - most network players, including Bose SoundTouch speakers
- Snapcast - multi-room audio with perfect synchronization
- Home Assistant media players - integration with HA players
- And many more - Alexa, Bluesound, MusicCast, Squeezelite
In May 2026, Bose shut down the SoundTouch cloud servers, taking the presets and music services down with them. Music Assistant brings everything back via DLNA – radio, streaming services, and multi-room – turning the speaker Bose wrote off into a fully capable device again.
Advanced Audio Features
Music Assistant provides features you'll appreciate during everyday listening:
- Gapless playback - seamless playback without gaps between tracks
- Smart fading - intelligent crossfading respecting BPM for natural transitions
- Volume normalization - consistent volume across tracks
- DSP filters - equalizer and tone controls for fine-tuning sound
- Playback synchronization - perfectly synchronized multi-room audio
- Queue transfer between players - move playback from one room to another
- Time-synced song lyrics - karaoke-style lyrics display
Home Assistant Integration
Music Assistant integrates perfectly with Home Assistant:
- Automations - start music based on events
- Notifications - during playback you can interrupt music for announcements
- Voice control - control music by voice through HA voice assistant
- Dashboards - add music control to your dashboards
- Scenes - play specific music as part of a scene
- User profiles - each household member can have their own music accounts and permissions
- Remote access - listen to music from anywhere via the internet thanks to WebRTC
Installation
Music Assistant is installed as an addon to Home Assistant, making installation very simple.
Prerequisites
Before installation, make sure you have:
- Home Assistant installed in HassOS or Supervised version
- Sufficient computing power - I recommend at least Raspberry Pi 4 (4GB RAM)
- Stable network connection for streaming
Music Assistant is more demanding than regular addons. On Raspberry Pi 3, operation may be slower, especially when using multiple streaming services simultaneously.
Installation Steps
-
In Home Assistant, go to Settings → Add-ons → Add-on Store
-
Click three dots in the upper right corner and select Repositories
-
Add Music Assistant repository:
https://github.com/music-assistant/home-assistant-addon -
After refreshing the page, you'll find Music Assistant in the list
-
Click on the addon and then the INSTALL button
-
Installation may take several minutes - the addon is quite large
You can use this direct link to add the repository:

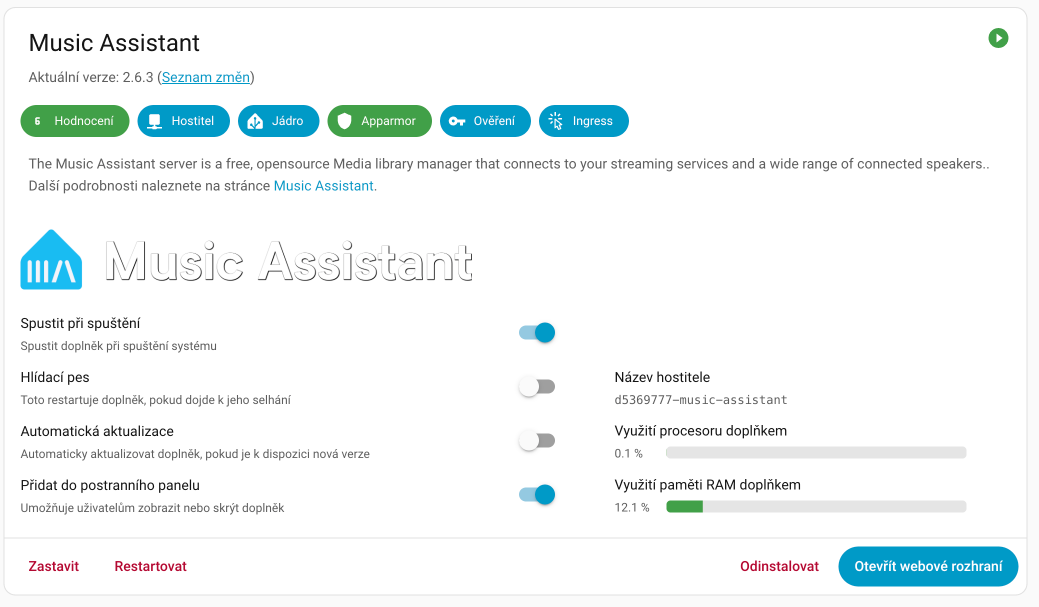
First Start
After installation:
- Enable Start on boot - Music Assistant should run continuously
- Enable Show in sidebar - for quick access to the interface
- Click START
The first start may take longer because the addon needs to download and install all dependencies.
Basic Configuration
After the first start, the Music Assistant web interface opens where we'll do the basic setup.
Adding Music Sources
The first step is adding your music sources:
-
In Music Assistant interface, go to Settings → Music Providers
-
Click Add Provider and select your service
-
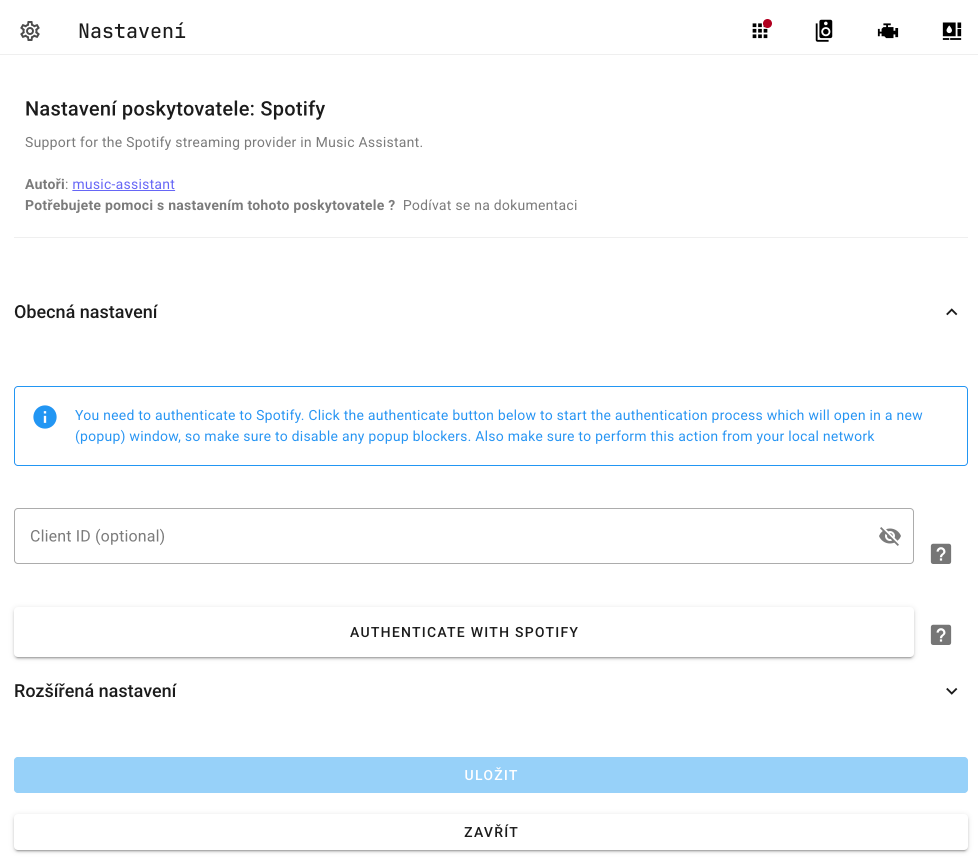
For streaming services (Spotify, Apple Music, etc.):
- Click on the provider
- You'll be redirected to the service login page
- After authorization, you'll return to Music Assistant
- It's recommended to read the documentation for adding a specific service, as the process can vary significantly for each provider.
- For local files:
- Select Filesystem
- Enter the path to your files (e.g.,
/mediaor/share) - Music Assistant will start scanning and indexing files
If you have music on a NAS, you don't need to mount anything into Home Assistant - Music Assistant can connect to an SMB share directly. You'll find the steps in the very next section.
Music from a NAS over SMB
You can add a music collection stored on a NAS (Synology, QNAP, TrueNAS...) as a full-featured music source using the remote share variant of the Filesystem provider:
-
Go to Settings → Music Providers and click Add Provider
-
Select Filesystem (remote share)
-
Fill in the details of your NAS:
- Server - IP address or hostname of the server (e.g.,
192.168.1.10ornas.local) - Share - name of the SMB share (e.g.,
music) - Subfolder - optional subfolder inside the share (e.g.,
flac/albums) - Username and Password - credentials for the NAS
- Server - IP address or hostname of the server (e.g.,
-
In the advanced settings, keep SMB version 3.0 (default) and Cache Mode set to Loose - that's the recommended combination for music libraries that are mostly read-only
-
After saving, the first sync starts - Music Assistant will go through all the files and index them into the library
If you plan to combine local files with streaming services, I recommend adding the local source first and letting the initial sync finish before connecting Spotify or Tidal. Music Assistant will then correctly link local tracks with their streaming counterparts and your library stays clean without duplicates.
If the connection fails, check which SMB versions your NAS has enabled. Version 3.0 or higher is recommended - the ancient SMB 1.0 is slow and insecure, so many NAS devices ship with it disabled. And one more detail: if you want to edit playlists stored on the NAS from Music Assistant, the account also needs write access to the share.
File Organization and Metadata
Music Assistant treats tags embedded directly in the files (ID3 for MP3, Vorbis comments for FLAC, etc.) as the authoritative source of information - folder names are secondary. A few recommendations to keep your library looking good:
- The ideal folder structure is
artist/album, withDisc 1,Disc 2subfolders for multi-disc albums - The Album Artist tag should be filled in for all files - Music Assistant requires it to correctly assign albums
- Folders starting with an underscore (
_) are ignored by Music Assistant during scanning - For bulk tagging and fixing metadata, I recommend MusicBrainz Picard - it also adds MusicBrainz IDs, which help Music Assistant link tracks across sources
Audiobooks and Podcasts
Music Assistant isn't just about music - you can add audiobooks and podcasts to your library and listen to them on the same speakers as your tunes.
You can add audiobooks in three ways:
- Audiobookshelf - if you run this popular self-hosted audiobook server, add the Audiobookshelf provider in Music Assistant: enter the server URL (e.g.,
http://192.168.1.4:13378/) and log in with username and password, or with an API key (from Audiobookshelf 2.26). The provider loads audiobooks and podcasts from all libraries the account has access to and syncs listening progress bidirectionally - you finish a half-listened book exactly where you left off. Guest accounts are not supported. - Audible - a provider for Audible subscribers. Authorization works by logging into your Audible account, after which you can stream your entire library including chapter navigation and resume from the last position reported by Audible. Keep the limitations in mind though: progress syncs only one way (from Audible to Music Assistant, not back) and the provider can't search the catalog.
- Local files - audiobooks also work through the Filesystem provider (so straight from your NAS using the steps above). Put each book in its own folder, or use a single
.m4bfile with embedded chapters. Music Assistant reads the author from the tags, takes the cover from an image embedded in the file or from a.jpg/.pngfile in the folder, and if you add a.txttext file to the folder, it's used as the book description. Supported formats include.m4b,.m4a,.mp3,.flac, or.ogg, among others.
The easiest way to add podcasts is the RSS Feed provider - just paste the podcast's RSS feed URL and new episodes will show up in your library. Beyond that, there are providers for discovering podcasts such as Podcast Index, iTunes Podcast Search, or gPodder, plus sources from specific broadcasters (BBC Sounds, ARD Audiothek).
Adding Players
Music Assistant automatically detects most players on your network:
-
Go to Settings → Player Providers
-
Activate provider for your devices:
- Google Cast - for Chromecast and Google Nest
- AirPlay - for Apple devices
- Sonos - for Sonos speakers
- DLNA - for general network players
- Home Assistant - for players in HA
-
After activating the provider, players will appear in the Players list
To play to a Mac over AirPlay, you have to enable the receiver on it: System Settings → General → AirDrop & Handoff → AirPlay Receiver. The key part is setting "Allow AirPlay for" to "Anyone on the same network" - the default "Current User" rejects non-Apple senders like Music Assistant. Also turn off "Require Password" (or set that same password in MA's settings for the player). Without this, playback ends with a "Playback failed to start" error even though the player shows up normally in the list.
Home Assistant Integration
For full integration with Home Assistant, you need to install the integration:
-
In Home Assistant, go to Settings → Devices & Services
-
Click Add Integration and search for Music Assistant
-
The integration should automatically detect the running server
-
After adding, entities will be created for each Music Assistant player
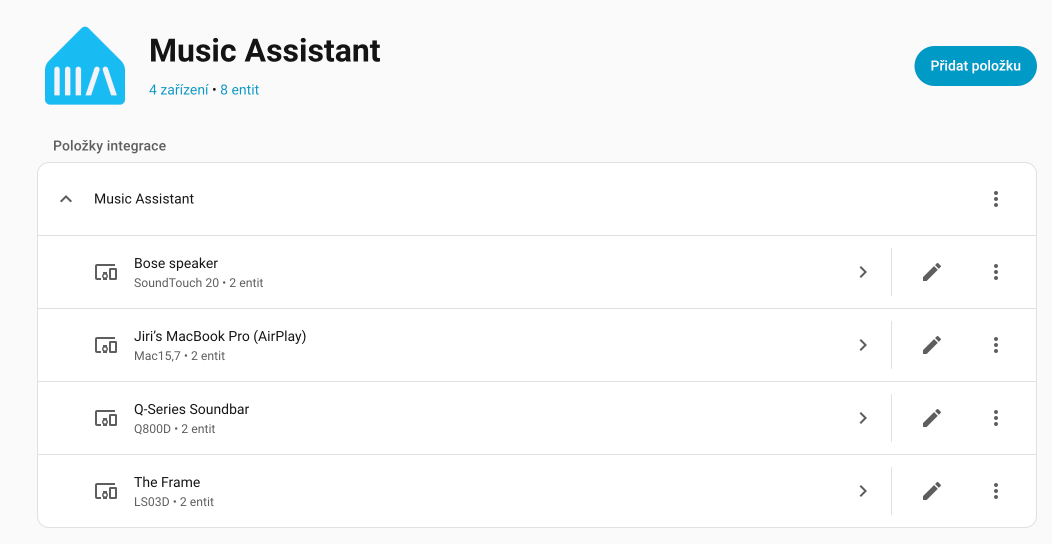
Music Assistant has two components:
- Addon - the music server itself that manages library and streaming
- Integration - connection between server and Home Assistant for automations
User Accounts and Profile Management
Music Assistant supports user profiles with authentication, allowing each household member to have their own music experience.
Benefits of user profiles:
- Personal music providers - each family member can have their own Spotify, Tidal, or Apple Music account
- Speaker permissions - determine who can play on which speakers
- Cleaner organization - no multiple accounts side by side in playlists
- Single Sign-On with Home Assistant - you can use existing HA account for login
How to set up users:
- In Music Assistant, go to Settings → User Management
- Click Add User
- Create a new user or link with Home Assistant account
- Configure permissions for speakers and music providers
Authentication was designed to be as non-intrusive as possible - you can even use Single Sign-On with Home Assistant account for seamless login.
Remote Music Access
Starting with version 2.7, you can listen to music from anywhere in the world thanks to new remote streaming!
How it works:
- Music Assistant has a new web application
- Uses WebRTC infrastructure from Home Assistant Cloud
- Connection is peer-to-peer and end-to-end encrypted
- Free for everyone (Home Assistant Cloud subscription not required)
- Cloud subscribers get access to more powerful routing for better streaming
You can open two instances of the web app and stream to two devices in sync - for example, listen to the same music simultaneously on laptop and mobile phone!
Using in Automations
This is where the real capabilities of Music Assistant combined with Home Assistant show. Music Assistant adds all its players as media_player entities that you can fully use in automations.
Basic Automation Examples
Morning wake-up with music:
automation:
  - alias: "Morning wake-up music"
    trigger:
      - platform: time
        at: "07:00:00"
    action:
      - service: media_player.volume_set
        target:
          entity_id: media_player.living_room
        data:
          volume_level: 0.15
      - service: media_player.media_play
        target:
          entity_id: media_player.living_room
Start music when arriving home:
automation:
  - alias: "Music on arrival"
    trigger:
      - platform: state
        entity_id: person.name
        to: 'home'
    condition:
      - condition: time
        after: '18:00:00'
        before: '22:00:00'
    action:
      - service: media_player.media_play
        target:
          entity_id: media_player.living_room
Pause music during phone call:
automation:
  - alias: "Pause on phone call"
    trigger:
      - platform: state
        entity_id: sensor.phone_state
        to: 'ringing'
    action:
      - service: media_player.media_pause
        target:
          entity_id: media_player.living_room
Advanced Control
Music Assistant entities support all standard media_player services:
media_player.media_play- Playmedia_player.media_pause- Pausemedia_player.media_stop- Stopmedia_player.media_next_track- Next trackmedia_player.media_previous_track- Previous trackmedia_player.volume_set- Set volumemedia_player.volume_up/volume_down- Increase/decrease volumemedia_player.play_media- Play specific media
To play a specific track, album, playlist, or radio, you can use the standard media_player.play_media service or the more advanced music_assistant.play_media.
Basic usage with media_player.play_media:
service: media_player.play_media
target:
  entity_id: media_player.living_room
data:
  media_content_type: music
  media_content_id: "Queen"  # Artist, album, or track name
Music Assistant supports various media_content_id formats:
- Name:
QueenorQueen - Innuendo - Streaming URI:
spotify://artist/12345orspotify://playlist/xyz - Streaming URL:
https://open.spotify.com/track/... - Library URI:
library://track/123,library://album/456,library://playlist/789,library://radio/3
Advanced usage with music_assistant.play_media:
For more control over playback, you can use the special Music Assistant service:
service: music_assistant.play_media
target:
  entity_id: media_player.living_room
data:
  media_id: "Innuendo"
  media_type: album
  artist: "Queen"  # Filter by artist
  enqueue: replace  # play, replace, next, replace_next, add
  radio_mode: true  # Automatically generate similar tracks
The enqueue parameter determines how content is added to the queue:
play- Play nowreplace- Replace entire queue and playnext- Add as next in queuereplace_next- Replace everything after current trackadd- Add to end of queue
Radio mode automatically creates a playlist of similar tracks based on the selection.
Voice Control of Music (Assist)
You can also control music in Music Assistant by voice through Home Assistant Assist. Before you dive in, it's only fair to say what works out of the box and what requires extra setup - so you won't be disappointed.
What Home Assistant Handles Natively
Home Assistant's built-in voice intents can only control playback that's already running:
- pause and resume playback
- next / previous track
- setting the volume (on a specific player or in a whole area)
A sentence like "Play Queen in the living room" does not work natively - neither Home Assistant nor the Music Assistant integration has built-in support for starting specific music by voice yet.
Starting Music by Voice - Official Blueprints
This is exactly the gap filled by the official music-assistant/voice-support repository, which contains ready-made blueprints. You can choose between two approaches:
-
Fully local (custom sentences) - the
local-assist-blueprintuses custom sentences and everything runs locally without the cloud. The price you pay is that sentences must be spoken exactly in the defined form - the keywords and their order have to match. The blueprint ships with language variants (English, German, Dutch, Spanish, and more), Czech unfortunately isn't among them yet - but the blueprint lets you supply your own translations of sentences and responses, so you can prepare a Czech variant yourself. -
Via an LLM (conversation agent) - the
llm-enhanced-local-assist-blueprintandllm-script-blueprintbring a large language model into play (e.g., ChatGPT or Gemini as a conversation agent in HA). The LLM understands naturally phrased sentences, so you don't have to watch your exact wording - and since modern models speak Czech, this route works with Czech sentences without any manual translation. In my opinion, it's the smarter option, even though it's no longer one hundred percent local.
Installing the Blueprint
-
Open the music-assistant/voice-support repository and pick the variant that suits you
-
In the README of that variant, click the blueprint import button (a My Home Assistant link) - Home Assistant opens the import dialog, no manual downloads needed
-
Create an automation from the blueprint - for the local variant you configure things like the default player, for the LLM variants the connection to the conversation agent
-
For the
llm-script-blueprint, additionally expose the created script to Assist so the LLM can use it as a tool
Here's what a Czech sentence via an LLM agent can look like:
"Pusť album Innuendo od Queen v obýváku." (Play the album Innuendo by Queen in the living room.)
"Zahraj něco od Pink Floyd v kuchyni." (Play something by Pink Floyd in the kitchen.)
When adding music by voice, queue behavior (replace vs. append) follows the Music Assistant setting in Settings → System → Player Queues.
Advanced Features
Sendspin - New Open Streaming Protocol
Music Assistant 2.7 brings support for Sendspin - a completely new open-source protocol for streaming and synchronizing multimedia, developed by Open Home Foundation.
What is Sendspin?
Sendspin is an open standard for complete music experience. Unlike existing protocols like AirPlay or Google Cast, which are closed and proprietary, Sendspin is fully open and available to everyone.
Existing protocols like AirPlay and Cast are closed and proprietary, making it impossible to create an open ecosystem of interoperable solutions. Additionally, they focus only on audio streaming, while the complete music experience includes playback control, visualizations, and per-speaker DSP. Sendspin solves this deficiency.
What Sendspin Can Do:
- Synchronized audio - playback on multiple speakers in perfect sync
- Metadata transfer - album covers, track and artist information
- Playback control - from tablets, screens, or mobile devices
- Audio visualization - smart bulbs pulsing to music rhythm (coming soon)
- Per-speaker DSP - individual audio processing for each device
- Automatic adaptation - according to each device's capabilities
Where You Can Try Sendspin:
- Music Assistant - stream music via Sendspin simultaneously to browsers and Google Cast devices
- Web browser - built-in player in Music Assistant uses Sendspin
- Home Assistant Voice Preview Edition - playback through beta firmware
- ESPHome - display album covers and playback control on custom devices
- Command-line tools - sendspin-cli and sendspin-go
Use Cases:
- Multi-room audio - E-paper display with album cover in one room, speakers in perfect sync in others
- Smart lighting - bulbs reacting to music rhythm and mood (coming soon)
- Control panels - tablet as music controller with metadata and album covers
- DIY projects - custom devices with ESPHome displaying playback information
Sendspin is a fully open protocol with public specification, open-source SDK, and possibility to use in commercial products. The protocol is currently in public preview - the team calls all developers and audio enthusiasts to test and contribute!
Player Groups (Multi-room Audio)
Music Assistant allows creating player groups for synchronized playback:
- In the interface, click on a player
- Select Group with and choose other players
- Music will play synchronized on all devices
For best synchronization, I recommend using Snapcast provider, which ensures sub-millisecond synchronization.
Announcements During Playback
Music Assistant can pause music, play an announcement, and then continue:
service: music_assistant.play_announcement
target:
  entity_id: media_player.living_room
data:
  url: "https://www.example.com/doorbell.mp3"
  announce_volume: 60
You can also use the use_pre_announce: true parameter to play a sound before the announcement to alert listeners.
Queue Transfer Between Players
You can move playback from one room to another without interruption:
service: music_assistant.transfer_queue
target:
  entity_id: media_player.kitchen  # Target player
data:
  source_player: media_player.living_room  # Source player
  auto_play: true  # Automatically start playback
DSP Presets
Music Assistant allows saving and quickly applying custom audio configurations as presets:
- In the interface, go to a player
- Set desired DSP filters (equalizer, gain, etc.)
- Save configuration as preset
- Later you can apply preset with single click
Create different presets for different scenarios - for example "Morning News" with higher midrange level for speech intelligibility, or "Evening Relax" with subdued highs.
Playback History Scrobbling
Music Assistant supports tracking listening history:
- Last.fm - most popular scrobbling service
- ListenBrainz - open-source alternative
- Subsonic - for own servers
Activate scrobbling in Settings → Plugins and connect your account.
Tips and Tricks
Song Lyrics Display
Music Assistant displays time-synced song lyrics during playback:
- In player interface, click on Lyrics tab in queue menu
- Lyrics automatically load from available sources
- Lyrics scroll synchronized with music (karaoke style)
Supported lyrics sources:
- LRCLIB - largest database of time-synced lyrics
- Tidal - if using Tidal as source
- Genius - for regular song lyrics
- Local LRC files - you can have your own lyrics files
The "Lyrics" tab appears only if track name, artist, and album are correctly recognized by lyrics provider.
Using with Spotify Connect
If you have Spotify Premium, you can install the Spotify Connect plugin, which allows controlling Music Assistant directly from the Spotify app.
AirPlay as External Source
Music Assistant now supports AirPlay audio as external source - you can stream from iOS/macOS devices to Music Assistant and it will distribute audio to all your speakers (even those that don't support AirPlay).
Smart Fading Between Tracks
Enable intelligent crossfading that takes BPM of each track into account:
- Go to selected player
- Scroll down to Audio section
- Enable "Enable Smart Fades"
Music Assistant will now automatically create natural transitions between tracks based on their tempo.
Performance Optimization
If Music Assistant runs slowly:
- Reduce the number of active music providers
- Disable automatic synchronization for large libraries
- Consider using external database (PostgreSQL)
Alternatives and Comparison
| Feature | Music Assistant | Volumio | Mopidy | Plex |
|---|---|---|---|---|
| Multiple sources | ✅ | ❌ | ✅ | ❌ |
| HA integration | ✅ | Partial | ✅ | Partial |
| Gapless playback | ✅ | ✅ | ❌ | ✅ |
| Multi-room sync | ✅ | ❌ | ✅ (Snapcast) | ✅ |
| Web UI | ✅ | ✅ | ❌ | ✅ |
| Free | ✅ | Partial | ✅ | Partial |
| Easy installation | ✅ | ✅ | ❌ | ✅ |
Summary
Music Assistant is a truly impressive project that brings professional music functionality to Home Assistant.
What I like:
- Unified library from all sources
- Automatic track linking
- Excellent Home Assistant integration
- Advanced audio features (gapless, crossfade)
- Active development and community
What could be better:
- Requires more powerful hardware
- Occasional issues with some streaming services
- Documentation still not completely comprehensive
- Initial setup can be complex for beginners and adding some sources is really complicated
If you have Home Assistant and want perfect control over music throughout your home, Music Assistant is the clear choice.
If your internet radio over Google Cast (Chromecast) always drops out after a short while, check out the separate guide Troubleshooting: Internet Radio Dropouts over Chromecast, where I describe the entire diagnostics workflow and the final fix.
Did this guide help you?
I write these guides in my spare time and keep them up to date. If one saved you time, you can chip in.
One-off, by card or Apple Pay. You can change the amount on the next page.
Would rather not send money? Buy the parts through my product links. The price is the same for you and it helps too.