ESPHome - Smart Device from ESP32 in Minutes
ESPHome is an open-source framework that dramatically simplifies creating custom smart devices from inexpensive Wi-Fi microcontrollers. Instead of complex C++ programming, you just need a simple YAML configuration file and ESPHome takes care of the rest.
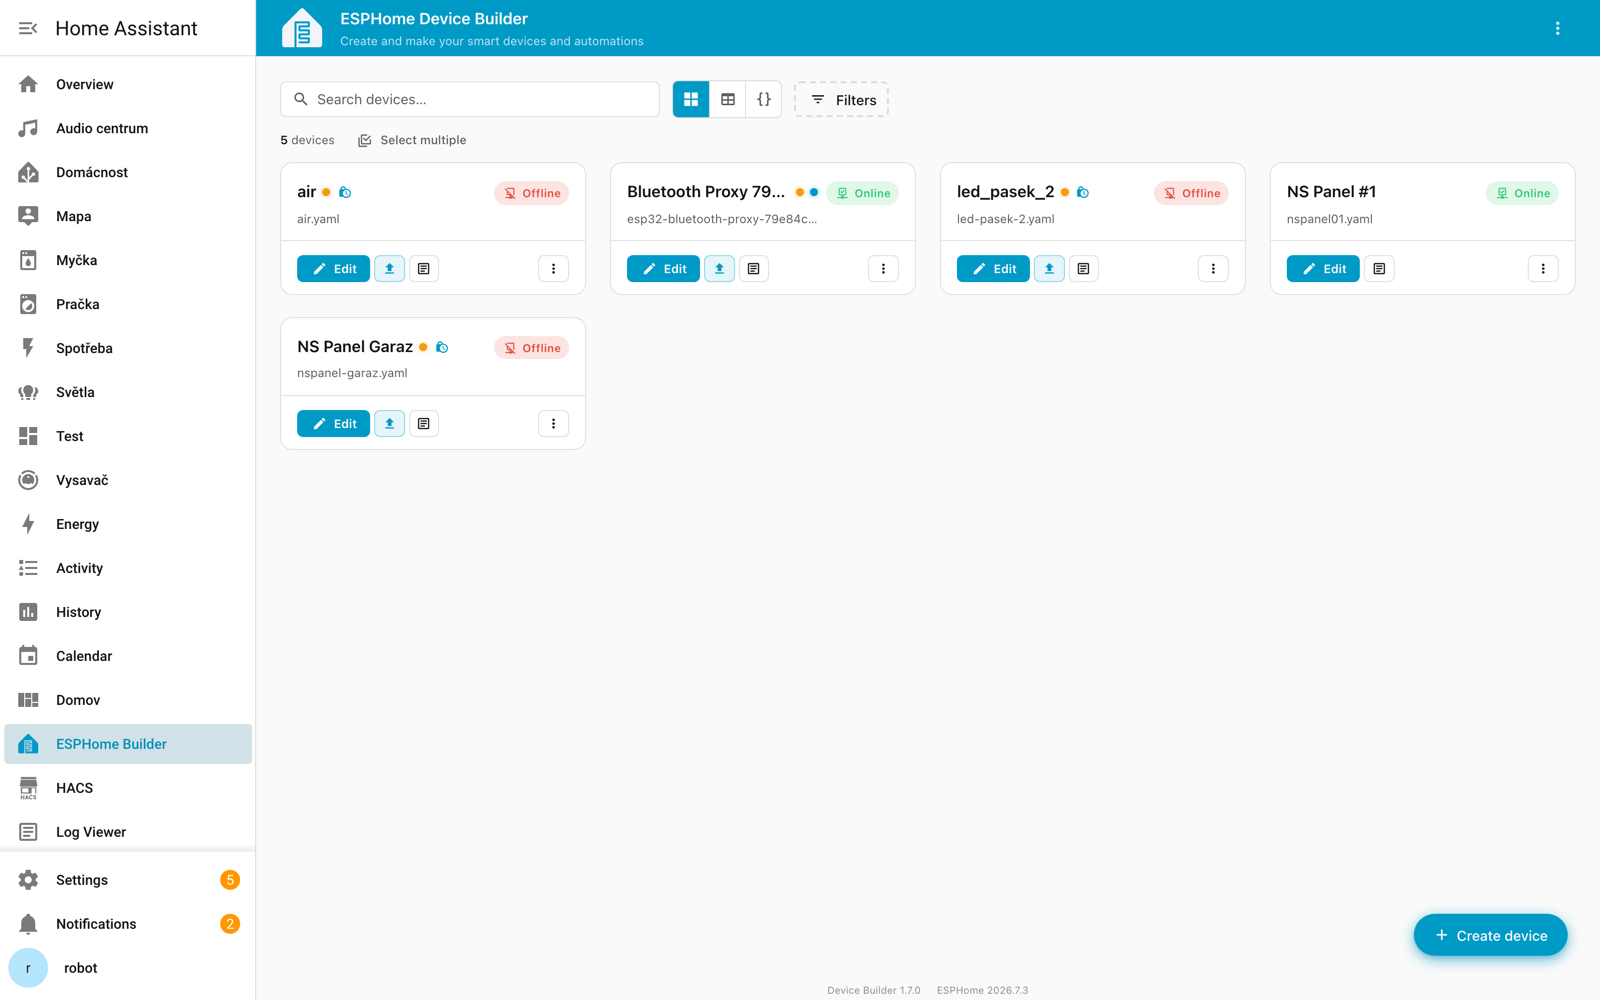
I originally wrote this article for version 2025.10, and a lot has changed in ESPHome since then - a new web interface called Device Builder, ESP-IDF as the default framework, and several breaking changes that affect nearly everyone. I verified every step and screenshot against ESPHome 2026.7.3 (Device Builder 1.7.0) and Home Assistant 2026.7.4.
If you haven't touched your configurations in a while, please skip straight to What changed since 2025 - it lists the changes that can stop a configuration from validating.
What is ESPHome
Essentially, it's a tool that allows you to:
- ✅ Create custom smart devices using simple YAML files
- ✅ Seamless integration with Home Assistant
- ✅ OTA updates - wireless firmware uploads
- ✅ Local control - no cloud dependency
- ✅ Almost 900 components - sensors, displays, relays...
- ✅ Automations directly on the device
- ❌ No need to program in C++
- ❌ No need to know Arduino IDE
- ❌ No need for cloud services
- ❌ No need for complex configuration
ESPHome is part of the Open Home Foundation - the same organization that Home Assistant belongs to. This ensures long-term support and development.
Supported Microcontrollers
ESPHome supports a wide range of hardware, and the list has grown noticeably over the past year:
| Platform | Description | Usage |
|---|---|---|
| ESP32 (classic, S2, S3, C3) | Wi-Fi 4 + Bluetooth, runs both Arduino and ESP-IDF | Most projects |
| ESP32-C6, C5 | Wi-Fi 6 + Bluetooth + Thread/Zigbee, ESP-IDF only | Modern projects, mesh |
| ESP32-H2 | No Wi-Fi at all - Thread/Zigbee and BLE only | Mesh sensors without Wi-Fi |
| ESP32-P4 | Powerful, but no radio of its own | Displays, audio, cameras |
| ESP8266 | Older, Wi-Fi only, little memory | Simple projects |
| RP2040 / RP2350 | Raspberry Pi Pico, substantially improved support since 2026.3 | Networked and offline projects |
| Nordic nRF52 | Zephyr / nRF Connect SDK, Zigbee, Thread, battery operation | Battery sensors |
| LibreTiny (BK72xx, RTL87xx, LN882x) | Reflashing Chinese Tuya devices | Rescuing off-the-shelf hardware |
For new projects, I recommend ESP32 - it has enough memory, supports Bluetooth, and costs practically the same as ESP8266.
Watch out for one thing though: the Arduino framework is now available only for ESP32 (classic), C3, S2 and S3. The C2, C5, C6, C61, H2 and P4 variants run ESP-IDF exclusively. If your project needs a component that exists only for Arduino, don't buy a C6.
ESP32-WROOM
 WiFi
WiFi Bluetooth
CP2102 USB 2.0 to TTL UART Module
 USB
USB
What changed since 2025
This is the most important part of the whole article. Between 2025.11 and 2026.7 a number of changes landed that aren't cosmetic - some configurations simply won't compile any more, and one of them can break firmware uploads.
ESPHome tightened OTA in 2026.1 - MD5 authentication is gone and SHA256 is mandatory, so the protocol can't be downgraded to the weaker variant. That came with one restriction, which the changelog words like this:
ESPHome versions before 2025.10.0 that use password authentication cannot OTA to devices running 2026.1.0 or later.
Please read that carefully, because it's easy to get backwards (which is exactly what happened to me): the restriction is on the tool doing the uploading, not on the device. If you install from ESPHome older than 2025.10 that authenticates with a password, you won't get firmware into a device already running 2026.1+.
You'll typically hit this when you have ESPHome in more than one place - Device Builder in Home Assistant, plus an old VM or a laptop with the esphome CLI frozen on last year's version. The changelog puts it bluntly: "If you use multiple systems to install and/or update your ESPHome devices, be sure they're all up-to-date!"
If you need to go back to a version older than 2025.10, route via 2025.12.x and only then OTA to something earlier. For a downgrade to really old ESPHome, switch ota: to version: 1 first.
Changes that affect nearly everyone
| Version | Change | What to do |
|---|---|---|
| 2025.11 | PSRAM no longer auto-loads | Add a psram: block; on ESP32-S3 the mode key (octal / quad) is now mandatory |
| 2025.11 | Scripts with mode: queued default to max_runs: 5 instead of unlimited | Prevents out-of-memory crashes. Scripts using mode: parallel are unaffected |
| 2025.11 | Wi-Fi priority only accepts integers | Change priority: 5.5 to priority: 5 |
| 2026.1 | ESP-IDF is the default framework for ESP32/C3/S2/S3 | Binaries up to 40% smaller, compiles 2-3× faster. If you need Arduino, you must now say so explicitly |
| 2026.1 | api: password: was removed | You must migrate to api: encryption: key: - otherwise the config fails validation |
| 2026.1 | OTA requires SHA256, MD5 is gone | See the warning above - it's about the instances you upload from |
| 2026.4 | ESP32, S2, S3 and C5 run at 240 MHz by default | Faster API, but higher power draw. On battery, set cpu_frequency: 160MHZ |
| 2026.5 | api: max_connections dropped from 8 to 5 | If several clients connect at once (HA + logs + web), raise it manually |
| 2026.6 | ESP8266 defaults to min_auth_mode: WPA2 | It caught up with the ESP32, which has had this for years. With an old WPA-only router you must set it by hand on ESP8266 |
| 2026.6 | The custom_components/ folder is no longer loaded | Switch to external_components: |
| 2026.7 | Native toolchain instead of PlatformIO | Without a toolchain: key, builds use native ESP-IDF. Get the old behaviour back with toolchain: platformio |
| 2026.7 | The legacy dashboard is gone (Tornado) | Only the new Device Builder remains, see below |
| 2026.7 | A single !include under packages: must be in a list | packages: [!include mine.yaml]. Named packages (a mapping) are unaffected |
Configurations using named packages (packages: remote_package: url: ...), which is exactly how NSPanel Easy is pulled in, are fine. The 2026.7 change only affects the form where packages: is followed by a single !include without a list item.
New features worth using
- Visual component editor in Device Builder - click your configuration together and the YAML writes itself
- Crash backtrace without a serial cable (2026.3 for ESP32, 2026.4 for ESP8266) - the device stores the crash across a reboot and reports it over the API
esphome analyze-memory- a per-component memory breakdown, so you finally don't have to guess- OTA can rewrite the partition table and the bootloader (2026.5) - and
safe_modecan boot into the factory partition, so even a botched OTA doesn't immediately mean reaching for a cable - Wi-Fi roaming (2026.1) - devices move to a better AP after connecting instead of clinging to a distant one
- BLE proxying got much cheaper on CPU - per the 2026.4 changelog, the API and advertisement forwarding together take about 1.8% of main loop runtime (measured on an ESP32-C3), and the BLE tracker shed 85% of its CPU usage (2026.2). None of that changes the memory picture, see the warning under Bluetooth Proxy
- A security layer for EN18031 (2026.7) - NVS encryption, OTA downgrade protection, and a
provisioningcomponent
Installing ESPHome in Home Assistant
In current Home Assistant (verified on 2026.7.4), Settings no longer contains Add-ons but Apps. The old path "Settings → Add-ons → Add-on Store" no longer matches what you see, even though it leads to the same place.
Step 1: Installing the App
- In Home Assistant, go to Settings → Apps
- Click Install app (bottom right)
- Search for ESPHome
- On the ESPHome Device Builder entry, click Install
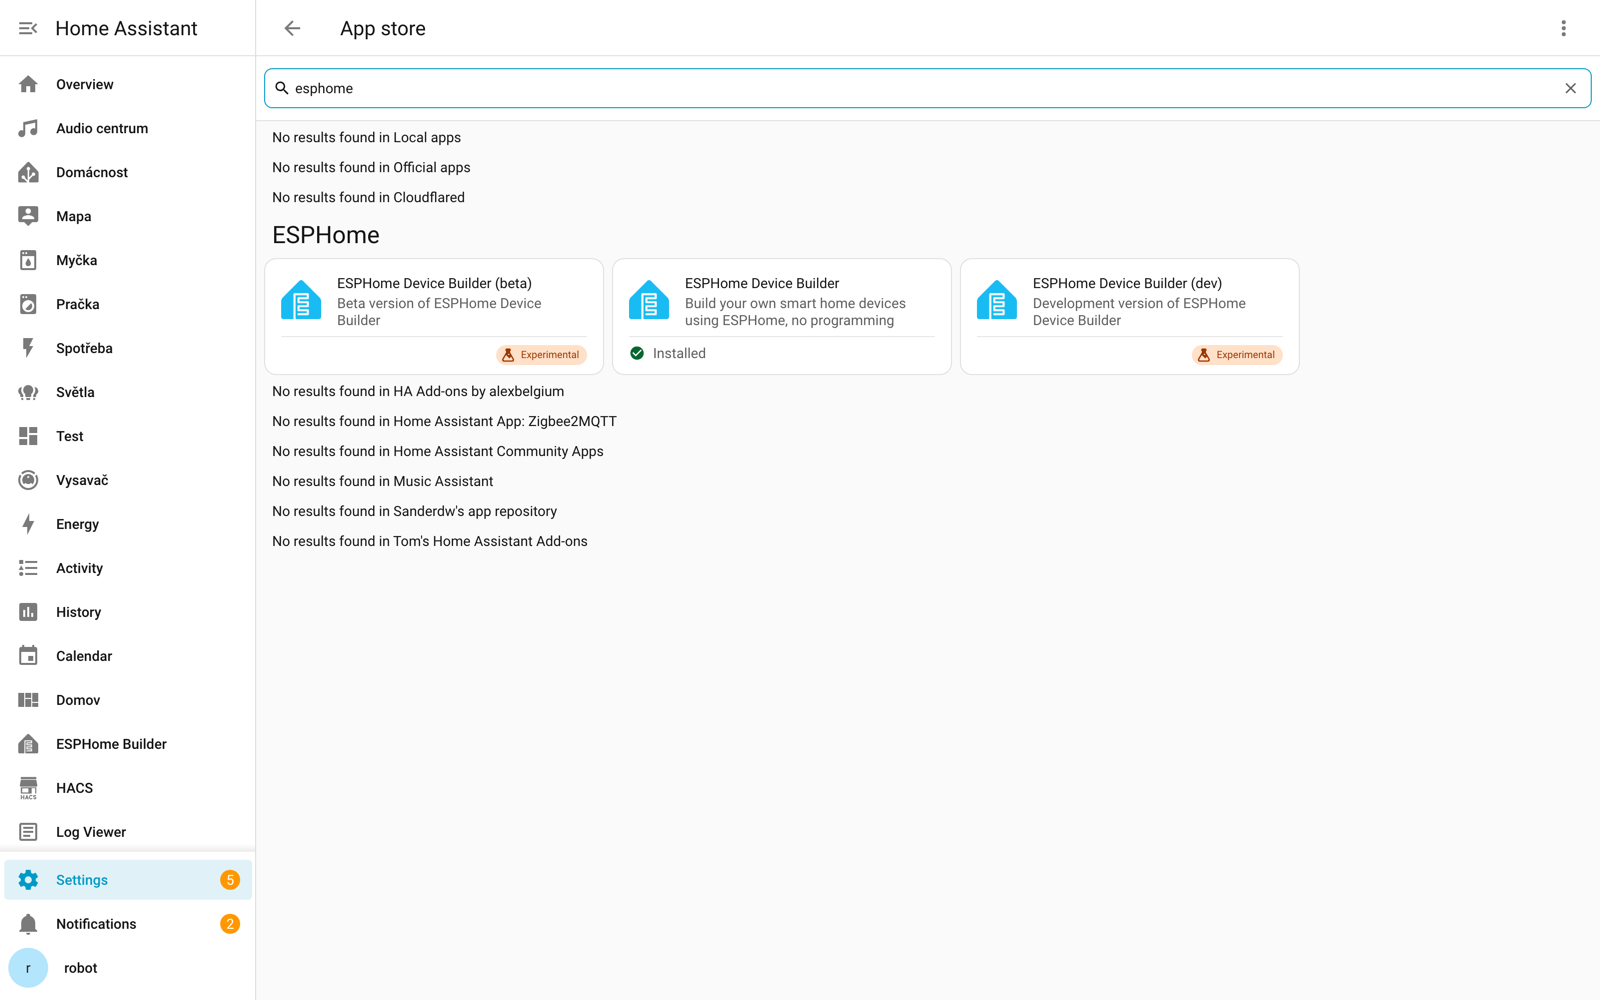
The store shows ESPHome Device Builder, (beta) and (dev). Both of the ones marked Experimental are meant for testing upcoming releases. For everyday use you want the one without a suffix - beta and dev won't give you any extra features, they'll just surface bugs sooner.
Installation may take several minutes depending on your connection speed and system performance.
Step 2: Starting the App
- After installation, click Start
- Wait for the app to come up (state Running)
- Click Open Web UI
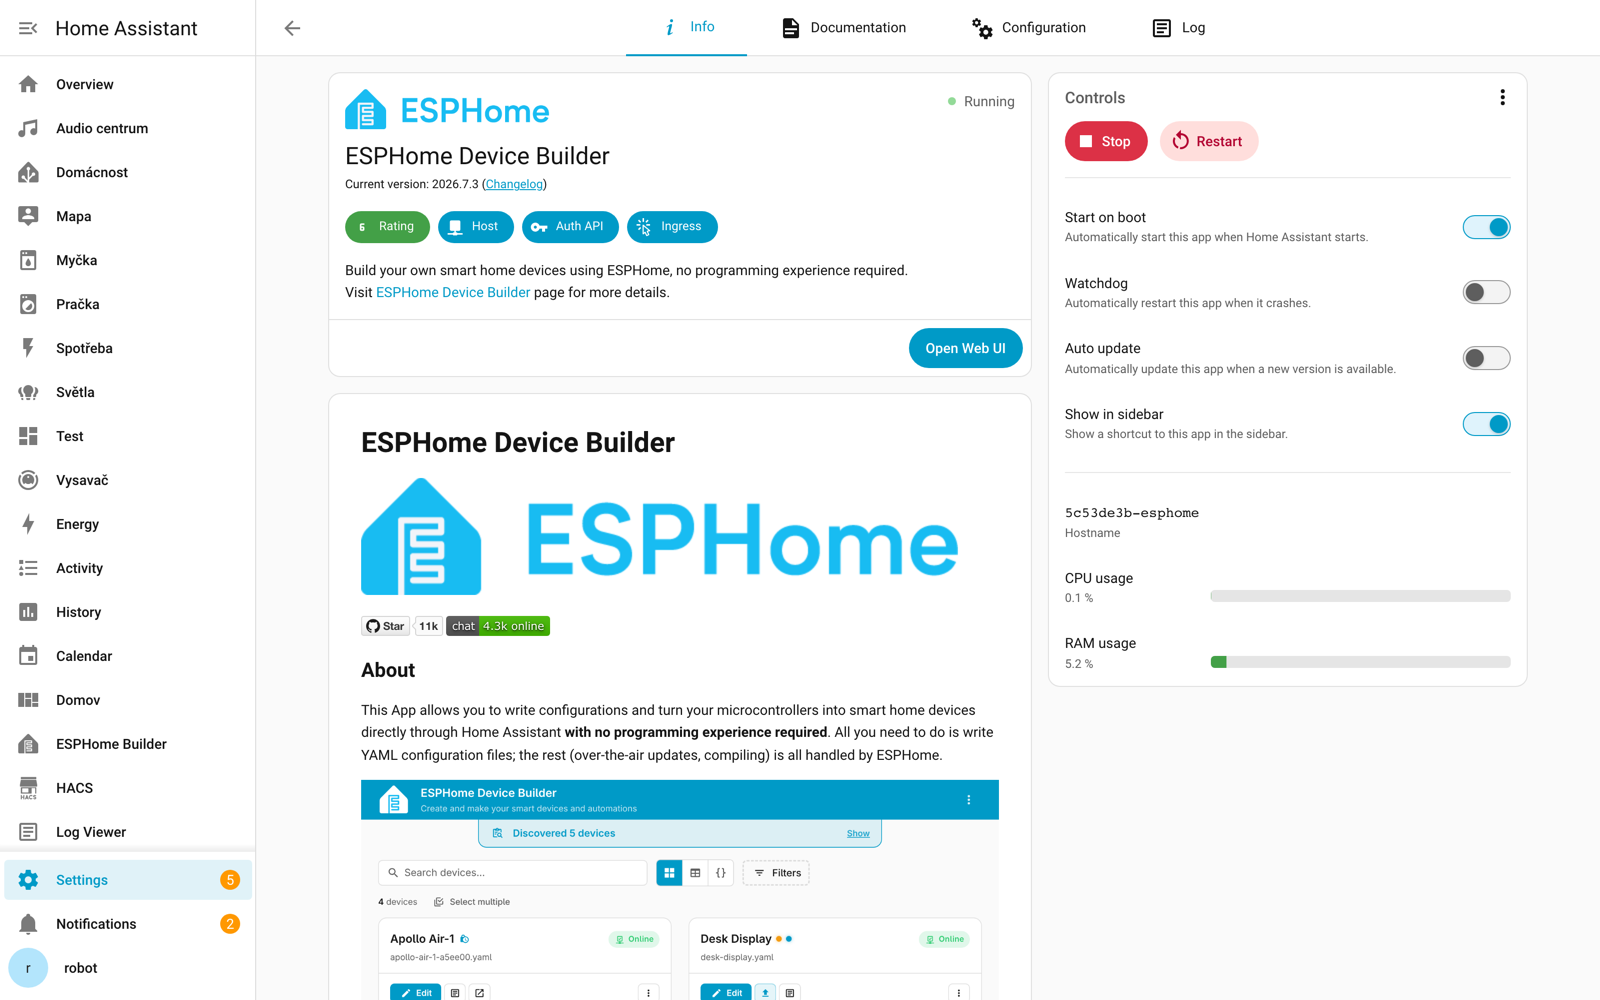
Turning on Show in sidebar saves you clicks - Device Builder then sits as a single entry in the left-hand menu.
It looks tempting, but ESPHome ships a new version every month and occasionally with a breaking change (see the table above). If the app updates itself and you then rebuild firmware, your configuration may fail validation at the worst possible moment.
ESPHome Device Builder - the new interface
This is the biggest visible change. In 2026.5 the new Device Builder arrived as an opt-in beta alongside the legacy dashboard, reached 1.0 and became the default in 2026.6, and in 2026.7 the original one was removed entirely - so you'll meet the new interface whether you want to or not.
The landing page lists your devices. New here: search, switching between cards, a table and YAML content search, filters (by labels, platform, status, available updates), and bulk operations via Select multiple.
Each device shows its status (Online / Offline), the configuration file name, and Edit, Install and Logs buttons (the latter two as icons only). The Device Builder and ESPHome version numbers sit in the footer - handy when you're filing a bug report.
Creating a new device
The Create device button in the bottom right opens the Create configuration dialog:
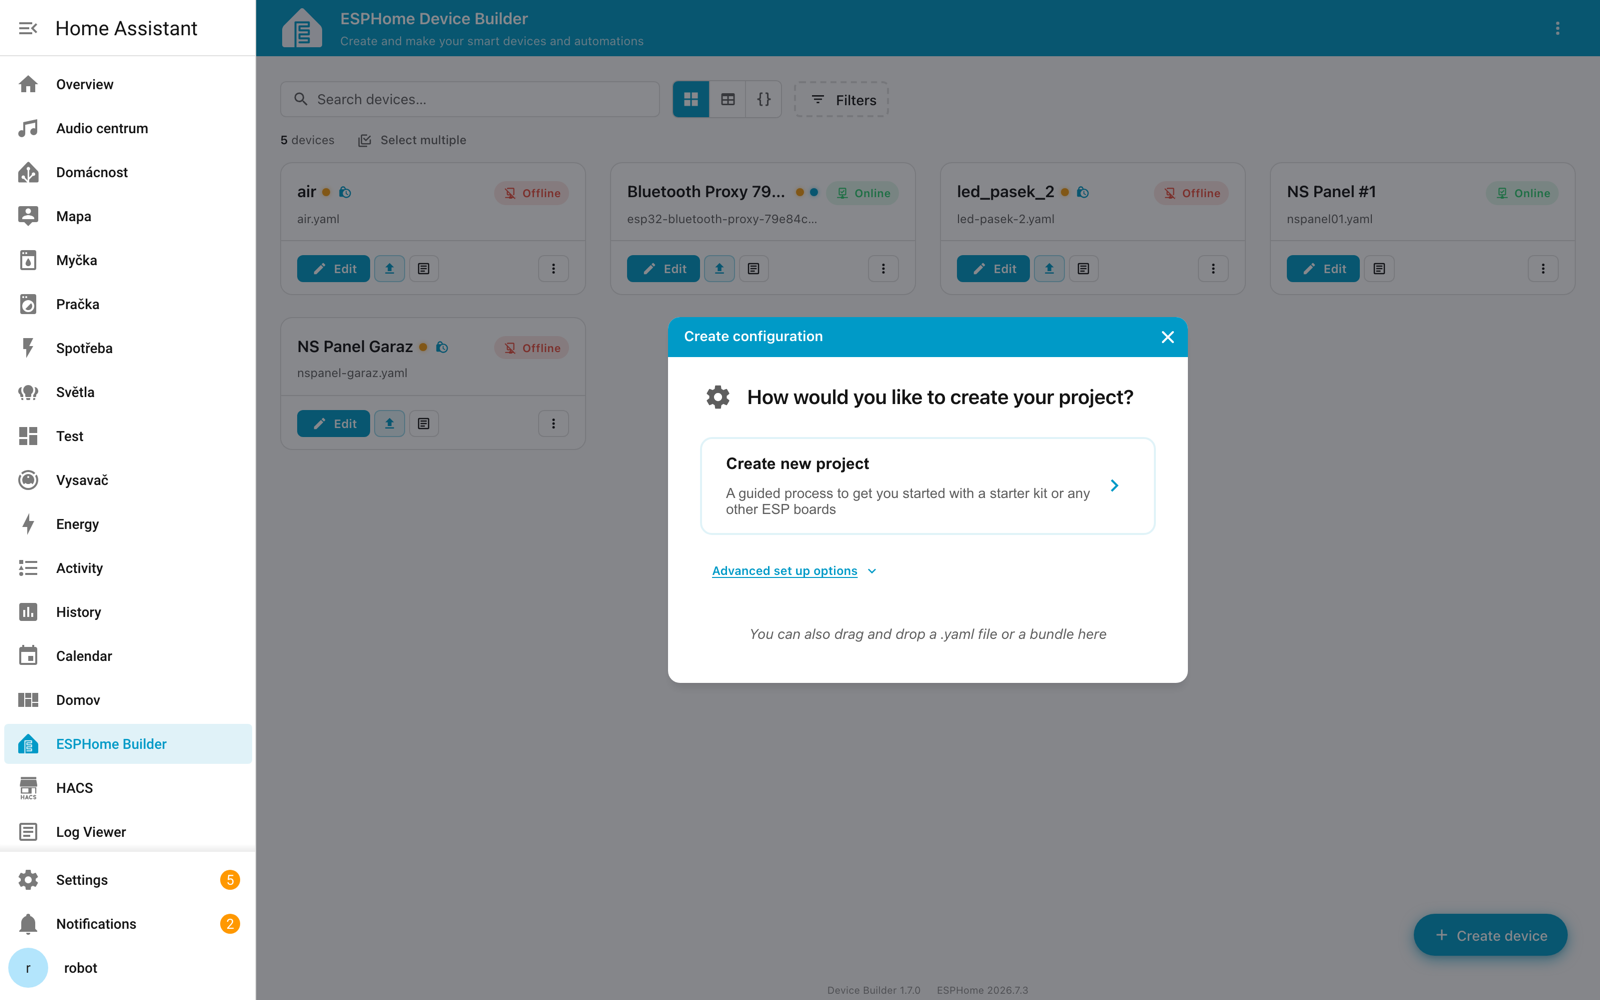
Create new project walks you through a wizard - pick a board (or a starter kit), enter a name and your Wi-Fi credentials. Also worth noting: you can drag and drop an existing .yaml file or a bundle here, so a configuration from another instance doesn't have to be copied in through Studio Code Server.
The visual component editor
Clicking Edit opens the editor, and this is the headline feature. On the left is the Device navigator, which breaks the configuration into Core configuration (name, Wi-Fi, OTA, API), Components (sensors, switches, displays) and Automations. The right-hand side is a signpost to those three parts; click something in the navigator and its detail opens there. You switch the YAML editor on with the toggle in the top right - it's deliberately hidden in the screenshot so no keys or Wi-Fi network names end up in frame.
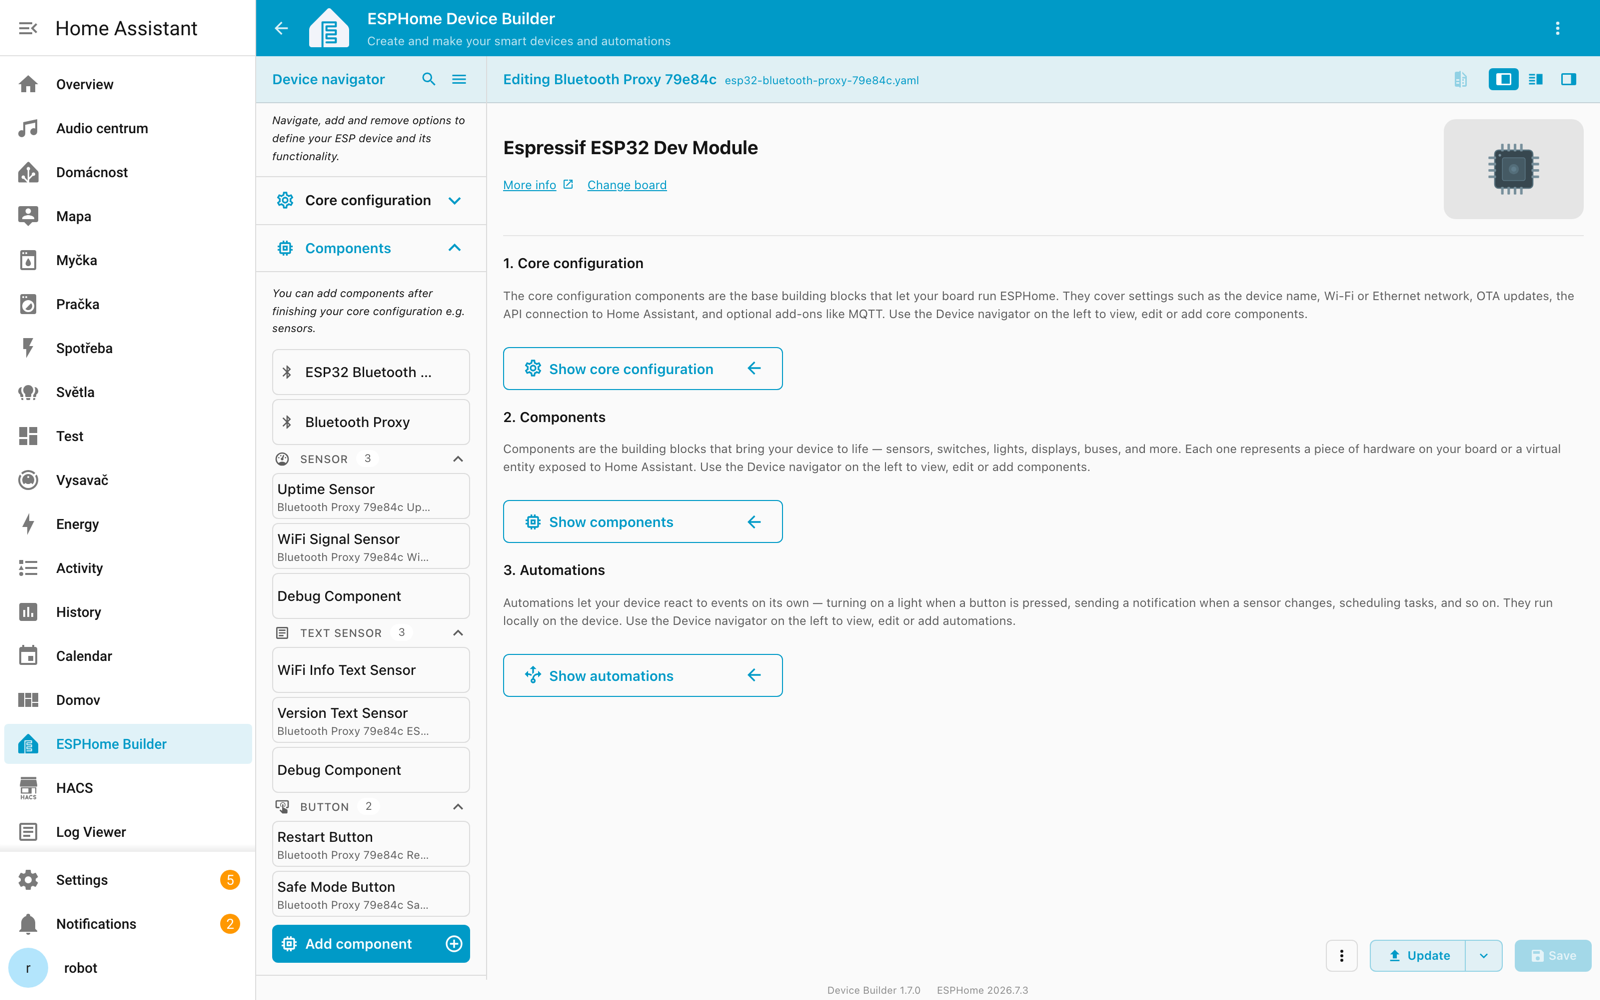
The screenshot shows the configuration of my Bluetooth proxy with the Components section expanded - the navigator nicely lays out what's inside: ESP32 Bluetooth, Bluetooth Proxy, three sensors, three text sensors and two buttons. You can click any entry and edit it in a form, without touching YAML.
The Add component button opens the catalogue. And here you can really see the scale of the project:
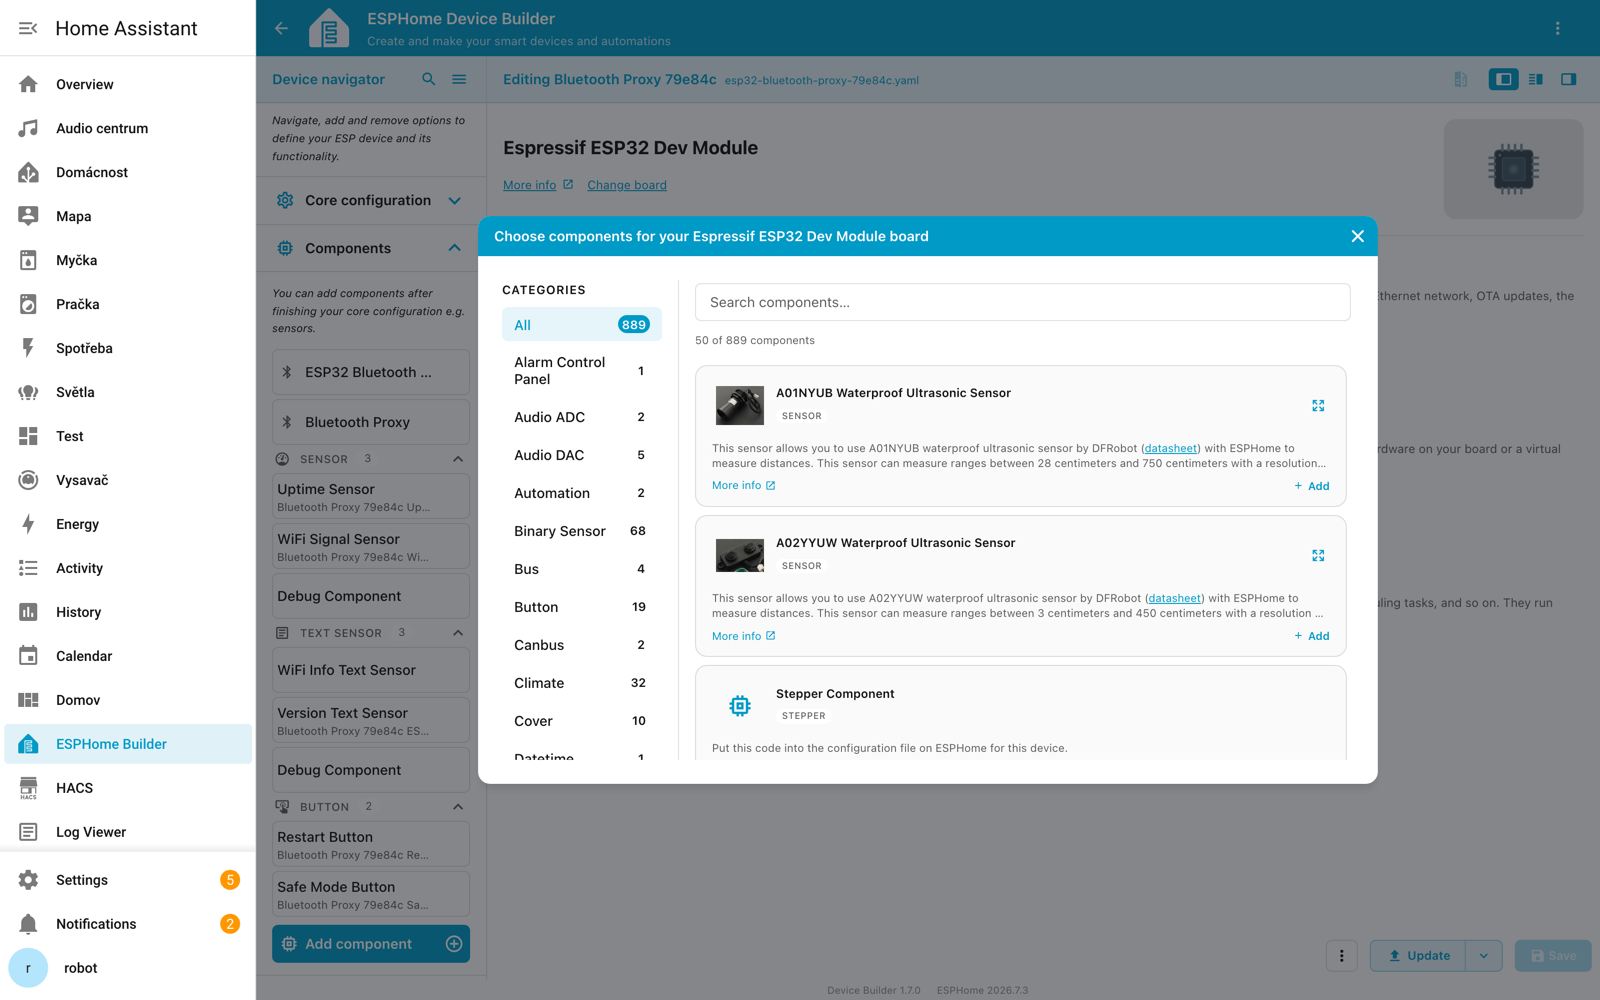
889 components available for an ESP32 board, sorted into categories, each with a picture, a description and a link to its documentation. Sensors and binary sensors are the largest groups. The full list, with documentation for every component, also lives at esphome.io/components.
The editor has a Reveal sensitive values button that temporarily expands values from secrets.yaml. Use it carefully - if you're recording your screen or sending someone a screenshot, your API key will show up in plain text.
First Device - Step by Step
Let's create your first ESPHome device!
What You'll Need
Hardware:
- ESP32 or ESP8266 development board
- USB cable (data cable, not just charging!)
- Computer with USB port
Software:
- Home Assistant with ESPHome installed
- Web browser (Chrome or Edge)
Creating Configuration
-
In Device Builder, click "Create device"
-
Choose "Create new project" and the wizard will guide you:
- Enter a device name (e.g., "test-esp32")
- Select a board (ESP32, ESP8266, C6...)
- Enter your Wi-Fi SSID and password
-
ESPHome will create a basic configuration
The resulting YAML file will look something like this:
esphome:
  name: test-esp32
  friendly_name: Test ESP32

esp32:
  board: esp32dev
  # You don't need framework or toolchain any more - ESP-IDF has been the
  # default since 2026.1, and 2026.7 builds with the native toolchain

# Enable logging
logger:

# Enable Home Assistant API - encryption is the only option today,
# the api: password: setting was removed in 2026.1
api:
  encryption:
    key: !secret api_encryption_key

# Enable OTA updates
ota:
  - platform: esphome
    password: !secret ota_password

wifi:
  ssid: !secret wifi_ssid
  password: !secret wifi_password

  # Fallback hotspot
  ap:
    ssid: "Test-Esp32 Fallback"
    password: !secret fallback_password
ESPHome supports !secret for storing sensitive data outside the configuration. This data lives in secrets.yaml, which you can open from the ⋮ menu in the top right of Device Builder.
One practical note: the secrets editor in ESPHome rewrites the whole file. If you append to secrets.yaml some other way (over SSH, for example), the next save from the web interface will wipe that out.
If you're building a device you won't be able to reach easily later, add this block:
safe_mode:
  storage: rtc
By default ESPHome counts failed boots in flash (NVS), and that counter survives even a reflash - the device then stubbornly keeps booting into safe mode. In RTC memory, simply unplugging it clears the counter. I paid for this lesson on an NSPanel and cover it in When an NSPanel won't boot after an update.
Uploading Firmware - First Installation
For the first upload you need a USB cable. The Install dialog now recognises that the device has never been flashed and tells you so:
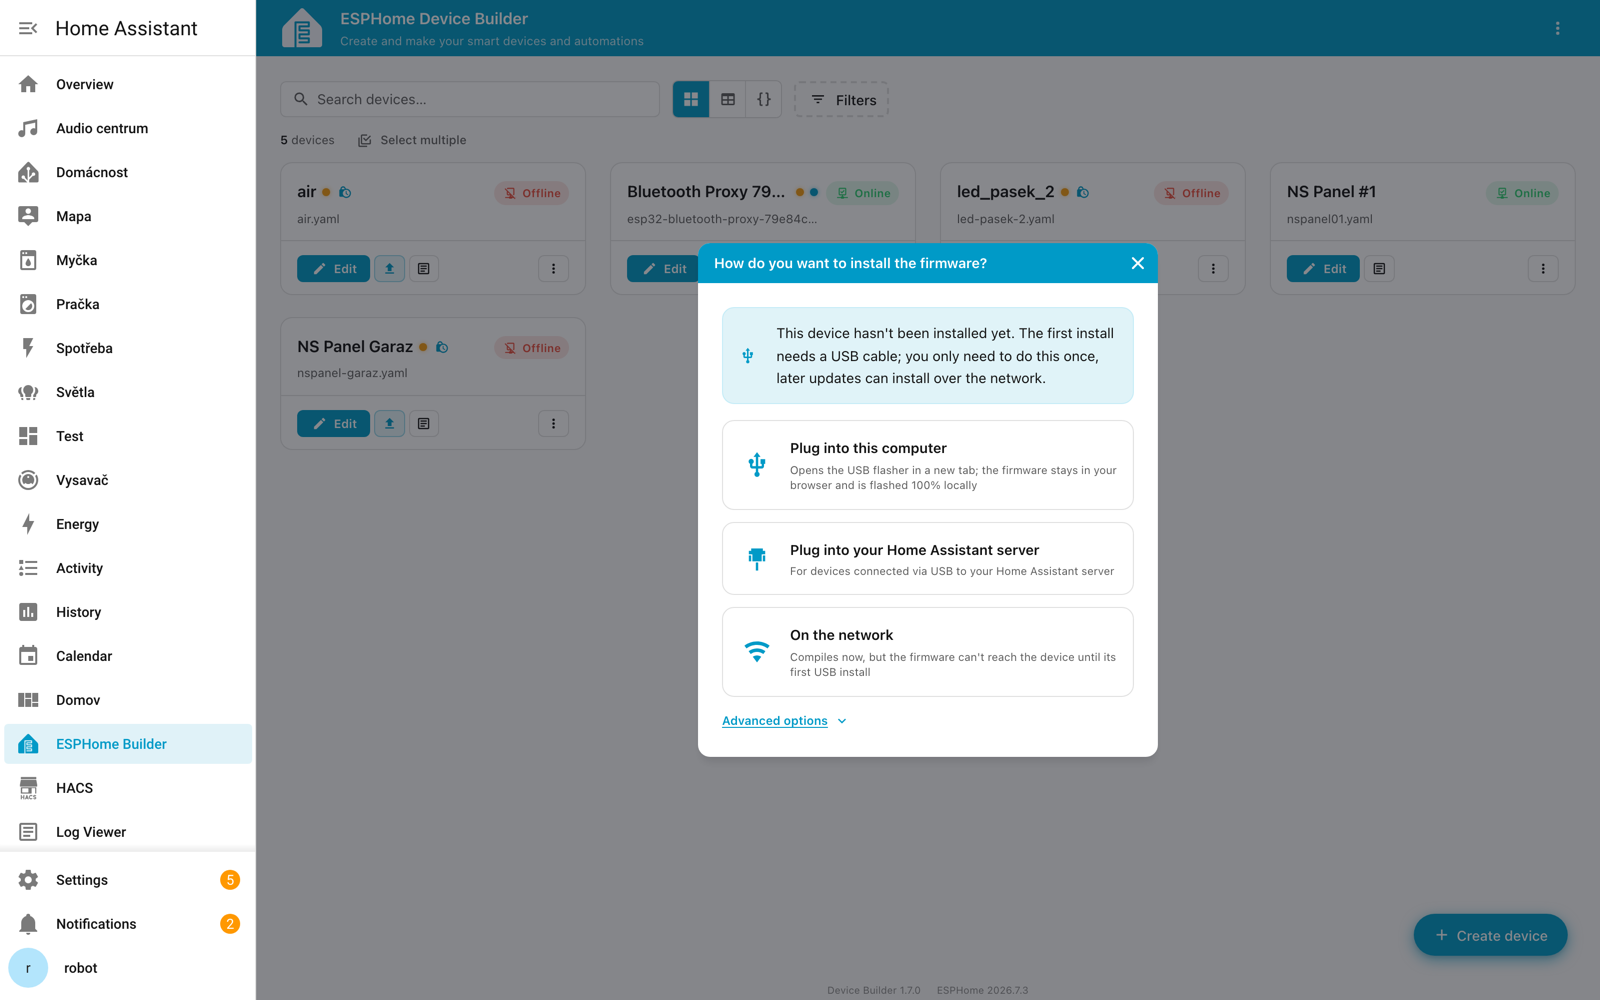
You have four options - note that the last one is hidden under the Advanced options disclosure at the bottom of the dialog:
| Option | When to use it |
|---|---|
| Plug into this computer | The ESP is in this computer's USB. A web flasher opens in a new tab; the firmware stays in your browser and is flashed 100% locally |
| Plug into your Home Assistant server | The ESP is in a USB port on the Home Assistant server |
| On the network | Compiles the firmware, but it can't be uploaded until the first USB install |
| Download firmware binary | Compiles and offers the firmware for download to disk. It's hidden under Advanced options |
The first firmware upload must be via USB. Only then do OTA (wireless) updates work.
Plug into this computer needs Chrome or Edge and a secure connection - the Web Serial API doesn't work over http:// on anything other than localhost. If you reach Home Assistant over plain HTTP, use the server USB option instead.
Download firmware binary is the key when Home Assistant runs on weak hardwareThis option downloads the firmware as a file, so you can then flash it from a completely different computer than the one running Home Assistant. And Device Builder can do one more thing I didn't know about for a long time: divert compilation over the network to a more powerful machine, while the configuration stays only in Home Assistant. For me that cut builds from minutes to seconds.
I cover it, pairing included, in a separate article: ESPHome Compiles for Minutes? Offload the Build to a Faster Machine.
Serial flashing comes in many forms and even more traps - boards with a USB port versus devices without one, esptool from the command line, CP2102 and CH340 drivers, or a device locked in safe mode that not even reflashing will save. I have all of it in a separate article: Flashing ESPHome Firmware over USB.
Connecting to Home Assistant
After successful upload and Wi-Fi connection, the device should automatically appear in Home Assistant:
- Go to Settings → Devices & Services
- Your ESPHome device should be in the Discovered section
- Click Configure
- Enter the encryption key from the configuration (if required)
- Confirm addition
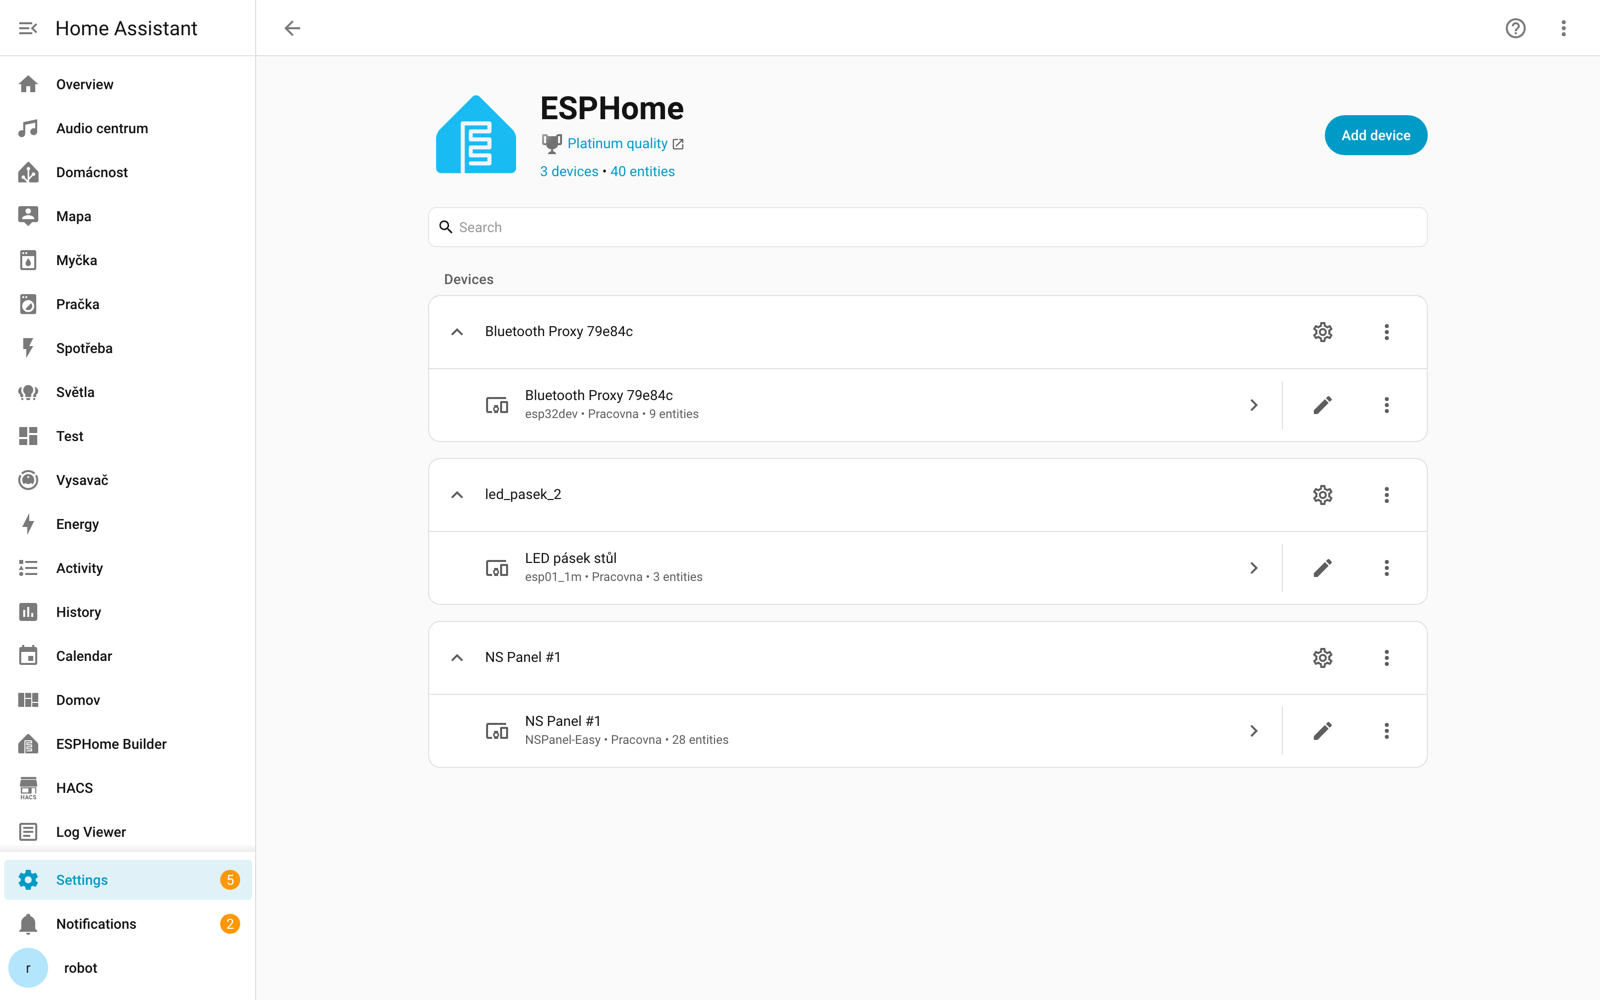
Once added, all your ESPHome devices live together on the integration page:
Adding Components
Now that you have a basic device working, we can add some useful components!
Example: GPIO Switch
Add relay or LED control to the configuration:
switch:
  - platform: gpio
    name: "Relay 1"
    pin: GPIO5
    id: relay_1
Example: Binary Sensor (Button)
Add button or door/window sensor state monitoring:
binary_sensor:
  - platform: gpio
    name: "Button 1"
    pin:
      number: GPIO0
      inverted: true
      mode:
        input: true
        pullup: true
    # Since 2026.3 mechanical contact bounce reaches your automations -
    # previously it was absorbed by main loop timing. Add a filter for switches:
    filters:
      - delayed_on_off: 20ms
Example: DHT22 Temperature Sensor
sensor:
  - platform: dht
    pin: GPIO4
    temperature:
      name: "Temperature"
    humidity:
      name: "Humidity"
    model: DHT22
    update_interval: 60s
Updating Device
After editing the configuration:
- Click "Save" in the editor
- Click "Install"
- This time choose "On the network" - no USB needed! ⚡
When a new ESPHome release lands you don't need to open Device Builder at all - the update shows up on the device directly in Home Assistant under Settings → Updates:
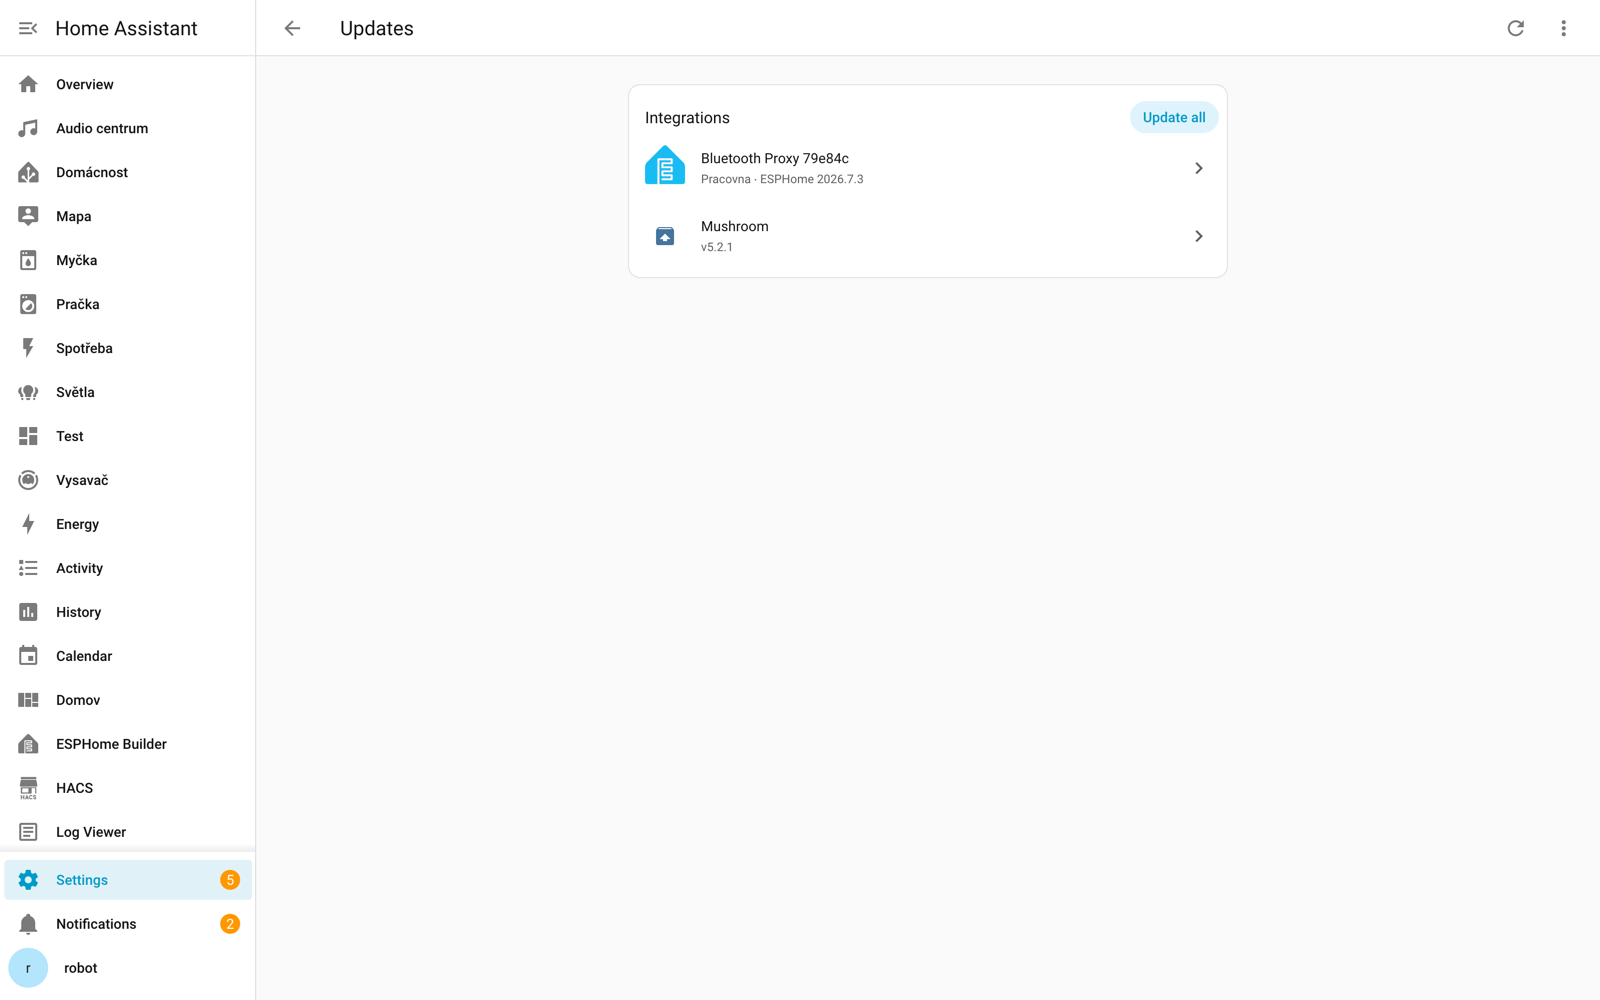
After the first USB installation, all subsequent updates happen wirelessly via Wi-Fi. It's fast and convenient!
Watching the logs
The Logs button on a device opens the same kind of dialog as installing - pick On the network and a live stream appears:
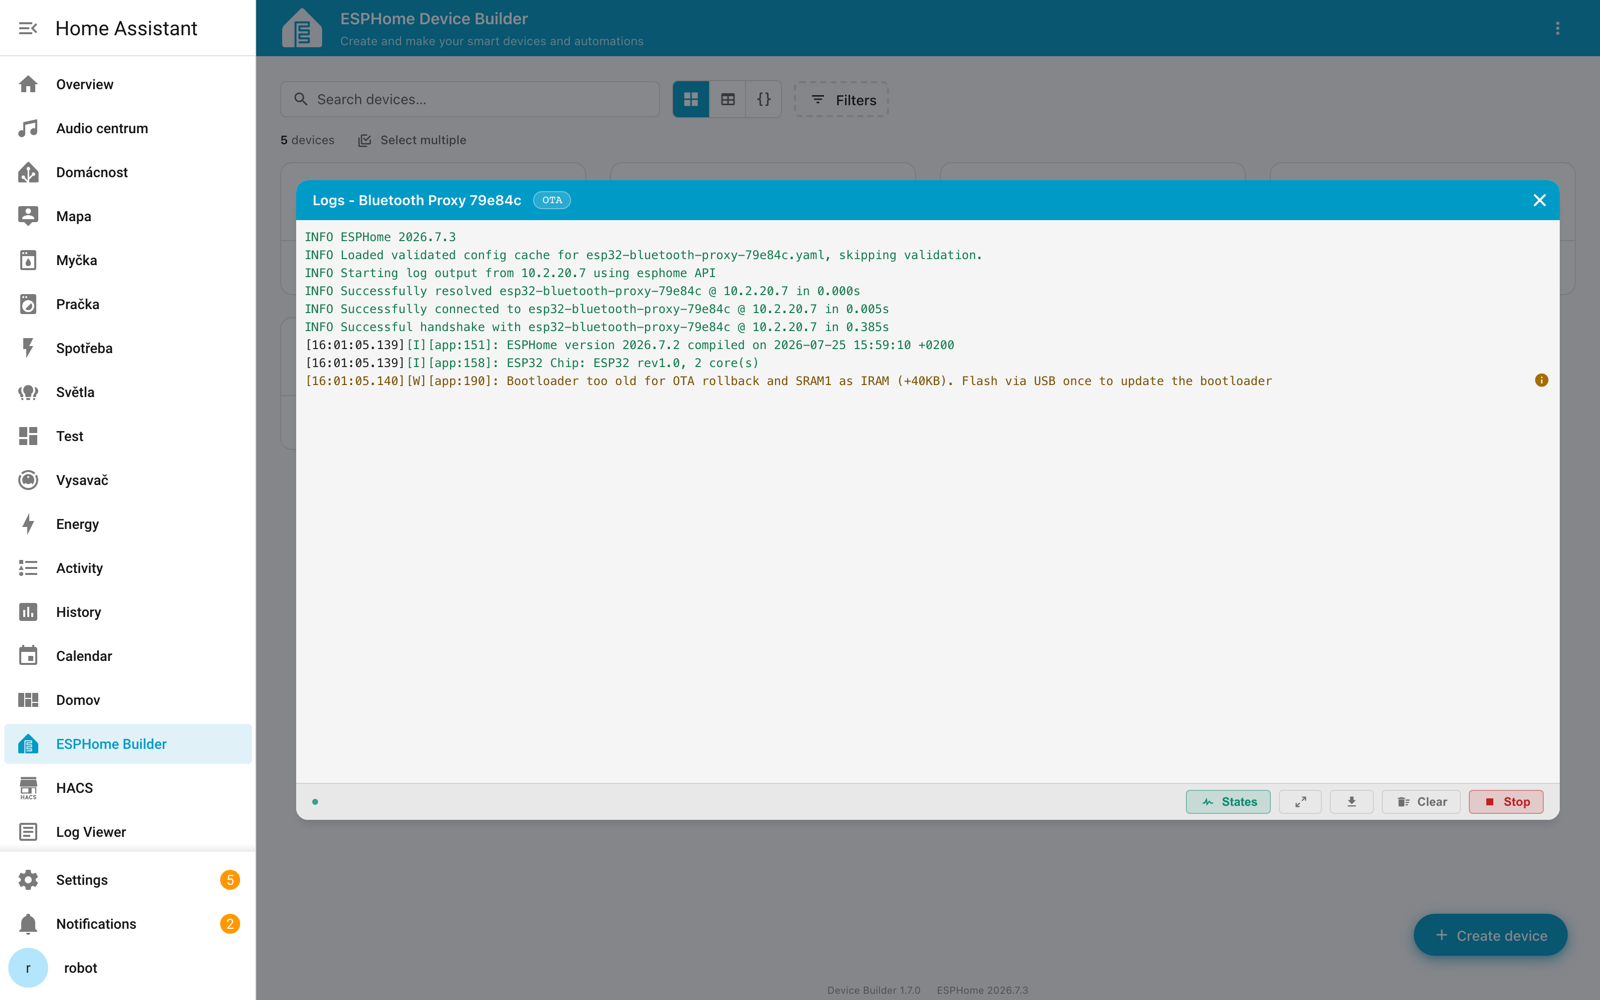
Beyond full-screen mode, downloading the log to a file and the States toggle (which shows entity state changes), there's one thing here worth reading right away. The screenshot shows a real message from my Bluetooth proxy:
[W][app:190]: Bootloader too old for OTA rollback and SRAM1 as IRAM (+40KB).
              Flash via USB once to update the bootloader
The device runs fine, but an old bootloader costs it two things: the ability to roll back to the previous firmware after a failed OTA, and an extra 40 KB of IRAM. ESPHome suggests one USB reflash; since 2026.5 you can also push a bootloader over the network with esphome upload --bootloader.
Advanced Features
On-Device Automations
ESPHome allows running automations directly on the ESP chip, without needing to communicate with Home Assistant:
binary_sensor:
  - platform: gpio
    name: "Button"
    pin: GPIO0
    on_press:
      - switch.toggle: relay_1
Bluetooth Proxy
ESP32 can function as a Bluetooth Proxy to extend BLE coverage. And here I have to correct what I wrote before - the configuration got simpler over the past year:
# The default scan parameters are fine; a scan_parameters block is deliberately absent
esp32_ble_tracker:

bluetooth_proxy:
  # active: true is the default today, you don't need to write it
  # connection_slots: 3 is the default, each slot costs ~1 KB of RAM
My original example had interval: 1100ms / window: 1100ms. The documentation is now quite explicit about this:
The default scan parameters are recommended for most users. Changing
intervalorwindowfrom their defaults typically provides no meaningful benefit while increasing CPU usage and network traffic.
Setting 1100/1100 means continuous scanning and only makes sense for a proxy on Ethernet, where it isn't competing with Wi-Fi for the radio. On Wi-Fi it will hurt your reception. If you have it in your configuration, delete it.
The BLE controller carves its memory out of the total pool at link time, not at runtime. On my NSPanel it took more than half of the free internal DRAM, and after one ESPHome update that grew the binary slightly, the remaining headroom vanished and the panel went black.
I cover the full measurements and the diagnosis in Sonoff NSPanel and When an NSPanel won't boot after an update.
My recommendation: put the proxy on its own ESP32. A board costing a few euros in a USB charger has all the memory to itself, you can place it for BLE coverage rather than for where a switch happens to be, and you can flash ready-made firmware through the web installer without writing any YAML.
More about Bluetooth Proxy in my article Bluetooth Proxy.
Web Server
You can enable the built-in web server for direct control:
web_server:
  port: 80
  # Since 2026.7, if something from another origin reaches the page:
  # allowed_origins:
  #   - http://homeassistant.local:8123
  # Adjust the address for your own instance - new Home Assistant OS installations run on port 80, so without :8123
Web server uses a lot of memory. I don't recommend using it simultaneously with Bluetooth Proxy!
The web server now uses entity names directly in URLs instead of the old sanitized object IDs. That finally fixed collisions with non-ASCII characters, but it brings two limits: a name can't contain / and is capped at 120 characters. If you linked to the old addresses from anything external, those links will break.
Memory and diagnostics
I added this section because most of the problems I've fallen into over the years turned out to be about memory.
Measure it, don't guess
You can add a debug component that exposes memory usage as ordinary entities in Home Assistant:
debug:
  update_interval: 60s

sensor:
  - platform: debug
    free:
      name: "Free Heap"
    min_free:
      name: "Min Free Heap"
    block:
      name: "Largest Free Block"

text_sensor:
  - platform: debug
    reset_reason:
      name: "Reset Reason"
Min Free Heap is the most useful of the three - it tells you how low the device has ever dipped, i.e. how much real headroom you have. And Reset Reason answers whether it restarted because of the watchdog or because someone unplugged it.
esphome analyze-memory
A new utility from 2025.11. It compiles the configuration and prints a per-component memory breakdown - exactly what you need when deciding what to drop from a configuration.
Backtrace without a serial cable
It used to be that if a device kept crashing, you had to go to it with a USB-TTL adapter. Since 2026.3 (ESP32) and 2026.4 (ESP8266), the device stores the crash backtrace across a reboot and sends it over the API - so you see the crash in the Device Builder log.
A raw address tells you nothing; turning it into a function name needs addr2line and the firmware.elf file from the build directory. If you use a remote build server, that directory lives there, not on the machine you're looking at it from.
Security
Version 2026.7 brought the first wave of features aimed at the European EN18031 standard, and they're worth knowing about even if you're not selling anything:
- NVS encryption - optional storage encryption via the HMAC peripheral (S2, S3, C3, C5, C6, H2, P4)
- OTA downgrade protection - the device refuses signed firmware with an older project version
- The
provisioningcomponent - manages the initial setup window for devices that ship unprovisioned
Two older changes affect everyone: API encryption is mandatory (the password option went away in 2026.1) and OTA supports signed updates even without Secure Boot (2026.4).
api: encryption: key unless you have toMoving the key's value into secrets.yaml is perfectly fine - it changes nothing functionally. But if you generate a new key, Home Assistant stops recognising the device and asks you to enter it again. On its own that's just an annoyance; entities and history are unaffected.
The worse move is the one people often reach for in that situation: deleting the integration and adding it again. That does lose history, and entities can come back with a _2 suffix. If you just need to look the key up, it's in secrets.yaml, not in Home Assistant.
Tips and Tricks
Framework and toolchain
This is the area where everything flipped over the past year. I originally wrote that for advanced projects I recommend switching to ESP-IDF. Today you don't need to deal with it at all:
esp32:
  board: esp32dev
  # ESP-IDF has been the default framework since 2026.1, and since 2026.7
  # builds use the native toolchain instead of PlatformIO. Nothing to write.
If you need to swim against the current:
esp32:
  toolchain: platformio     # back to PlatformIO (2026.7+)
  framework:
    type: arduino           # back to Arduino, ESP32/C3/S2/S3 only
Why that transition was a good thing:
- Binaries up to 40% smaller
- Compiles 2-3× faster
- Lower memory usage and more stable Bluetooth
I originally had a categorical warning here that switching arduino → esp-idf requires USB because the partition table changes. Since 2026.5 that's only partly true - OTA learned to rewrite the partition table, and safe_mode can boot into the factory partition, so even a failed attempt can be recovered without a cable.
It's still the riskiest operation you'll perform on a device, though. For something you can open with a single screwdriver, I'd reach for USB. For a panel sunk into a wall, OTA is a viable route today. I show that such a panel can be reflashed purely over Wi-Fi in migrating an NSPanel - there the framework doesn't change, though, which makes it a notch safer than this.
Secrets File
Use secrets.yaml for sensitive data:
# In configuration file:
wifi:
  ssid: !secret wifi_ssid
  password: !secret wifi_password

# In secrets.yaml file:
wifi_ssid: "MyWiFi"
wifi_password: "SuperSecretPassword123"
Debug Logging
To troubleshoot issues, increase logging level:
logger:
  level: DEBUG  # or VERBOSE for even more detail
Verbose logging consumes both flash and RAM, and on a device already at its memory limit it can cause the very crash you're chasing. Turn it on while debugging, then put it back to INFO.
Troubleshooting
Configuration fails validation after an update
The most common causes are in the changes table. A quick pass:
- Do you still have
password:underapi:? Replace it withencryption: key: - Are you using PSRAM without a
psram:block? - Do you have a single
!includeafterpackages:without a list item? - Do you have components in a
custom_components/folder? Switch toexternal_components:
Device Didn't Appear in Home Assistant
- Check that device is connected to Wi-Fi (look in router)
- Check the logs in Device Builder (the Logs button)
- Try manual addition via IP address
- Restart Home Assistant
Device won't join Wi-Fi after an update
On ESP32, ESPHome has required WPA2 as a minimum for years; ESP8266 joined it in 2026.6. If this caught you out after updating an ESP8266 and you have an older router:
wifi:
  min_auth_mode: WPA
A second common cause: .local addresses now need mDNS enabled. Without it, connecting is delayed by more than ten seconds.
OTA Update Fails
- Check the ESPHome version you're uploading from - anything older than 2025.10 using password authentication won't reach a device on 2026.1+ (see the warning). If you run ESPHome in several places, update them all
- Check Wi-Fi signal stability
- Check available memory in logs
- Try updating via USB
The message esp_ota_end failed (err=0x1503) means the data transferred but the target partition stayed empty - ESPHome refused to verify the new binary. Retrying OTA won't help; this one needs a serial flash. The usual culprits are a faulty or relabelled flash chip, or protection bits in its status register.
Device Constantly Restarts
- Power issue - try different USB source
- Low memory - disable Web Server or reduce components, and measure your
min_freeheap - Configuration error - check logs; a backtrace is available today even without a cable
A battery device suddenly lasts noticeably less
Since 2026.4 the ESP32, S2, S3 and C5 run at 240 MHz by default instead of the previous 160 MHz. Put it back:
esp32:
  cpu_frequency: 160MHZ
Logs or the web server won't connect even though the device is up
Since 2026.5 the default api: max_connections is five instead of eight. When Home Assistant, a log window, the web interface and something else all hang off the device at once, that limit can run out:
api:
  max_connections: 8
Practical Projects
Room Thermometer
sensor:
  - platform: dht
    pin: GPIO4
    temperature:
      name: "Living Room Temperature"
    humidity:
      name: "Living Room Humidity"
    model: DHT22
    update_interval: 60s
Smart Switch with LED Indication
switch:
  - platform: gpio
    name: "Main Light"
    pin: GPIO5
    id: main_light
    on_turn_on:
      - light.turn_on: led_status
    on_turn_off:
      - light.turn_off: led_status

light:
  - platform: status_led
    name: "LED Status"
    id: led_status
    pin: GPIO2
Door/Window Sensor with Time Logging
binary_sensor:
  - platform: gpio
    name: "Main Door"
    pin:
      number: GPIO0
      mode:
        input: true
        pullup: true
      inverted: true
    filters:
      - delayed_on_off: 20ms
    on_press:
      then:
        - logger.log: "Door opened!"
    on_release:
      then:
        - logger.log: "Door closed!"
Evaluation
After several years of using ESPHome, I can say it's one of the best tools for DIY smart home. And the year that passed since the original version of this article hasn't changed that - quite the opposite. The new Device Builder moved ESPHome closer to people who don't want to write YAML at all, and the move to ESP-IDF turned compiling into a matter of minutes rather than tens of minutes.
✅ Main Advantages
- Simple configuration - YAML, or clicking these days
- Perfect integration with Home Assistant
- OTA updates - now including partition table and bootloader
- Huge community - thousands of projects
- Local control - no cloud
- Active development - a new release every month
- Cheap hardware - ESP32 for pennies
⚠️ What Could Be Better
- Breaking changes - a monthly cadence means occasionally catching your configuration up
- Limited memory on ESP8266 for complex projects
- First flashing requires USB cable
- Multiple ESPHome instances must stay in step - an old install can no longer upload to current devices
Recommendation
I highly recommend ESPHome if you:
- ✅ Use Home Assistant
- ✅ Want to create your own sensors/switches
- ✅ Don't want to learn C++ programming
- ✅ Appreciate local control without cloud
- ✅ Want to save compared to commercial solutions
I don't recommend if you:
- ❌ Are an absolute beginner (start with ready-made Zigbee/Wi-Fi devices)
- ❌ Want plug-and-play solution without any configuration
- ❌ Don't use Home Assistant (then consider Tasmota)
Update your devices regularly and one at a time, not all at once after a year. ESPHome's monthly cadence means that if you let a configuration sit for two years, you'll be catching up on ten breaking changes at once - and working out which one broke the build is far worse than handling them one by one.
Related Articles
- Flashing ESPHome firmware over USB - first install, esptool and device rescue
- Bluetooth Proxy (ESPHome)
- Sonoff NSPanel with NSPanel Easy - ESPHome install, pinout and error fixes
- When an NSPanel won't boot after an update - memory diagnostics
- From NSPanel_HA_Blueprint to NSPanel Easy - migrating over OTA without taking the panel off the wall
- Tasmota - Alternative to ESPHome
Additional Resources
- Official ESPHome Documentation
- ESPHome changelog - full list of changes and breaking changes per release
- ESPHome Device Database - database of supported devices
- ESPHome Discord - active community
- ESPHome GitHub - source code
Did this guide help you?
I write these guides in my spare time and keep them up to date. If one saved you time, you can chip in.
One-off, by card or Apple Pay. You can change the amount on the next page.
Would rather not send money? Buy the parts through my product links. The price is the same for you and it helps too.