From NSPanel_HA_Blueprint to NSPanel Easy: migration step by step
You have an NSPanel running Blackymas/NSPanel_HA_Blueprint, it works, and you have no desire to take it off the wall. Good news: you don't have to. Migrating to NSPanel Easy is a plain OTA update - the panel stays where it is, the serial adapter stays in the drawer, and your entire automation configuration carries over.
This article is only about that transition. Setting a panel up from scratch, or are you after the hardware, pinout and serial flash? I have a complete guide to installing NSPanel Easy from scratch, which is also where I explain why this isn't some unknown fork.
Arguments for switching tend to stay general. So here is a specific one, which I ran into in my own build. Let's be clear about what this is not: the pinned version of the original project (v2026041) is not older than the change in ESPHome. It is newer and reacts to it directly - the version guard is there in esphome/nspanel_esphome_addon_upload_tft.yaml. It's just that the newer branch is missing .c_str():
#if ESPHOME_VERSION_CODE >= VERSION_CODE(2025, 11, 0)
ESP_LOGCONFIG("${TAG_UPLOAD_TFT}", "  File model: %s", tft_file_model->current_option());
#else
ESP_LOGCONFIG("${TAG_UPLOAD_TFT}", "  File model: %s", tft_file_model->state.c_str());
#endif
So an esphome::StringRef object is handed to a %s that expects a char*, and that is undefined behaviour. The compiler spells it out on every single build:
nspanel_esphome_addon_upload_tft.yaml:114: warning: format '%s' expects argument of type
   'char*', but argument 5 has type 'esphome::StringRef' [-Wformat=]
This isn't code tucked away in some corner - it sits in dump_config, so it runs on every boot of the panel. In my log it shows up as [C][nspanel.addon.upload_tft:114]: File model: NSPanel EU, with the note dump_config took a long time for an operation (115 ms) right beside it.
Let's be honest: it works for now. Those bytes happen to be read correctly, and I have nothing that would tie this to a crash of the panel. But undefined behaviour stays undefined behaviour - and NSPanel Easy does have the .c_str() there.
That it isn't a one-off only became clear from the build itself. I compiled both projects on the same panel and the same ESPHome 2026.7.3 and compared the compiler warnings: Blackymas threw five, NSPanel Easy one.
| Compiler warning | Blackymas v2026041 | NSPanel Easy v2026.7.1 |
|---|---|---|
GPIO5 is a strapping PIN | yes | no |
platformio_options->build_flags is deprecated | yes | yes |
%s fed a StringRef (undefined behaviour) | yes | no |
%hhu / %i / %u format-string mismatches | 4× | no |
And honesty in the other direction too: migrating does not get rid of the build_flags deprecation, because it's in both projects - ESPHome removes that support in version 2026.12.0. In NSPanel Easy it's tracked in the open issues #343 and #344.
This is not a verdict on the whole firmware, and four extra warnings won't slow a panel down. But this is exactly the class of problem that a "showstoppers only" mode leaves lying around, because it doesn't break the build.
The official documentation promises under 10 minutes per panel. Let's be honest about that number: those ten minutes are your time at the keyboard. On top come the firmware compile (up to ten minutes the first time) and the TFT upload (10-20 minutes). Set aside half an hour to forty minutes, most of it spent watching a progress bar.
And expect that for a while after the flash it looks broken - the panel waits until you've finished Step 3, and complains in the log until you do. I go through it in Step 2.
I ran this procedure on 27 July 2026 on my own panel: from Blackymas v2026041 to NSPanel Easy v2026.7.1 with ESPHome 2026.7.3. Current releases are on the releases page.
Checklist before you start
Run through this before you start. None of it is difficult, but two items can stop the migration on the very first step:
- The panel runs
NSPanel_HA_Blueprintand is reachable in the ESPHome Device Builder. Without a working OTA connection, a wireless migration isn't possible. - You know which add-ons you use. Look at
packages:→files:and write the list down - you'll be rewriting it. - You know whether you have
nextion_update_urlin your substitutions. That's the substitution whose behaviour changed the most, see below. - You know your display model (EU / US / US Landscape).
- The panel has memory to spare. If your config has
bluetooth_proxy:, remove it first - the TFT upload needs RAM it won't get with BLE enabled. The measured numbers, and why I don't recommend Bluetooth on this panel at all, are in the main guide. - You know where your
substitutions:block is - every change happens there and inpackages:. The whole configuration for a clean install is in Step 2 of the main guide.
Wi-Fi credentials, device name and the rest of the substitutions stay untouched. Essentially you're only telling ESPHome where to fetch the package from.
What changes: old project vs. new
Here's the entire migration in one table. The rest of the article just spells it out.
| Setting | NSPanel_HA_Blueprint | NSPanel Easy |
|---|---|---|
url in packages: | https://github.com/Blackymas/NSPanel_HA_Blueprint | https://github.com/edwardtfn/NSPanel-Easy |
ref | main or a tag | latest for the first install, a specific tag afterwards |
| Add-on files | repository root | inside the esphome/ subfolder |
Base nspanel_esphome.yaml | root | root - no change! |
ota_password | derived from the Wi-Fi password | separate; you must add it for a wireless migration |
| Panel language | Blueprint dropdown | language: substitution in the YAML |
nextion_update_url | model selection and URL override | full override only |
upload_tft, wake_up API actions | always registered | opt-in via substitution |
| Blueprint | Blackymas/nspanel_blueprint.yaml | edwardtfn/nspanel_easy_blueprint.yaml |
| CJK languages | separate TFT variants | built into the standard TFT files |
Step 1: Changes in the ESPHome YAML
Open your panel's configuration in the ESPHome Device Builder and rewrite the packages: block like this:
packages:
  remote_package:
    url: https://github.com/edwardtfn/NSPanel-Easy
    ref: latest
    refresh: 300s
    files:
      - nspanel_esphome.yaml   # base package - NO esphome/ prefix
      # Add-ons, if you use any - ALWAYS with the esphome/ prefix
      # - esphome/nspanel_esphome_addon_climate_heat.yaml
      # - esphome/nspanel_esphome_addon_climate_cool.yaml
      # - esphome/nspanel_esphome_addon_climate_dual.yaml
      # - esphome/nspanel_esphome_addon_cover.yaml
      # - esphome/nspanel_esphome_addon_display_light.yaml
The add-ons moved into the esphome/ subfolder, but the base package nspanel_esphome.yaml stayed at the root. Give it the prefix too and the compile ends in a 404 or an empty package. Forget the prefix on the add-ons and you get the same error from the other direction.
ota_password - the trap that sends you looking for a serial cable
In the old project the OTA password was derived from your Wi-Fi password inside the remote package. NSPanel Easy broke that link, so you can set it independently. The catch: during a wireless migration the new firmware still has to reach a panel running the old firmware - and that one expects the password derived from Wi-Fi.
Add this to your substitutions: block:
substitutions:
  # ... everything else stays
  ota_password: ${wifi_password}   # for backward compatibility during migration
Skip it and OTA fails on authentication, at which point it's very easy to conclude you have to open the panel and flash over serial. You don't. The documentation mentions this, but only as a note under a table - which is why I'm saying it this loudly.
If you're flashing over USB-TTL anyway, this doesn't affect you and you can pick any OTA password you like.
Panel language
In NSPanel Easy the language is set in the ESPHome YAML, not in the Blueprint:
substitutions:
  language: en
Only the texts for that one language get compiled into the firmware. Leave it out and the panel falls back to English after migration regardless of what you had selected in the old Blueprint.
The language carries over, but the date and time format can end up set to the twelve-hour one. On my (Czech) panel the log showed this after the first boot:
[C][nspanel.localization:4513]: Language: 'cs'
[C][nspanel.localization:4514]:   Valid: Yes
[C][nspanel.localization:4517]:   Date format: '%A, %d.%m'
[C][nspanel.localization:4517]:   Time format: '%-I:%M %p'
The cs language is right, but %-I:%M %p is a 12-hour clock with AM/PM - almost certainly not what a Czech panel is meant to show. That format lives in the Blueprint, in the Localization section, not in the YAML. For a 24-hour clock you want %H:%M there.
nextion_update_url
This substitution changed meaning, so decide which group you're in:
- Did you only use it to pick your display model? Remove it. The Display model selector in Home Assistant now handles that, and builds the correct versioned download URL for you.
- Are you hosting a custom or local TFT file? You can keep it, but it's now a full override - it bypasses the model selector and the entire version logic, and that one URL is used as-is. Keeping a compatible, up-to-date file behind it is on you. If what sits behind it is a file from the old project, remove it - it isn't valid for NSPanel Easy, and the panel would be handed an incompatible TFT after migrating.
Missing API actions
If your automations call the upload_tft or wake_up actions, you won't find them after migrating - NSPanel Easy doesn't register them by default, because every registered action costs heap memory at boot. Restore them with substitutions:
substitutions:
  include_action_upload_tft: true
  include_action_wake_up: true
Step 2: Flash over Wi-Fi
Save the configuration, then:
- In the ESPHome Device Builder, find your panel and click the three-dot menu
- Install → Wirelessly
- Let it compile and upload
That's it. The panel reboots on the new firmware, you don't touch the hardware and you need no adapter. With several panels, repeat Steps 1 and 2 for each - there's no need to migrate them all at once.
ref: latest is deliberate here - the project's migration guide wants it for that first install, and an old tag from the original repository wouldn't work at all. Once the panel is up, switch to a specific tag with refresh: never so the version doesn't shift under you on every recompile. Why I insist on that is in Step 2 of the main guide.
The first boot looks broken until you finish Step 3
This, to me, is the most valuable thing in the whole article. For a while after flashing it all looks like a wreck - W and E lines pouring into the log, a display that doesn't respond, and an irresistible urge to reboot or reflash the thing. Don't.
On my panel just under five minutes passed between the reboot and the line The system is ready to run actions. Don't read that number as a property of the firmware, though - that's simply how long it took me to import the Blueprint and rewrite path: in the automation, in other words all of Step 3. The panel was waiting on me the whole time. Get Step 3 done sooner and your panel will be ready considerably faster.
Here is how it went for me, from second zero:
| Time from boot | Log line | What's happening |
|---|---|---|
| 0 s | firmware starts | - |
| 0.4 s | [W][nextion:110]: Not connected | the first of dozens of identical lines |
| 44 s | [E][nspanel.hw.display:531]: Display is not set. Restarting. | looks like a failure, is actually recovery |
| 57 s | [I][nspanel.hw.uart:077]: Baud scan: starting (target 921600 bps) | hunting for the rate the display speaks at |
| 65 s | [I][nspanel.hw.uart:177]: Baud scan: found active rate 115200 bps | found the old rate |
| 66 s | [I][nextion:116]: Connected | display attached, end of the automatic part |
| 74 s | [I][nspanel.addon.upload_tft:128]: Starting auto-upload count down: 65 sec | the firmware schedules the TFT upload - mine never completed, see Step 4 |
| 204 s | [W][nspanel.versioning:092]: Blueprint version mismatch! | from here the panel is waiting on you, not on itself - I was importing the Blueprint at this point |
| 289 s | [I][nspanel.versioning:207]: Blueprint version: 2026.7.1 | the Blueprint matches - this line arrived because I finished Step 3 |
| 292 s | Receiving settings from Blueprint: 100.0% | settings transferred |
| 295 s | [I][nspanel.base:120]: The system is ready to run actions | done |
That timeline has two halves and it's worth keeping them apart: the first 66 seconds are the firmware's own work and play out the same way no matter what you do. Everything after them is the panel waiting on you.
The first 66 seconds: this happens on its own
Not connected and a serial baud scan. NSPanel Easy talks to the display at 921600 baud, whereas NSPanel_HA_Blueprint used 115200. The display remembers its own rate, so at first the new firmware is talking into the void. The log spells it out - something does come back at 921600, but it's garbage:
Baud scan: rx 228 bytes at 921600 bps but no 0xFF terminator - likely framing garbage
Baud scan: no response at 921600 bps
Baud scan: trying 115200 bps
Baud scan: rx 4 bytes at 115200 bps: 1A FF FF FF
Baud scan: found active rate 115200 bps
Until that resolves, [W][nextion:110]: Not connected appears in the log dozens of times. That is expected.
Display is not set. Restarting. is not the panel crashing. It's flagged E and it reads badly, but it's part of the recovery - the panel doesn't reboot as a whole, it just forces the display to be attached again.
Once it is attached, dozens of Invalid variable name, Invalid component ID/name and Invalid page ID lines follow. At that point the new firmware is talking to the old TFT from the previous project - in the log that shows as TFT: 2026041 against ESPHome: 2026.7.1, plus Old TFT contract v0 — initializing EEPROM. The old TFT simply doesn't know the components the new firmware addresses. They only go away once the new TFT is uploaded (Step 4).
The rest: the panel is waiting on you
Blueprint version mismatch!, then Receiving settings from Blueprint: 0.0% over and over. Nothing is being computed or negotiated here - the panel is asking Home Assistant for its settings, and it will keep asking for as long as your automation isn't pointed at the new Blueprint. So that delay isn't a firmware delay, it's however long Step 3 takes you. The moment you finish it, the rest snaps into place - for me 0% → 66.7% → 100% in three seconds.
The practical upshot: feel free to do Step 3 earlier than the flash, or straight after it. There's no point waiting for the panel to "get there", because you are the thing it's waiting for.
Don't expect a particular duration - it takes exactly as long as Step 3 takes you. Until then those log lines mean nothing and there's nothing to read into them. Rebooting in the middle starts the whole process over, baud scan included. Only the line [I][nspanel.base:120]: The system is ready to run actions means the panel is yours.
And if nothing at all moves in the log for ten minutes and Step 3 is already done, then cut the power to the panel and switch it back on.
Once the panel is up, NSPanel Easy reports more about memory than just free bytes:
Internal:       230512 /  313308 bytes free (73.6%)
Internal min:   226724 bytes (watermark)
Internal blk:   110592 bytes (largest contiguous)
PSRAM:         2076676 / 2097152 bytes free (99.0%)
So alongside free memory you also get the watermark (the lowest it has ever dropped to) and the largest contiguous block. When you're debugging, that's far more useful than a single number - a big free figure means nothing if the memory is fragmented. My panel sits at 73.6% free internal memory after boot, a comfortable margin.
I'm deliberately not putting a comparison against the old firmware here. The two builds ran in different environments (the Home Assistant add-on with ccache versus a remote build without it, and the build directory was deleted and recreated in between), so memory differences can't be attributed to the projects. It would be exactly the mistake I describe in the post-mortem: validate your measurement rig before trusting the data.
How to tell the new firmware actually booted
On the device page in Home Assistant you should see the diagnostic entities Version - ESPHome, Version - Blueprint and Version - TFT. If they aren't there, the NSPanel Easy configuration isn't running on the panel and there's no point continuing - how to track down the cause is in a dedicated section of the main guide.
Step 3: Point your automation at the new Blueprint
This is the most elegant part of the whole migration: you don't rebuild the automation, you change one line in it.
First import the new Blueprint:

Or by hand via Settings → Automations & Scenes → Blueprints → Import Blueprint with this URL:
https://raw.githubusercontent.com/edwardtfn/NSPanel-Easy/refs/tags/latest/nspanel_easy_blueprint.yaml
You'll now have both Blueprints in the list. That's fine, and in fact necessary.
Then switch the automation:
- Settings → Automations & Scenes, open your panel's automation
- From the three-dot menu choose Edit in YAML
- Find the
use_blueprint:section at the top and change only thepath:line
use_blueprint:
  path: edwardtfn/nspanel_easy_blueprint.yaml   # was: Blackymas/nspanel_blueprint.yaml
  input:
    # ... everything else stays EXACTLY as it is
- Save
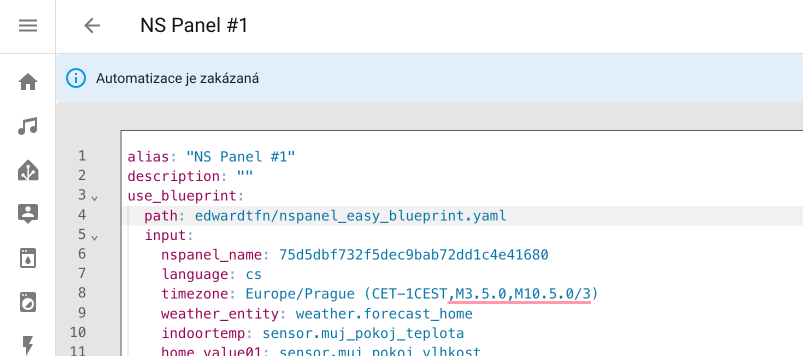
input: sectionThat's where your entire panel configuration lives - entities, buttons, weather, pages. Changing only path: is precisely what carries all of it over unchanged. Re-clicking everything in the visual editor is wasted effort.
Two inputs that end up orphaned in your automation
This is the flip side of that elegant "just change the path: line". Leaving input: alone also carries over inputs the new Blueprint doesn't know at all. Both are visible in my screenshot above:
    language: cs
    timezone: Europe/Prague (CET-1CEST,M3.5.0,M10.5.0/3)
I checked this against nspanel_easy_blueprint.yaml at tag v2026.7.1, and neither of them exists there as an input:
timezone- dropped from the new Blueprint entirely.language- moved to a substitution in the ESPHome YAML (see Step 1). The old input just sits there in the automation and does nothing.
So after switching path:, go through input: and delete those two lines. They break nothing, but they mislead - and language doubly so, because it looks as though the language were still set here. Leave the rest of input: alone, it all still applies.
After saving, switch back to the visual editor and check that your settings are intact and the automation shows the new Blueprint.
pathHome Assistant assigns path based on how the Blueprint was imported, so it may differ from what you expect. To find the real value, create a temporary test automation from the new Blueprint, switch it to Edit in YAML, copy the actual path, use that in your real automation, then delete the test one.
Only delete the old Blueprint once its In use column shows 0. Anything else means an automation is still attached to it.
That zero appears the moment you switch path: - so you can delete it right away, but you don't have to. If you're keeping the door open to going back, leave it in the list. It costs nothing, and the rollback doesn't work without it: your automation would point at a Blueprint that isn't in Home Assistant any more. Delete it once you're confident on the new project.
Step 4: Upload the TFT to the display
The display needs a TFT file matching the new firmware. The firmware can upload it on its own - but check that it actually did, because on my panel it didn't.
I had upload_tft_automatically: true and even the Starting auto-upload count down: 65 sec countdown in the log. The transfer never happened anyway, and I ended up uploading the TFT by hand. You can spot it on the device page from three diagnostic entities:
Baud rate            115200 bps
Version - Blueprint  2026.7.1
Version - ESPHome    2026.7.1
Version - TFT        2026041      <- still the old one
Version - ESPHome and Version - Blueprint have to match (both 2026.7.1 in my case). If Version - TFT still differs on top of that, the automation didn't finish and you have to start the transfer yourself.
Incidentally Baud rate still showed the old 115200 bps, because the display is what holds the rate - and that only changes with the new TFT. It's consistent with the baud scan at first boot described above.
How you know the TFT actually landed
After a successful transfer, that same diagnostic block reads like this:
Baud rate            921600 bps
Version - Blueprint  2026.7.1
Version - ESPHome    2026.7.1
Version - TFT        20.0
Two things changed, and each is a confirmation in its own right.
Baud rate jumps to 921600 bps. This is the more convenient check, because there's nothing to compare against the documentation - as long as it still reads 115200, the transfer hasn't gone through. The display is what holds the rate, and it only switches with the new TFT. It's the same mechanism that causes the baud scan at the start, seen from the other end.
Version - TFT stops being a calendar number. NSPanel Easy versions the TFT separately, independently of the firmware and the Blueprint - which is why you get 20.0 sitting next to two 2026.7.1s. It looks like a bug and it isn't: the project has three independently versioned parts. 2026041, by contrast, was a calendar number from the old project.
Each release carries its own required TFT version - for v2026.7.1 it's min_tft_version: 20.0 in esphome/nspanel_esphome_version.yaml. That number can move with later releases, so the dependable rule isn't "it must say 20.0" but "it must not be a calendar number". If you still see 2026041, you're running the old TFT.
To trigger it manually:
- Open the device page: Settings → Devices & services → ESPHome → your panel
- In the Configuration section set Display model to your actual model
- Press Update TFT display
- Wait - the transfer takes 10-20 minutes
If the transfer never starts or stalls, work through the cause-by-cause procedure in the main guide - most often it's the display's Active Reparse Mode, switched on by the previous firmware.
The Display model selector also offers NSpanel Easy EU (Under construction). It sounds exactly like what you're installing and it's the obvious pick - but it's a work-in-progress new display design, not "the TFT for NSPanel Easy". Hence the "(Under construction)". It would upload something around 3.3 MB against the 13 MB of the finished file, and the panel would be unusable.
For a European panel pick NSpanel EU, even though you're migrating to NSPanel Easy. This is the nastiest trap of the whole process, purely because the name clashes with the project name.
What all five options do, including NSpanel Blank, and what else the selector drives besides the file, is covered in the main guide.
The panel didn't come back after migrating
If the panel stays black, never joins Wi-Fi and even a power cycle doesn't help, this isn't a migration problem but a more general ESP32 one - most often a latched safe mode that not even reflashing clears. The full breakdown with the diagnostics is in a separate article: When the NSPanel won't boot after an update.
How to roll back
If anything doesn't sit right with you, the rollback is as gentle as the migration and you don't open the panel for that either:
- If you've already deleted the old Blueprint, import it again - without it your automation has nothing to point at
- Set
urlback tohttps://github.com/Blackymas/NSPanel_HA_Blueprintandrefback to whatever you had - Strip the
esphome/prefix from the add-ons - Flash the firmware (wirelessly again)
- Change the automation's
path:back toBlackymas/nspanel_blueprint.yaml
If you've already uploaded the new TFT, put the original one back too.
FAQ
Will I lose my settings? No. Substitutions, Wi-Fi credentials and the automation configuration don't change - you carry them over one to one.
Do I need to flash over serial?
No, the whole migration happens over Wi-Fi. Just don't forget ota_password: ${wifi_password}.
Can I go back? Yes, see the previous section.
Do I have to migrate all my panels at once? No. Each panel is independent, so take them one at a time.
My panel speaks English after the migration.
By far the most common question. The language is no longer set in the Blueprint, so your original choice went nowhere. Add language: with your language code to the substitutions, then compile and flash again. You can't fix it in the Blueprint - its Localization section now only covers date, time and unit formats.
My panel shows the time with AM/PM.
The language carried over, the time format didn't. Set it in the Blueprint under Localization - %H:%M for a 24-hour clock. More detail in Step 1.
After migrating, the panel logs dozens of errors and the display doesn't respond.
That's normal, and most often it means Step 3 isn't done yet - the panel is waiting for the new Blueprint. I go through it under the first boot. Don't intervene until the panel says The system is ready to run actions.
After migrating my automation has language and timezone inputs the new Blueprint doesn't know.
Exactly - they come along with the untouched input: section. They break nothing and do nothing: delete them.
Some API actions my automations call have disappeared.
upload_tft and wake_up have to be enabled with a substitution, see Step 1.
Do I need to change my CJK TFT variant? No, the separate CJK variants are gone. Chinese, Japanese and Korean are built into the standard TFT files, so just pick the model matching your hardware.
I removed bluetooth_proxy: before migrating - should I put it back?
I wouldn't. The reasons and the measured numbers are in the main guide. The practical answer is to move the proxy onto a dedicated ESP32 that has all its memory to itself.
ESP32-WROOM
 WiFi
WiFi Bluetooth
Verdict
I expected this migration to be more work than it was: three changed blocks in the YAML, one rewritten line in an automation, then just waiting on the compile and the TFT. Not having to pull the panel off the wall and fiddle with a serial line is, to me, the most valuable thing about the procedure.
There are really only two places it can go wrong - a missing ota_password and the NSpanel Easy EU option in the model selector. Watch those two and it goes through first time.
In the end, though, the most unpleasant part was the one thing that couldn't go wrong: the stretch after the reboot when the log looks like you've just bricked the panel. If I hadn't known the panel was merely waiting for Step 3, I'd have reached in - and started the whole thing over. Looking back, I should have imported the Blueprint before flashing and saved myself three minutes of nerves.
Related Articles
- Sonoff NSPanel in Home Assistant: eWeLink, ESPHome and NSPanel Easy - the complete from-scratch installation guide, hardware and pinout
- When the NSPanel won't boot after an update - anatomy of one outage
- ESPHome - Introduction and Installation
Sources
- Migrating to NSPanel Easy - the project's official migration documentation
- NSPanel Easy documentation - including the language list
- NSPanel Easy on GitHub - source code and releases
- Issue #3277 - Transitioning Development to NSPanel Easy - the announcement that development moved
- NSPanel Easy community Discord - the fastest place to get help
Did this guide help you?
I write these guides in my spare time and keep them up to date. If one saved you time, you can chip in.
One-off, by card or Apple Pay. You can change the amount on the next page.
Would rather not send money? Buy the parts through my product links. The price is the same for you and it helps too.