Raspberry Pi 5 / 4 / 3
Raspberry Pi has played and continues to play a significant role in smart home solutions for households. I also started with a Raspberry Pi 3 years ago. The advantage of this small device is mainly its price and relatively good performance for these needs.
The fifth version has just been released and further pushes the performance and amount of RAM while maintaining the size.
Hardware Options Comparison
Before diving into details about Raspberry Pi, let's look at a comparison of all main options:
| Feature | Raspberry Pi 5 (4GB) | Home Assistant Green | Mini PC (x86-64) |
|---|---|---|---|
| CPU Performance | Quad-core ARM 2.4 GHz | Quad-core ARM 1.8 GHz | Intel/AMD 2.0-3.4 GHz (4-8 cores) |
| RAM | 4-8 GB | 4 GB | 8-32 GB (expandable) |
| Storage | microSD card | 32 GB eMMC | M.2 NVMe SSD 256-1000 GB |
| Complete Price | ~1,800 CZK (without accessories) | ~2,650 CZK | 3,000-8,000 CZK |
| Power Consumption | ~3-8 W | ~1.7-3 W | 6-20 W (depends on model) |
| Installation | Requires installation | Plug & Play | Requires installation |
| Storage Reliability | microSD (lower) | eMMC (high) | SSD (highest) |
| Frigate/cameras | Limited (1-2 cameras) | Limited (1-2 cameras) | Full support, HW acceleration |
| Proxmox/VM | No | No | Yes (multiple services) |
| Expandability | Limited | None | Easy RAM/SSD upgrades |
| Bluetooth/WiFi | Integrated (BT 5.0) | External adapter | Mostly integrated |
| Recommended for | Performance/price, universal | Simplicity, beginners | Cameras, multiple services, advanced |
Raspberry Pi 5 is best if:
- ✅ You want best performance/price
- ✅ You have installation experience with systems
- ✅ You're planning multiple applications on one device
- ✅ You need integrated Bluetooth
- ✅ You're looking for universal use (not just HA)
Home Assistant Green is ideal if:
- ✅ You want the simplest solution without installation
- ✅ You're looking for reliable eMMC storage
- ✅ You prefer lowest power consumption (1.7-3 W)
- ✅ You want to support Home Assistant development
Choose Mini PC if:
- 🎥 You're planning cameras with Frigate (AI detection)
- 🚀 You want multiple services (Proxmox, Plex, AdGuard...)
- 📈 You need room to grow (100+ devices)
- 💪 You're looking for performance at a reasonable price
More information:
- Home Assistant Green - plug & play solution
- Mini PC and generic x86 hardware - for more demanding installations
Pros
- ✅ Wide software and community support: Raspberry Pi is supported by a wide range of operating systems and has strong community support.
- ✅ Flexibility in use: Suitable for a wide range of applications from educational projects to smart home solutions.
- ✅ Availability and affordability: Raspberry Pi models are widely available and offer excellent value for money.
- ✅ Continuous development and innovation: Each new version brings performance and feature improvements.
- ✅ Compact design: Small dimensions, which are almost the same for all models, allow easy placement.
Cons
- ❌ Storage limitations: Most models use a microSD card, which can be slower and less reliable compared to internal storage.
- ❌ Performance limitations: Although newer models are more powerful, they can still be limited for some more demanding applications.
- ❌ Need for additional accessories: For some functions, such as Zigbee, you will need to purchase external extensions.
- Raspberry Pi 5
- Raspberry Pi 4 B
- Raspberry Pi 3B Plus
- Raspberry Pi 3B
Raspberry Pi 5
Brings 2-3× higher processor performance than Raspberry Pi 4 along with a significant increase in graphics performance thanks to the 800MHz VideoCore VII GPU.
Raspberry Pi 5 - 4 GB RAM
 WiFi
WiFi Bluetooth
Specifications
- Processor: Quad-core ARM 2.4 GHz (Cortex-A76)
- RAM: 4-8 GB
- Storage: none internal
- External storage: microSD card - with support for high-speed SDR104 mode
- Ports: USB 2.0 2x + USB 3.0 2x + USB-C (PD) 1x
- Network: 1GBit Ethernet port
- Bluetooth: 5.0
- Zigbee/Thread: ❌ - requires a USB dongle
Raspberry Pi 4 model B
So far the most available and recommended single-board computer model from Raspberry is labeled 4 model B.
These computers are very popular and for several years there have been periods when specific configurations are long-term sold out. If you want, for example, more or very little memory, you will often have to wait.
Raspberry Pi 4 model B - 2 GB RAM
- WiFi
- Bluetooth
Specifications
- Processor: Quad-core ARM 1.5 GHz (Cortex-A72)
- RAM: 2-8 GB
- Storage: none internal
- External storage: microSD card
- Ports: USB 2.0 2x + USB 3.0 2x + USB-C (PD) 1x
- Network: 1GBit Ethernet port
- Bluetooth: 5.0
- Zigbee/Thread: ❌ - requires a USB dongle
Accessories for Raspberry 4 model B
You can imagine the Raspberry itself as a motherboard with a processor and memory. You will usually still need power, a case, and some disk storage.
Raspberry Pi 4 - 5V/3A Black
Raspberry Pi 4 case, Black
SanDisk MicroSDHC 32GB Ultra + SD adapter
Raspberry Pi 3 model B+
Specifications
If you want to save money and don't have big demands, then the 3rd model can be an interesting option. A certain limitation can be the size of the memory, but even with 1GB, HA can be operated.
Raspberry Pi 3 Model B+
- WiFi
- Bluetooth
Specifications
- Processor: Quad-core ARM 1.4 GHz (Cortex-A53)
- RAM: 1 GB
- Storage: none internal, microSD card as external storage
- Ports: USB 2.0 4x
- Network: 1GBit Ethernet port (practically only 300Mbit)
- Bluetooth: 4.2
- Zigbee/Thread: ❌ - requires a USB dongle
Raspberry Pi 3 model B
This model is probably no longer available as new, but it can still be a good and cheap solution for a small installation or so-called for playing.
Raspberry Pi 3 Model B
- WiFi
- Bluetooth
Specifications
- Processor: Quad-core ARM 1.2 GHz
- RAM: 1 GB
- Storage: none internal, microSD card as external storage
- Ports: USB 2.0 4x
- Network: 100Mbit Ethernet port
- Bluetooth: 4.1
- Zigbee/Thread: ❌ - requires a USB dongle
HA Installation
-
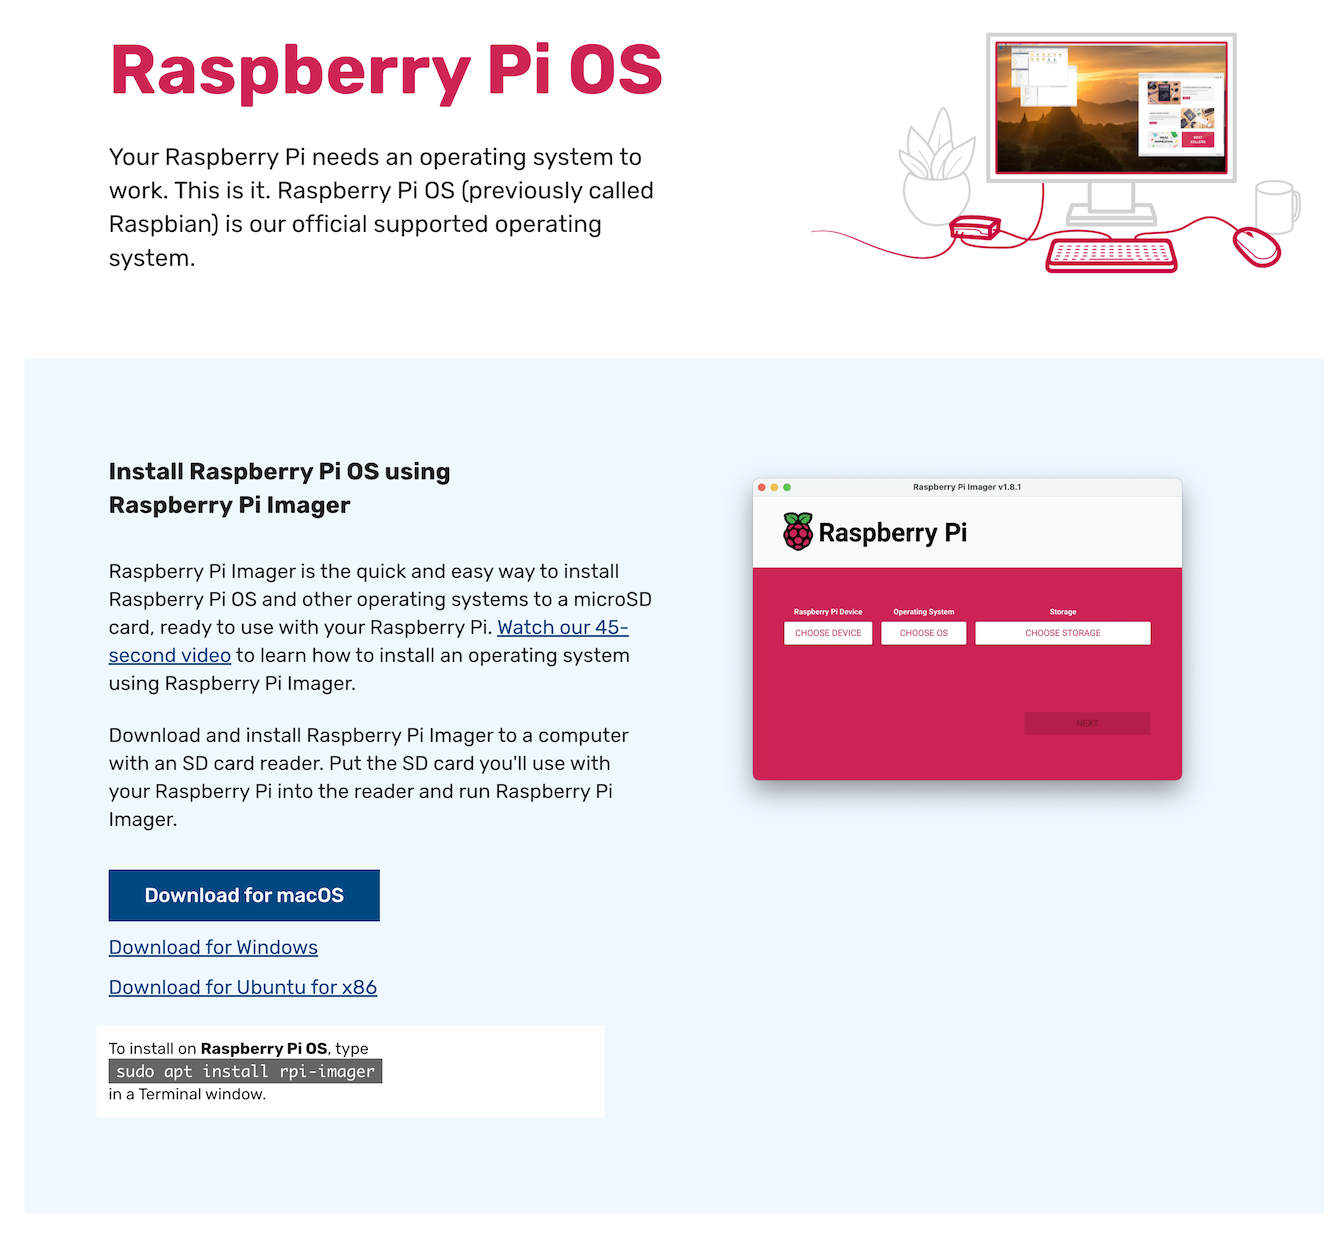
Download and install Raspberry Pi Imager on your computer - more detailed description at https://www.raspberrypi.com/software/.
-
Open the downloaded Raspberry Pi Imager and select the type of your device - choose Raspberry Pi Device - e.g., Raspberry Pi 4
-
Continue by choosing the operating system - Choose OS - where first select
Other specific-purpose OS, thenHome Assistants and home automationand finallyHome Assistant.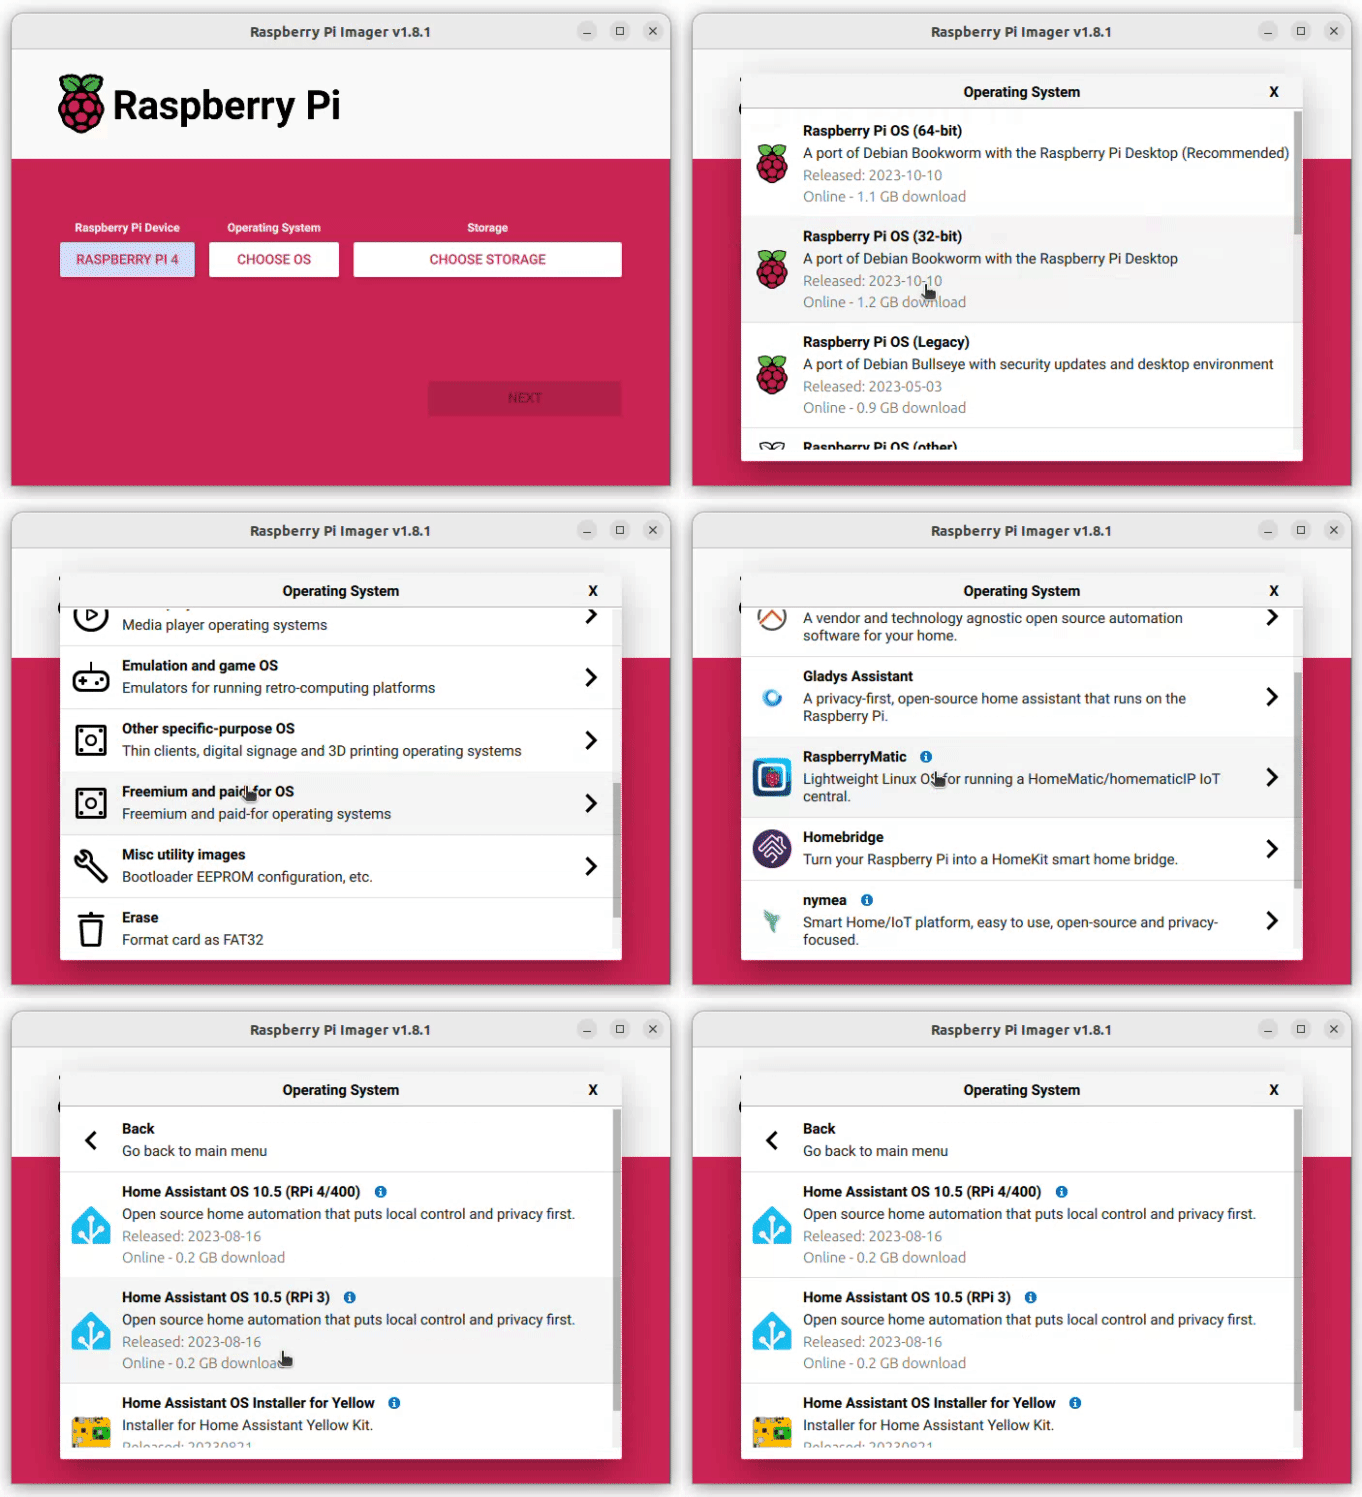
-
Select Home Assistant for your hardware
-
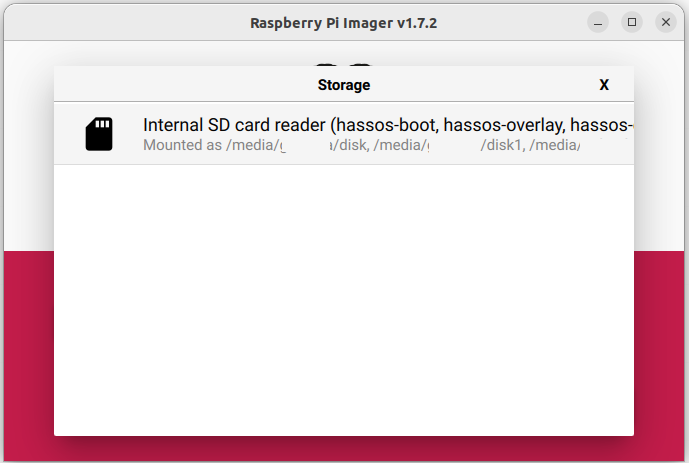
From the main menu, the last third option Choose storage.
-
Insert the micro SD card into your computer - the card will be overwritten and select it from the list.
-
Click Next and wait for the installer to be copied to the SD card.
-
Remove the SD card and insert it into the Raspberry Pi
-
Connect the ethernet and power supply.
-
After a few minutes, you should be able to display the page homeassistant.local in your browser - older installations are at homeassistant.local:8123.
If you still do not see anything in the last step, try to find out the IP address of the Raspberry Pi computer and connect using it, i.e., http://X.X.X.X (replace X.X.X.X with the Raspberry Pi IP address; older installations http://X.X.X.X:8123).
A Raspberry Pi is a fine machine for running Home Assistant, but compiling firmware in ESPHome is pure computation and that's where it shows - a single build here takes minutes, and with a larger collection of devices an update turns into an afternoon. You don't have to buy anything new over it, though: Device Builder can offload the compile over the network to your own computer, while the configuration stays in Home Assistant on the Raspberry Pi. I cover the procedure in ESPHome Compiles for Minutes? Offload the Build to a Faster Machine.
Firmware Updates Directly from Home Assistant
Since Home Assistant 2026.7 (on HAOS 18 and newer), you can update the Raspberry Pi firmware (EEPROM) directly from Home Assistant using a new update entity – no command line needed. On Raspberry Pi 4 this only works when booting from an SD card, and Home Assistant Yellow with the CM4 module is not supported.
Did this guide help you?
I write these guides in my spare time and keep them up to date. If one saved you time, you can chip in.
One-off, by card or Apple Pay. You can change the amount on the next page.
Would rather not send money? Buy the parts through my product links. The price is the same for you and it helps too.