Zigbee2MQTT
Zigbee2MQTT is a universal and open-source solution for running a Zigbee mesh network for a smart home. It can be operated both within Home Assistant and completely standalone.
I assume you are already familiar with the basics of Zigbee and so you should start by choosing a coordinator suitable for Zigbee2MQTT.
Choosing a Coordinator - Recommended Hardware
Zigbee2MQTT supports all three types of coordinator firmware - EZSP, DECONZ, and ZSTACK.
1. Coordinators Based on EmberZNet from Silicon Labs - EZSP
The best choice currently is coordinators based on the EFR32MG21 and EFR32MG24 chips using the EZSP protocol. These chips support the Thread protocol for future Matter devices. These chips are also used by the creators of Home Assistant for their products.
Coordinators with EFR32MG24 chip (latest generation)
The MG24 chip offers higher performance, better range, and improved stability compared to the previous MG21 generation.


Home Assistant Connect ZBT-2
USB adapter - USB Zigbee/Thread coordinator for Home Assistant (ZHA/Thread), model NC-ZBT-9741, SoC Silicon Labs MG24 + ESP32-S3 (USB-UART), support for Zigbee 3.0 and Thread/Matter-over-Thread (in HA), USB-C connection, power supply 50 m frequency 5 V 2400–2483.5 MHz, omnidirectional antenna 4.16 dBi (Ø24 × 164 mm), CE/FCC/RCM certification, FCC-ID 2A8ZE04, device dimensions 83 × 83 × 179 mm, weight 157 g, polycarbonate housing, operation 0–65 °C, 0–65 °C, operation 0–65 °C indoor use, requires Home Assistant 2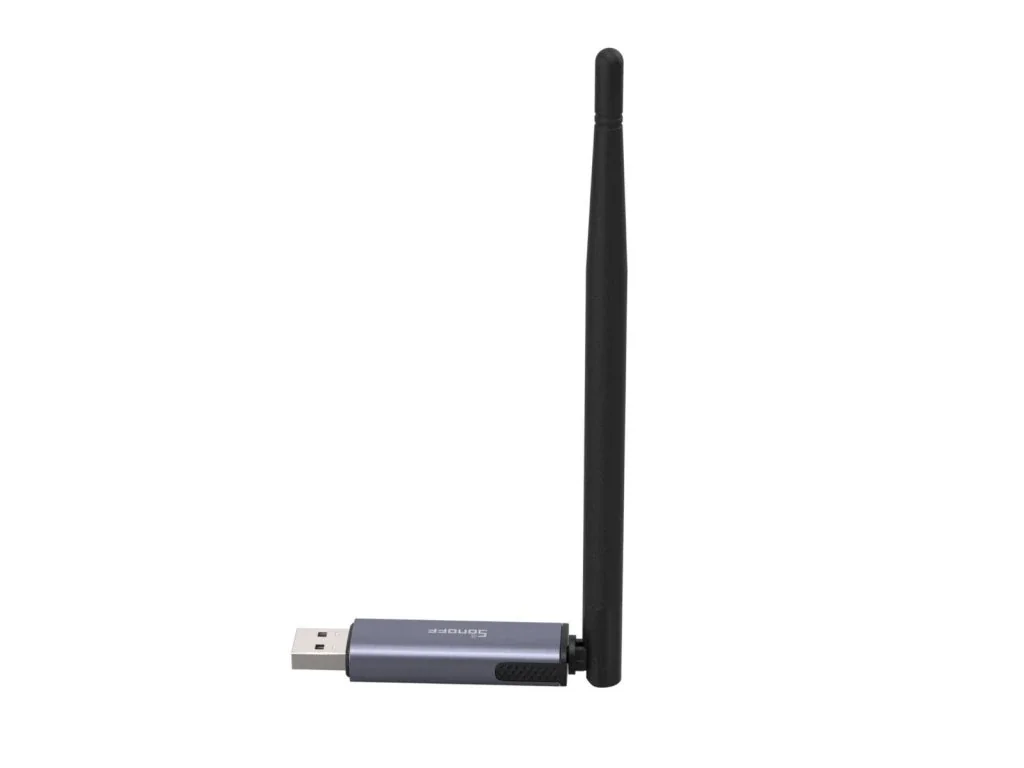
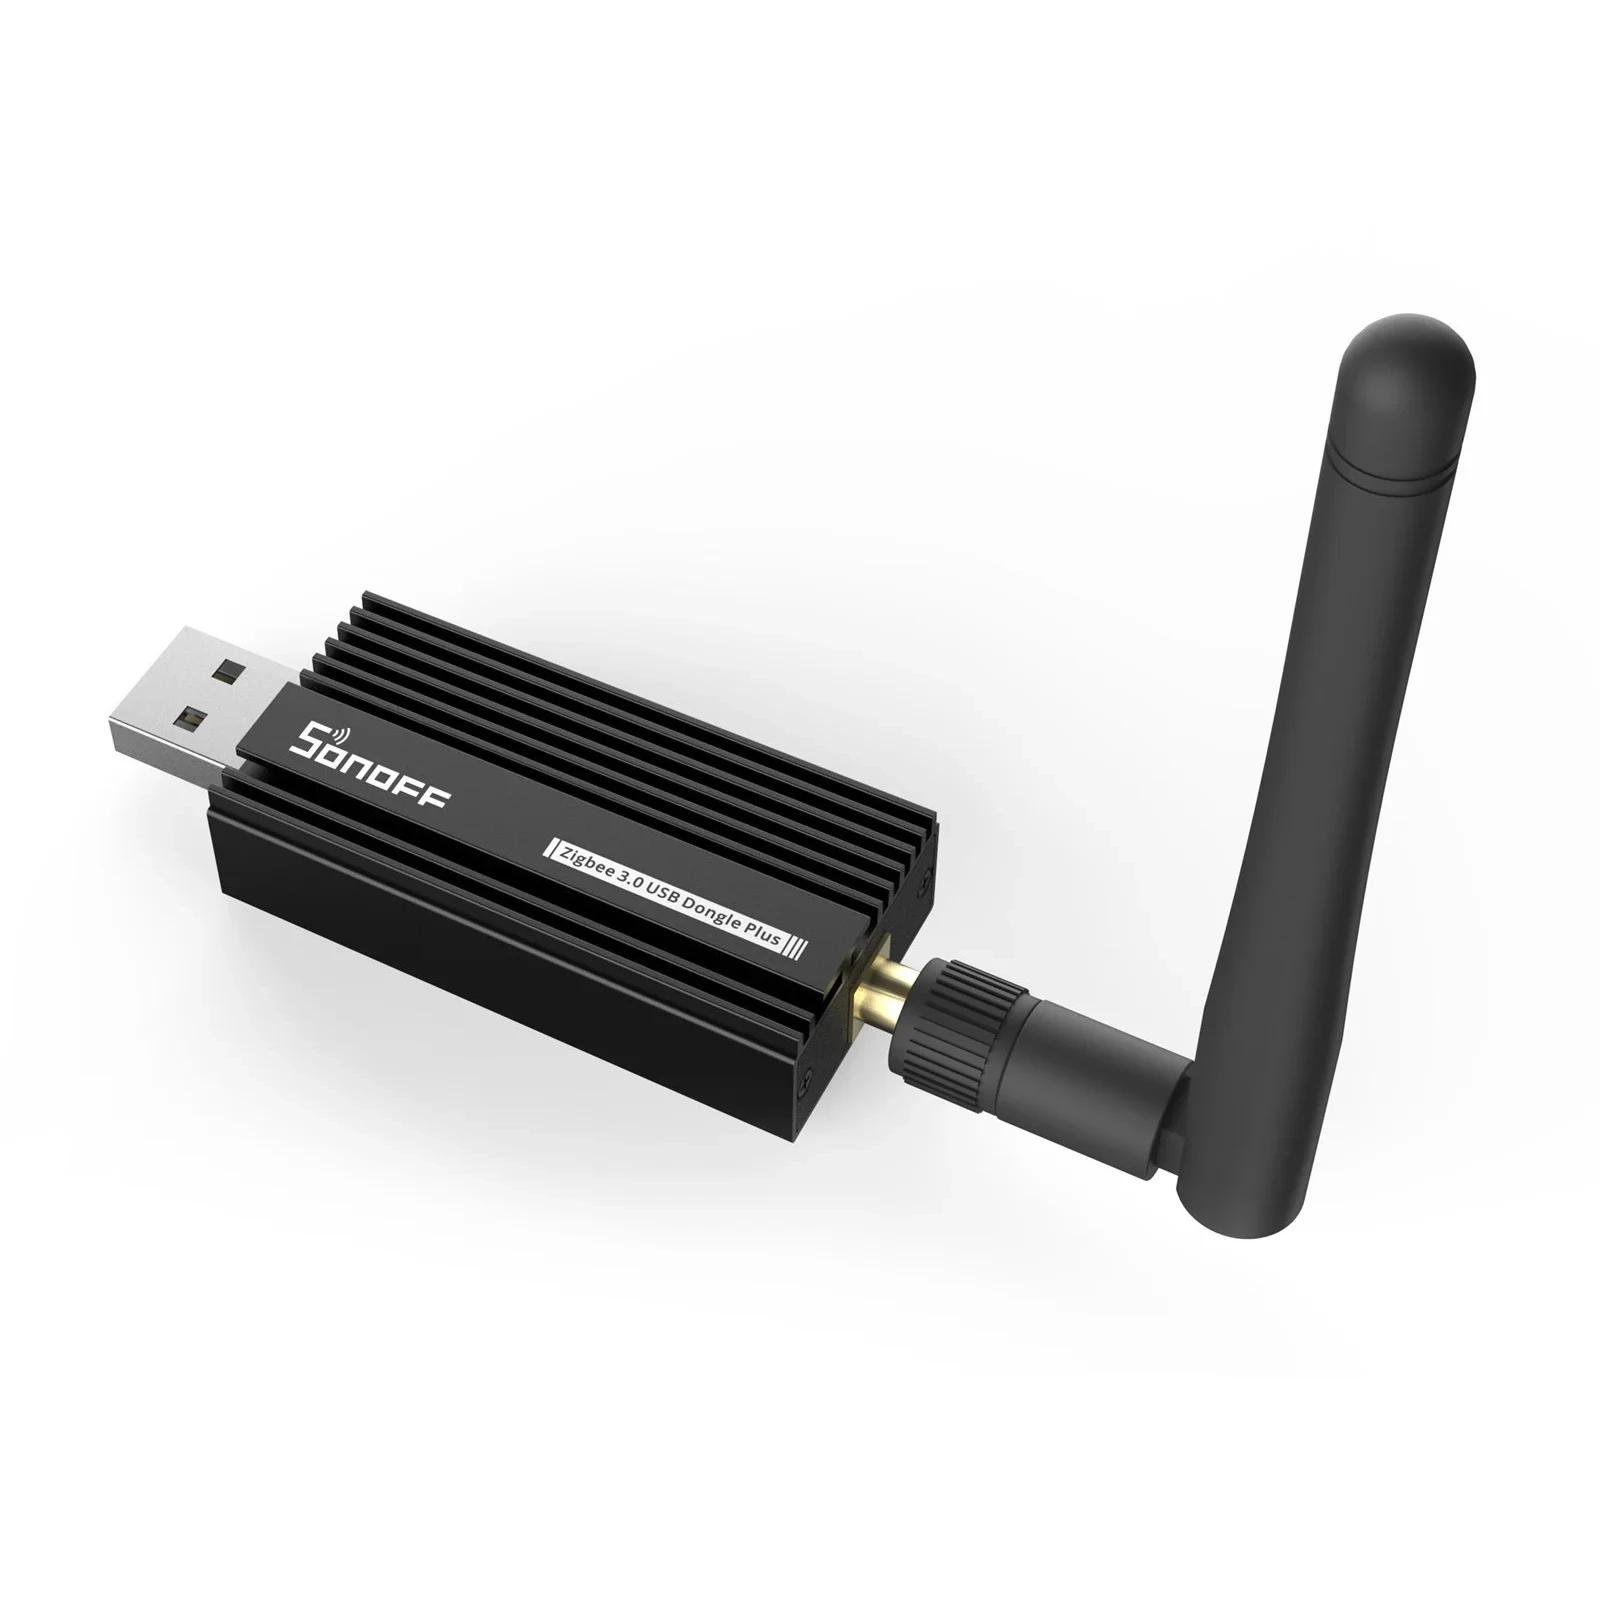
Sonoff Dongle Plus MG24 Zigbee/Thread
Power with the advanced EFR32MG24 chip, offering richer resources and higher performance to deliver faster automation processing and stable sub-device control. Default 3dBi antenna gain, optimized up to 4.5dBi for stronger signal strength and wider coverage.Coordinators with EFR32MG21 chip (previous generation)
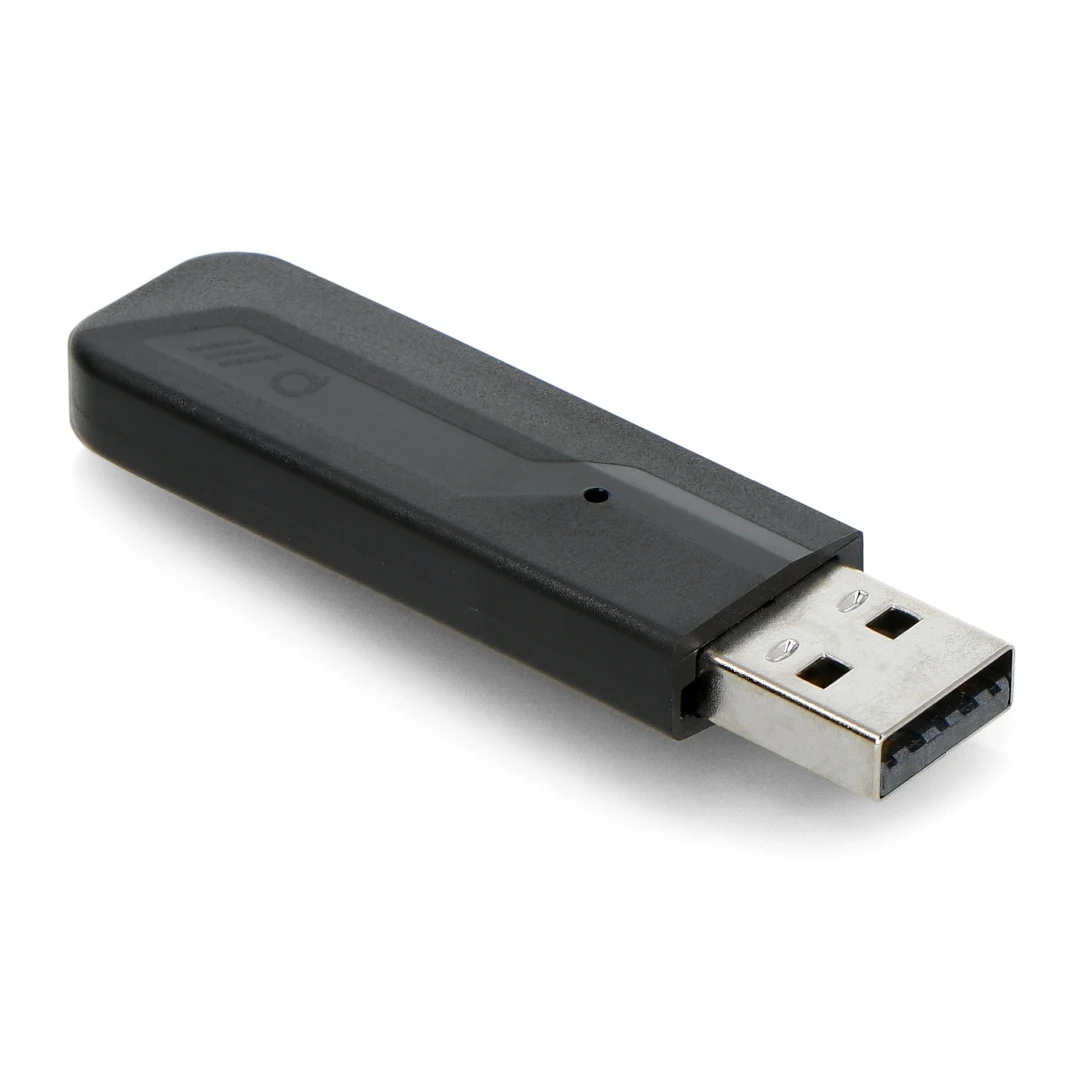
Sonoff Zigbee 3.0 USB Dongle Plus E
USB adapter for connecting Zigbee devices to smart home. With EFR32MG21.I currently use the original ZBT-1 (SkyConnect) with the MG21 chip, which I have set up for Zigbee. The new ZBT-2 with the MG24 chip offers an improved antenna and better range.
In future versions of Zigbee2MQTT, support for the ezsp driver for adapters with EZSP firmware 6.x and < 7.4 will be discontinued. It is therefore advisable to update the firmware now (if needed) and switch the driver to ember. It may seem complicated, but fortunately, it is not that difficult, and you will not need to disassemble anything. How to do it can be found below in the chapter Updating Firmware of EZSP Coordinators
ezsp: Deprecated driver 'ezsp' currently in use, 'ember' will become the officially supported
EmberZNet driver in the next release
2. Coordinators Based on deCONZ from Dresden Elektrik - DECONZ
Phoscon ConBee III
New version of USB dongle using EFR32MG21
Phoscon ConBee II
USB dongle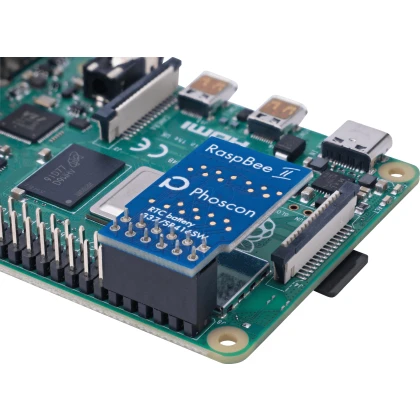
Phoscon RaspBee II
Raspberry PI shieldI have both II generation products from deCONZ, but if you don't have a specific reason, I recommend the ConBee III today.
Since Zigbee2MQTT version 2.5.0, ConBee adapters use an improved deCONZ driver with better performance:
- Faster device pairing - new devices connect more quickly
- Better network stability - fewer connection drops and errors
- Lower latency - faster response from devices
- Bug fixes - resolved issues with some device types
If you're using ConBee/RaspBee adapters, make sure you're running Zigbee2MQTT 2.5.0 or newer to benefit from these improvements.
3. Coordinators from Texas Instruments - ZSTACK
The oldest chips, which I recommend only if you really want to save money. Firmware needs to be flashed, so it is not suitable for regular users.
- CC2652P/R/RB USB dongle with flashed firmware coordinator from Z-stack
- CC1352P/R USB dongle with flashed firmware coordinator from Z-stack
In the past, I used the CC2531, which is now outdated, and its range was not the best. Currently, I do not use any product from this range.
Updating Firmware of EZSP Coordinators
This chapter only applies to EZSP coordinators. If you plan to or have another one, you can skip it and continue with the next Installing the Coordinator.
If you have a Zigbee adapter from Sonoff or ZB-GW04, I recommend checking the firmware version installed in this adapter. The current recommended firmware version is EZSP 8.2.0 (v17), which offers significant improvements over older versions.
The latest EZSP firmware 8.2.0 brings:
- Improved network stability - better handling of large networks with 50+ devices
- Faster device responses - reduced latency in device communication
- Better Thread support - preparation for Matter devices
- Bug fixes - resolves connection issues with certain device types
- Security improvements - updated encryption and authentication
Minimum required version: EZSP 7.4.x for the ember driver, but 8.2.0 is highly recommended for best performance.
CRITICAL: Always create a backup of your coordinator before updating firmware! The update process can potentially fail or corrupt the network configuration.
Zigbee2MQTT has built-in automatic backup (see Coordinator Backup and Restore section), but it's wise to manually download a backup before proceeding with firmware update.
If something goes wrong, you can restore your network configuration without having to re-pair all devices.
EZSP Sonoff Dongle Plus E or Sonoff Dongle Plus MG24
-
Connect the adapter to the computer via USB.
-
Make sure no application or process is using this adapter on the computer.
-
Open a Chrome-based browser and go to darkxst.github.io/silabs-firmware-builder
-
Find your adapter - for Sonoff Dongle Plus E (EFR32MG21), you need to find out the version 1.1 or 1.2 - it is written directly on the adapter board. For Sonoff Dongle Plus MG24, select the appropriate model with the EFR32MG24 chip.
-
Click on Connect, and after a while, a dialog with your version and the latest available should appear. Click on Upgrade.

-
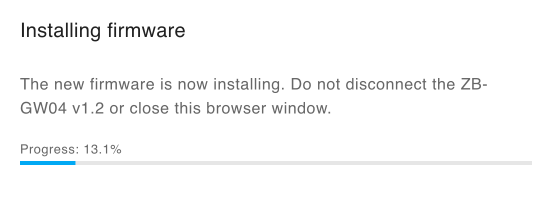
The new firmware will start installing - do not disconnect the adapter or turn off the computer!
-
It's done!
EZSP Home Assistant ZBT-1 (SkyConnect) and ZBT-2
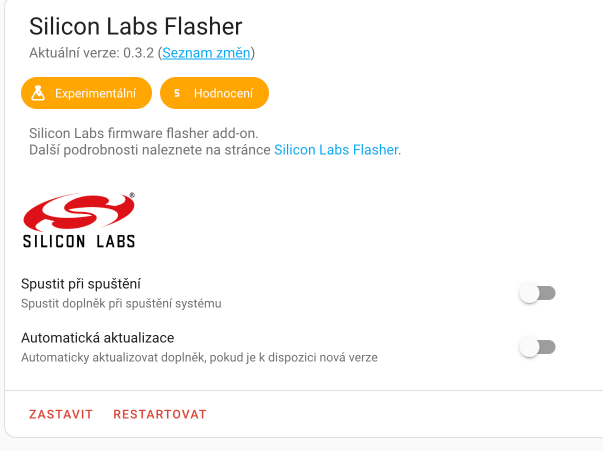
These adapters should already have EZSP 7.x or newer, but for Zigbee2MQTT and ember, you will need at least 7.4. I recommend updating through the Silicon Labs Flasher add-on.
-
Install the Silicon Labs Flasher add-on
-
Disable the ZHA integration or turn off Zigbee2MQTT, depending on what you are using.
-
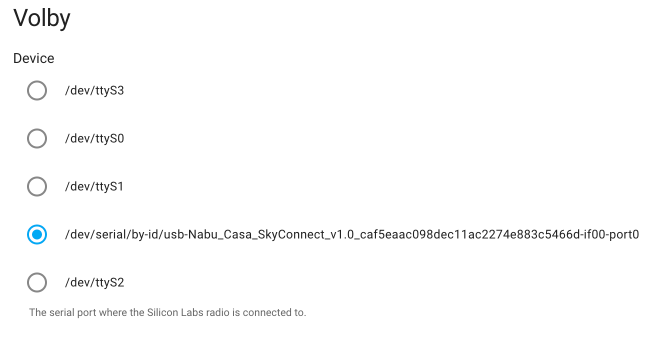
In the add-on settings, select the adapter.
-
Run the add-on and check the logs to see if everything went well. The add-on will turn off automatically.
-
Re-enable ZHA or start Zigbee2MQTT.
-
It's done!
Adapters with EZSP 7.4 and higher use the ember setting in Zigbee2MQTT instead of the original ezsp. Zigbee2MQTT does not allow simultaneous use of Zigbee and Thread, i.e., adapters with multiprotocol EZSP firmware are not supported.
Installing the Coordinator
I will assume you have chosen one of the USB coordinators, and then the installation is quite simple. Just insert the USB coordinator into one of the USB ports.
In the case of Raspberry, I recommend using USB 2.0 ports (the black ones), and it is generally better to connect the coordinator to the computer via a USB extension cable - both to reduce interference.
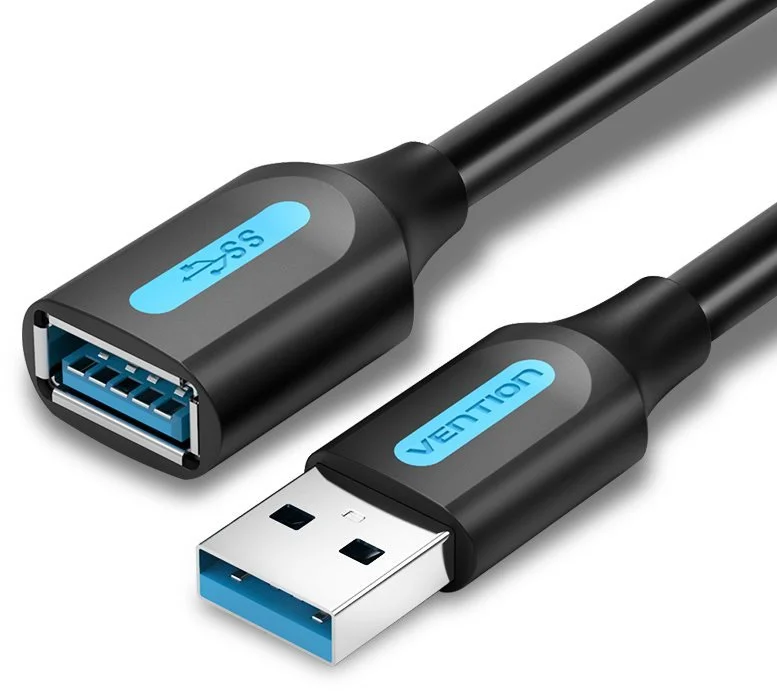
Vention USB 3.0 Male to Female Extension Cable 0.5m Black
USB 3.0 extension cable.Installing Software in Home Assistant
The installation is quite multi-step and can get stuck at several steps. However, if you follow the manual below, you should not be surprised.
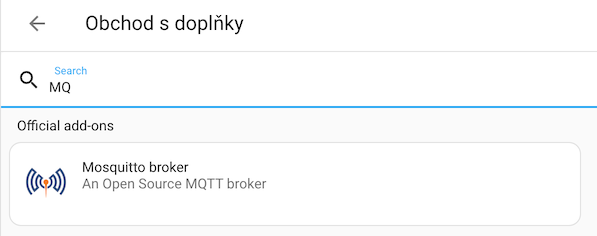
1. Installing the HA MQTT Add-on
First, we will install the broker (message catcher), which is essential for Zigbee2MQTT.
-
In Home Assistant, select Settings -> Add-ons -> Add-on Store and find MQTT in the list and click Install.
-
Switch to the add-on settings and in the logins section, add
usernameandpasswordfor MQTT:- username: smarthome
password: smarthome -
Start the add-on.
2. Installing the HA Zigbee2MQTT Add-on
-
In Home Assistant, select Settings -> Add-ons -> Add-on Store and in the menu in the top right corner with three dots, select Repositories and add:
https://github.com/zigbee2mqtt/hassio-zigbee2mqttZigbee2MQTT RepositoryZigbee2MQTT is not part of the standard add-on repositories in Home Assistant
Or click on:

-
Find Zigbee2MQTT in the list and click Install.

-
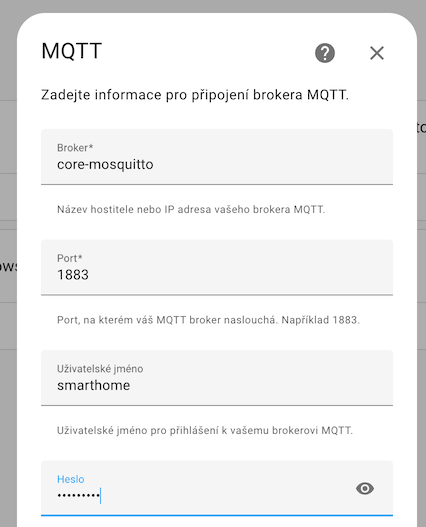
Switch to the add-on settings and in the mqtt section, change the settings to:
server: mqtt://core-mosquitto:1883
user: smarthome
password: smarthome
and also adjust the serial section - enter the ID of your USB dongle in the port.
Example for Phoscon ConBee II
serial:
port: >-
    /dev/serial/by-id/usb-dresden_elektronik_ingenieurtechnik_GmbH_ConBee_II_DEXXXXXX-if00
adapter: deconz
Example for Sonoff Dongle Plus E or Sonoff Dongle Plus MG24 with older firmware EZSP 6.x and less than 7.4
port: /dev/serial/by-id/usb-1a86_USB_Serial-if00-port0
adapter: ezsp
If you still have this firmware, you should definitely upgrade, as support for
ezspwill be removed in the future.Example for Sonoff Dongle Plus E or Sonoff Dongle Plus MG24 with newer firmware EZSP 7.4 and newer
port: /dev/serial/by-id/usb-1a86_USB_Serial-if00-port0
adapter: ember
Settings for Different CoordinatorsThe
portname can be found, for example, using the menu in Home Assistant - Settings -> System -> Hardware -> All hardware and find the ttyU item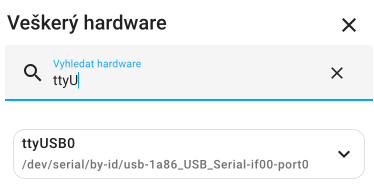
The
adaptersetting varies depending on the chip used (category see above list of coordinators):- EmberZNet from Silicon Labs -
ezspfor firmware EZSP 6.x and < 7.4,emberfor firmware 7.4 >= (ZBT-1, ZBT-2, Sonoff ...) - deCONz -
deconz(ConBee coordinators) - Zstack -
zstack
Zigbee2MQTT 2.0>The
adaptersetting is mandatory in Zigbee2MQTT from version 2.0. If you are using a previous version and did not have this attribute set, you need to add it, otherwise, Zigbee2MQTT will not start.zstackis no longer the default value. - EmberZNet from Silicon Labs -
-
Start the add-on and set it to be in the sidebar.
In the logs, we should see:
Zigbee2MQTT:info 2023-12-30 18:51:54: Zigbee2MQTT started!
3. Integration into Home Assistant
Integration into Home Assistant is done indirectly through the MQTT add-on. If we did everything correctly, MQTT should automatically appear among the discovered integrations, and we just need to click on set up.
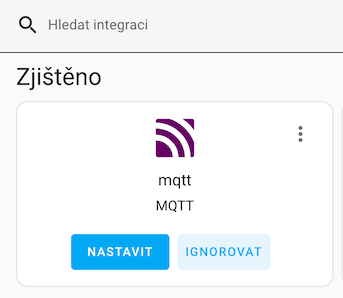
If it doesn't work, we can add MQTT manually and fill in the details:
4. Accessing Zigbee2MQTT Web Interface
Since Zigbee2MQTT version 2.6.2, the default web interface is Windfront - a modern, user-friendly UI that replaces the original basic interface.
Windfront became the default frontend for Zigbee2MQTT in version 2.6.2 (August 2024). If you're using an older version, you'll see the original legacy interface.
The new interface offers:
- Modern design - cleaner and more intuitive UI
- Better performance - faster loading and smoother interactions
- Enhanced features - improved device management, better visualization
- Mobile-friendly - responsive design for smartphones and tablets
To access the web interface:
- In Home Assistant's main left menu, click on Zigbee2MQTT in the sidebar
- The Windfront interface will open, showing all your Zigbee devices and network status
You can also access Zigbee2MQTT directly via web browser at http://homeassistant.local:8099 (or your Home Assistant's IP address). This is useful when you need to manage Zigbee network without logging into Home Assistant.
If you prefer the old interface or have compatibility issues, you can switch back to the legacy frontend in Zigbee2MQTT settings:
frontend:
  type: legacy
However, the legacy frontend will eventually be deprecated, so it's recommended to get familiar with Windfront.
Coordinator Backup and Restore
One of the most critical features of Zigbee2MQTT is the automatic backup of your coordinator's network configuration. Since version 2.0, Zigbee2MQTT automatically backs up your network settings, so if your coordinator fails or you want to migrate to a new one, you don't have to re-pair all your devices.
A coordinator backup contains:
- Network key - the encryption key for your Zigbee network
- PAN ID - unique network identifier
- Extended PAN ID - extended network identifier
- Device list - all paired devices with their addresses
- Network channel - your Zigbee channel setting
Without a backup: If your coordinator fails, you'll have to re-pair every single device manually.
With a backup: Restore the backup to a new coordinator, and all devices will automatically reconnect within a few hours (no re-pairing needed!).
Automatic Backup (Default)
Zigbee2MQTT automatically creates a backup of your coordinator every night by default. You don't need to do anything - it just works!
The backup is stored in the data/coordinator_backup.json file in your Zigbee2MQTT configuration directory.
Automatic backups are created:
- Daily - every night at 3:00 AM local time
- After network changes - when you change network settings (channel, PAN ID, etc.)
- On coordinator firmware update - before applying firmware updates
You can also trigger a manual backup anytime from the Settings -> Tools -> Create backup menu in the Zigbee2MQTT UI.
Manual Backup
To manually create and download a backup:
- Open Zigbee2MQTT in Home Assistant sidebar
- Go to Settings → Tools
- Click Create backup button
- The backup file will be created as
coordinator_backup.json - Download the backup file and store it safely (e.g., cloud storage, external drive)
I recommend storing the backup in multiple locations:
- Home Assistant backups - included automatically in full HA backups
- Cloud storage - Google Drive, Dropbox, iCloud
- External drive - USB stick or external HDD
- Network storage - NAS or network share
The backup file is small (few KB), so there's no excuse not to have multiple copies!
Restoring from Backup
If you need to restore your network (e.g., after coordinator failure or migration to new hardware):
- Install the new coordinator and configure Zigbee2MQTT as usual
- Stop Zigbee2MQTT add-on
- Upload the backup file to the
data/directory ascoordinator_backup.json - Start Zigbee2MQTT - it will automatically detect and restore the backup
If Zigbee2MQTT detects a coordinator_backup.json file when starting with a blank coordinator, it will automatically offer to restore the backup. Just confirm the prompt in the logs or UI.
- Devices won't appear immediately - It can take several hours for battery-powered devices to wake up and reconnect
- Router devices reconnect faster - Mains-powered devices (bulbs, smart plugs) usually reconnect within minutes
- Some devices may need a restart - Older devices might need a power cycle to reconnect
- Network key must match - The new coordinator must use the same network key from the backup
Migrating Between Coordinators
If you need to upgrade to a newer coordinator or replace failed hardware, Zigbee2MQTT offers migration capability without re-pairing all devices. Thanks to automatic backup, you can easily swap coordinators.
When Is Migration Useful?
- ✅ Upgrade to newer generation (e.g., from EFR32MG21 to EFR32MG24)
- ✅ Replace damaged coordinator
- ✅ Switch to coordinator with better antenna (e.g., from regular dongle to ZBT-2)
- ✅ Move to another server (while keeping the same coordinator type)
Supported Migrations
You can only migrate between coordinators of the same type:
- EmberZNet (EZSP/Ember) → EmberZNet ✅
- deCONZ → deCONZ ✅
- ZStack (Texas Instruments) → ZStack ✅
You cannot migrate between different protocols:
- ❌ EmberZNet → Texas Instruments
- ❌ Texas Instruments → deCONZ
- ❌ deCONZ → EmberZNet
If you want to switch to a different coordinator type, you'll need to re-pair all devices.
Migration Procedure
1. Preparation
- Verify you have a backup - automatic backup should be at
/config/zigbee2mqtt/coordinator_backup.json - Download the backup to your computer for safety
- Note your coordinator settings (port, adapter type) from configuration
- Plan the migration for a time when you can address potential issues
Before migration, verify that the coordinator_backup.json file contains data (is not empty) and is current. You can download it via File Editor or SSH.
2. Coordinator Replacement
- Stop the Zigbee2MQTT add-on in Home Assistant
- Disconnect the old coordinator from the USB port
- Connect the new coordinator to the same or different USB port
- Find the new coordinator's port in Settings → System → Hardware → All Hardware
3. Configuration Update
- Open Zigbee2MQTT add-on Settings
- Update
serial.portfor the new coordinator:
serial:
  port: /dev/serial/by-id/usb-NEWCOORDINATOR-if00-port0
  adapter: ember  # Must be the same type as the old one!
- Save changes but don't start the add-on yet
4. Backup Restoration
- Verify that
coordinator_backup.jsonis still in/config/zigbee2mqtt/ - If you removed it or had multiple backups, copy the correct backup back
- Start Zigbee2MQTT add-on
- Monitor the logs - you should see:
Zigbee2MQTT:info  Coordinator backup found, restoring...
Zigbee2MQTT:info  Coordinator restored successfully
Zigbee2MQTT:info  Zigbee2MQTT started!
5. Migration Verification
- Check Zigbee2MQTT dashboard - all devices should be listed
- Test devices - verify they respond to commands
- Check network map - should match original topology
After migration, it can take several hours before all devices fully connect and stabilize. Battery-powered devices will wake up during next communication (button press, state change), which may take even longer.
Troubleshooting After Migration
| Problem | Possible Cause | Solution |
|---|---|---|
| Add-on won't start | Wrong port or adapter | Check serial.port and adapter settings |
| Backup not found | Missing file | Copy coordinator_backup.json to /config/zigbee2mqtt/ |
| Some devices not responding | Haven't connected yet | Wait 24 hours, for router devices try power reset |
| Battery devices offline | Waiting to wake up | Press button or replace battery |
| "Incompatible backup" error | Different coordinator type | Use coordinator of the same type as original |
Based on user experiences with migration (especially to new coordinators with Ember driver):
- Router devices powered from mains typically connect within 15-60 minutes
- Battery devices can take hours to days - depends on wake interval
- If a device doesn't respond after 24 hours, try restarting it (disconnect battery/power for 10 seconds)
- IKEA devices can be problematic - you may need to reset some
- Older devices without standard Zigbee 3.0 certification may require re-pairing
Migrating to ZBT-2
If migrating from ZBT-1 (SkyConnect) to newer ZBT-2, the procedure is the same as above. Both use EmberZNet protocol and the backup is fully compatible.
Benefits of upgrading to ZBT-2:
- 📡 Better antenna - longer range and more stable signal
- 🚀 Newer EFR32MG24 chip - improved efficiency and performance
- 🏠 Original Home Assistant design - better integration with ecosystem
If you plan to have a dedicated Thread coordinator for Matter, you can switch ZBT-1 to Thread and use ZBT-2 for Zigbee. Thanks to migration, you won't lose any paired devices!
I've migrated between different coordinators (ConBee II → SkyConnect → ZBT-2) using this method, and it worked flawlessly. The only "issue" was waiting for all battery-powered sensors to wake up and reconnect - some took up to 24 hours. Mains-powered devices (bulbs, plugs) reconnected within 10-15 minutes.
Pro tip: Do the migration in the evening, so battery devices have a full day to reconnect while you're not using automations heavily.
First-Time Setup - Onboarding Wizard
Since Zigbee2MQTT version 2.2.0, there's a handy onboarding wizard that guides you through the initial setup when you first start Zigbee2MQTT with a new coordinator.
The wizard helps you configure:
- Network settings - Choose Zigbee channel, PAN ID, network key
- Frontend access - Set up web interface password (optional)
- MQTT discovery - Enable Home Assistant auto-discovery
- Permit join - Choose default behavior for pairing new devices
- Coordinator info - Display coordinator firmware version and capabilities
The wizard only appears on first start with a new/blank coordinator. If you skip it, you can always configure these settings manually later.
For most users, I recommend:
- Zigbee channel: 25 or 26 (least interference with WiFi)
- Random network key: Let Zigbee2MQTT generate a secure key automatically
- Frontend password: Set a password if exposing Z2M outside your local network
- Permit join: Disabled by default (enable manually when pairing devices)
- Home Assistant discovery: Enabled (makes devices appear automatically in HA)
You can always change these settings later in Settings → Advanced.
Pairing a New Device
While the installation into Home Assistant for Zigbee2MQTT is a bit more complicated, pairing new devices is the easiest.
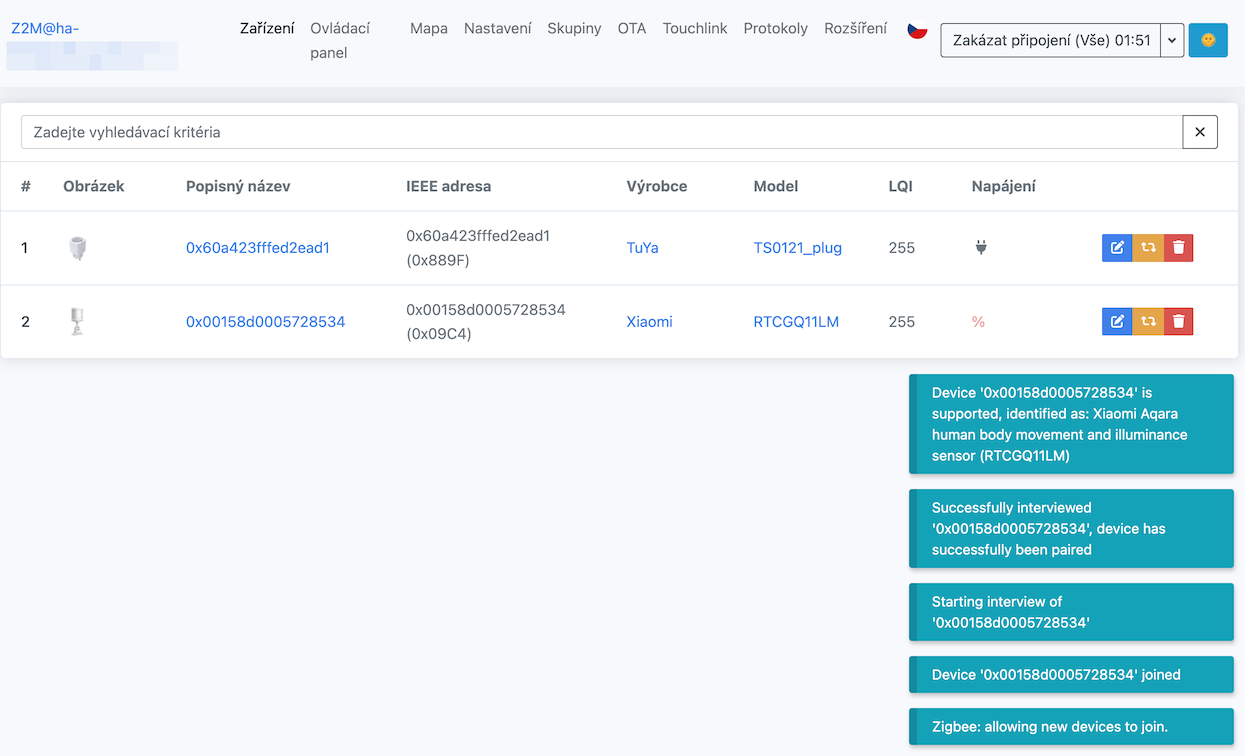
Just select Zigbee2MQTT in the sidebar and click Permit join (All) on the main screen. The new device should appear in the list within a few seconds.
Unfortunately, the default naming system is not very smart and contains a unique device address, which is not very descriptive.
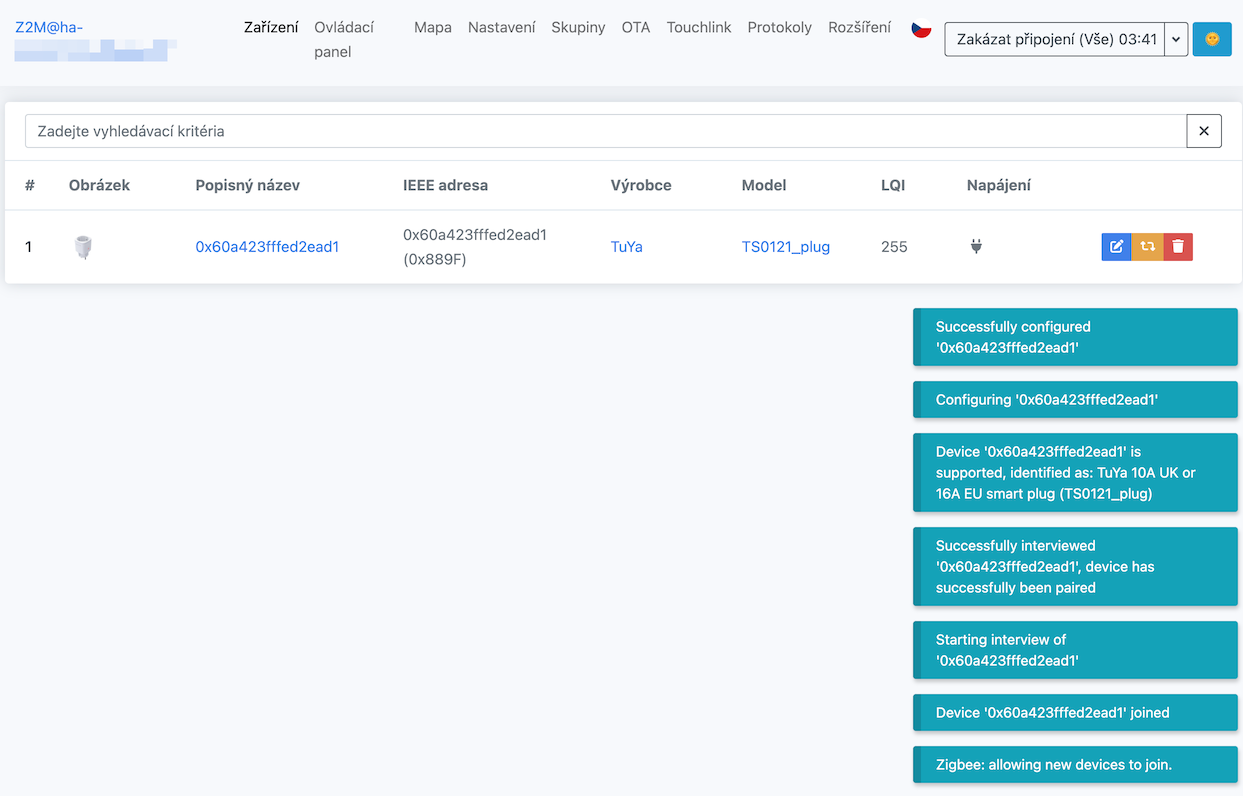
Similarly, pairing a battery-powered Aqara motion sensor from the Chinese manufacturer Xiaomi will work.
Displaying the Zigbee Network Diagram
Once you have more Zigbee devices, it will become more difficult to keep track of them. Here, Zigbee2MQTT lags a bit and seems to be the worst of all solutions.
The Zigbee network diagram needs to be regenerated each time in the Map menu and the Load map option. This can take several seconds to minutes, depending on the size of the network.
- Coordinator - blue star
- Zigbee devices under constant power - blue circle with a device photo
- Battery-powered Zigbee devices - green circle with a device photo

OTA Firmware Updates for Zigbee Devices
Zigbee2MQTT supports OTA (Over-The-Air) firmware updates for your Zigbee devices - no need to remove batteries or physically access the device! This is especially useful for bug fixes, new features, or security patches from manufacturers.
Most modern Zigbee devices from major manufacturers support OTA updates:
- IKEA Trådfri - bulbs, drivers, outlets, remotes
- Philips Hue - bulbs, switches, motion sensors
- Aqara/Xiaomi - sensors, switches, relays
- Tuya - various smart home devices
- Sonoff - switches, sensors
- And many others...
Check your device page in Zigbee2MQTT to see if an OTA update is available (there will be an "Update" button in the device info).
Manual OTA Updates
To update a device manually:
- Open Zigbee2MQTT and navigate to the Devices tab
- Click on the device you want to update
- Scroll to the OTA updates section
- If an update is available, you'll see a Check for updates button
- Click the button - Zigbee2MQTT will download the firmware
- Click Update to start the installation
- Wait - updates can take 5-30 minutes depending on device type
- Keep the device powered - don't remove batteries or unplug during update
- Don't restart Zigbee2MQTT - wait until update completes
- Router devices work better - battery devices may need to be kept awake (press a button periodically)
- Update one device at a time - don't start multiple OTA updates simultaneously
If an update fails, you can usually retry. The device won't brick - it will just stay on the old firmware.
Scheduled OTA Updates (v2.3.0+)
Since version 2.3.0, Zigbee2MQTT supports scheduled OTA updates - you can set a specific time for updates to run automatically. This is great for updating multiple devices without manual intervention.
To enable scheduled updates, add this to your configuration.yaml:
ota:
  # Download index updates every day at 3 AM
  update_check_interval: 1440  # minutes (1440 = 24 hours)
  # Automatically install updates
  disable_automatic_update_check: false
I recommend running OTA updates:
- At night - when you're not using devices actively
- One at a time - especially for battery devices
- After reading changelogs - some updates change device behavior
- Before leaving home - gives time to fix any issues before automation dependencies
Avoid updating:
- During important automations (morning routines, security system active)
- Multiple devices simultaneously (can overload the Zigbee network)
- Battery devices when battery is low (< 20%)
I check for OTA updates monthly and install them gradually:
- Router devices first (plugs, bulbs) - they update faster and are easier to reset if needed
- Non-critical sensors (temperature, humidity) - low risk if something breaks
- Critical devices last (door locks, security sensors) - only update if there's a specific bug fix
I also always read the changelog before updating to avoid surprises!
Enabling Device Availability Polling
By default, Zigbee2MQTT disables device availability polling in the network to reduce traffic on the Zigbee network. However, if you don't have an extremely large network, it can be useful to have this feature enabled. For example, I use it to receive notifications about device outages directly from Home Assistant automation.
We can enable the feature directly from the Zigbee2MQTT UI. Go to Settings -> Availability, check the Enabled option, and confirm with the Submit button.
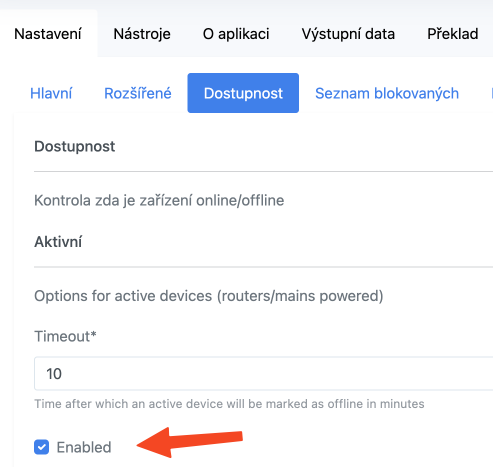
Or we can make the change directly in the configuration.yaml file.
availability:
  enabled: true
Advanced Availability Settings
You can customize the availability polling behavior with additional settings:
availability:
  enabled: true
  active:
    timeout: 10  # Time in minutes after which a device is marked as unavailable
  passive:
    timeout: 1500  # For battery devices - time in minutes (25 hours default)
By default, Zigbee2MQTT checks device availability:
- Every 10 minutes for mains-powered devices (routers)
- Every 25 hours for battery-powered devices (end devices)
You can customize these intervals, but be careful:
- Too frequent = more Zigbee traffic, battery drain for battery devices
- Too infrequent = delayed notifications about device failures
For most users, the default values work perfectly.
Blacklisting Devices from Availability Checks
Some devices don't handle availability checks well and may report false "unavailable" status. You can exclude specific devices from availability polling:
availability:
  enabled: true
  active:
    timeout: 10
  passive:
    timeout: 1500
  # Exclude devices by friendly name or IEEE address
  blacklist:
    - '0x00158d00045f2eaa'  # Aqara temperature sensor
    - 'Living Room Motion'   # Friendly name
Consider blacklisting:
- Devices that sleep deeply - some battery sensors go into deep sleep and don't respond to polls
- Devices showing false unavailable - if a device works fine but constantly shows as unavailable
- Very old Zigbee devices - older devices may not support availability checks properly
However, most modern devices work fine with the default settings.
Temporarily Disabling a Device in the Zigbee Network
If a device in the Zigbee network becomes unavailable, for example, if you use it only seasonally, and you have the device availability polling feature enabled, it will have the undesirable effect of constantly displaying an error message.
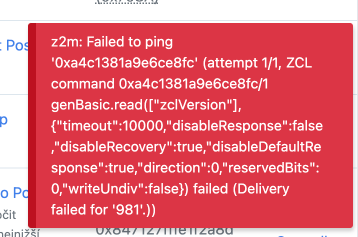
We can get rid of this problem by disabling the device in the Zigbee network. In the specific device settings, check the Disabled option.
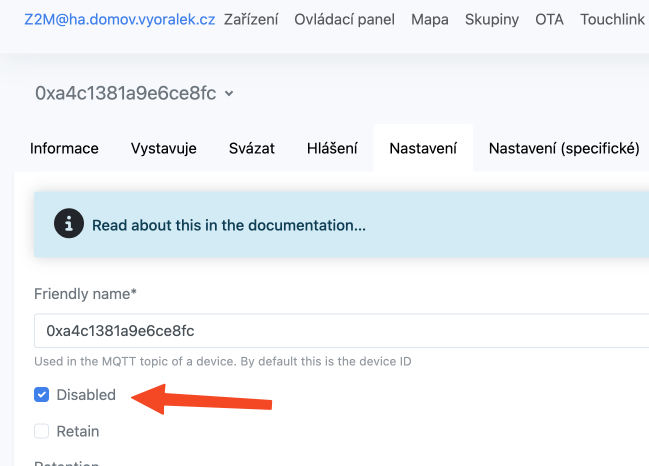
The device will be excluded from all status queries (including the network map), and we will get rid of the above error. In the device list, we can recognize the disabled device by the strikethrough on the image and the Disabled status.

If you prefer to write directly to the configuration.yaml file, you can do so in the devices section by adding the disabled: true option.
devices:
  ...
  '0xa4c1381a9e6ce8fc':
    friendly_name: '0xa4c1381a9e6ce8fc'
    disabled: true
  ...
Network Health Monitoring
Zigbee2MQTT provides comprehensive network health monitoring to help you identify and fix connectivity issues. Monitoring your network health is crucial for maintaining a stable smart home.
A healthy Zigbee network means:
- Faster device responses - commands execute immediately
- Better reliability - fewer "device unavailable" errors
- Longer battery life - devices don't waste power retrying failed connections
- Easier troubleshooting - quickly identify problematic devices or areas
Regular health checks can prevent small issues from becoming big problems!
Accessing Network Health Info
To view your network health:
- Open Zigbee2MQTT in Home Assistant
- Go to the Map tab - this shows your network topology
- Look for devices with:
- Weak connections - shown with thin/dashed lines
- No route to coordinator - disconnected from the mesh
- Low LQI (Link Quality Indicator) - poor signal quality
You can also check individual device health by clicking on a device and viewing its LQI and Route information.
LQI (Link Quality Indicator) ranges from 0-255:
- 255-200 - Excellent connection (green)
- 199-150 - Good connection (yellow)
- 149-100 - Weak connection (orange)
- < 100 - Very poor connection (red) - needs attention!
If a device consistently shows LQI < 100, consider adding a router device nearby or relocating the device/coordinator.
Common Network Issues and Solutions
| Issue | Symptoms | Solution |
|---|---|---|
| Weak signal (low LQI) | Slow responses, frequent unavailability | Add router devices between the device and coordinator, or relocate devices closer |
| No route to coordinator | Device completely unavailable | Check if router devices in the path are powered on, re-pair the device if needed |
| Coordinator overload | All devices slow to respond | Reduce network traffic (fewer availability polls), add more router devices to distribute load |
| WiFi interference | Random dropouts, unstable connections | Change Zigbee channel to avoid WiFi overlap (see Changing Zigbee Channel) |
| Too many hops | Delayed responses | Add router devices to create more direct paths, optimize router placement |
| Dying battery | Increasing response times | Replace battery - low battery = weaker signal |
Even if a device "works most of the time" with a weak connection, it's worth fixing because:
- Battery devices drain faster - more retries = more power consumption
- Automations become unreliable - missed triggers cause frustration
- Problems worsen over time - weak connections tend to get weaker
- Other devices affected - network congestion impacts all devices
A little preventive maintenance saves a lot of troubleshooting later!
I check my Zigbee network health:
- Monthly - quick check of the network map for red/orange connections
- After adding devices - ensure new devices have good connectivity
- When issues appear - first place to look when automations fail
- Seasonally - adjust router placement if furniture/obstacles change
I also keep a few spare smart plugs (routers) handy to fill connectivity gaps when needed.
Changing the Zigbee Channel
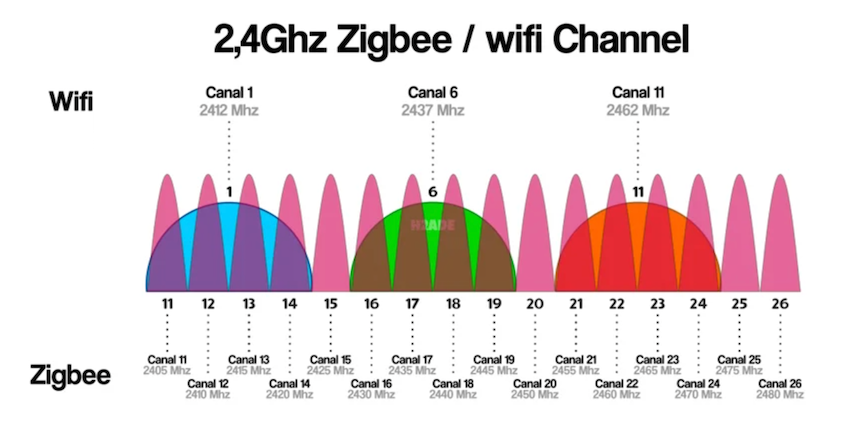
Properly setting the Zigbee network channel is crucial to minimize interference from WiFi networks, which operate on the same frequency band.
Channel overlap can lead to a significant reduction in the performance of both networks and problems with poor response from individual devices in the smart home. I recommend finding out which channel has the most WiFi networks and choosing the one that is least occupied.
WiFi channels are much wider, so we only have three in the 2.4GHz band, while there are 16 Zigbee channels. I recommend choosing channels at the interface of WiFi channels, i.e., Zigbee channels 11, 15, 20, or 25.
Mapping WiFi vs. Zigbee Channels
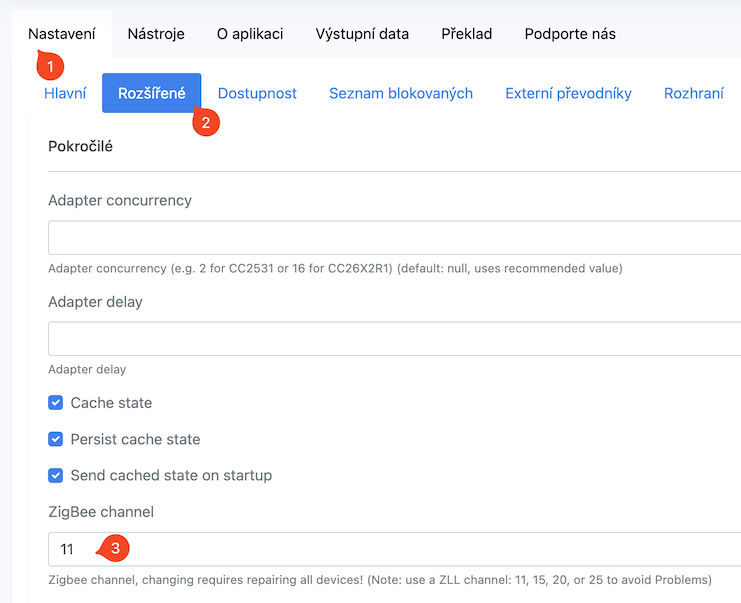
Setting in Home Assistant
-
In the main left menu of Home Assistant, click on Zigbee2MQTT and select Settings
-
Click on the Advanced item
-
Manually enter the Zigbee channel.
Practical Tips for Channel Selection
Before changing your Zigbee channel, first analyze which WiFi channels are most congested in your area. You can use:
- Android: WiFi Analyzer app
- iOS: Airport Utility app (enable WiFi scanner in settings)
- Windows: Command
netsh wlan show networks mode=bssidin command prompt - Linux/Mac: Command
sudo iwlist wlan0 scanor WiFi Explorer app
After analyzing, choose a Zigbee channel that's as far as possible from the strongest WiFi networks.
When to Change Your Zigbee Channel?
Consider changing your channel in these situations:
- Added a new WiFi network or access point - New WiFi can interfere with a previously quiet Zigbee channel
- Devices stopped responding - If Zigbee devices have communication issues, it might be interference
- You moved to a new location - New environment = new neighbor WiFi networks
- Router automatically changes WiFi channels - Some routers have automatic channel optimization
- Added many new Zigbee devices - Larger network = more sensitive to interference
Remember that after changing the Zigbee channel, all devices must automatically reconnect. Most modern devices will reconnect on their own within a few hours, but some older devices may need to be restarted (power cycle) or, in extreme cases, re-paired.
Recommendation: Change the channel when you have time to check devices and restart them if needed.
Recommended WiFi and Zigbee Channel Combinations
The following table shows optimal combinations to minimize interference:
| WiFi Channel | Recommended Zigbee Channels | Avoid Zigbee Channels |
|---|---|---|
| 1 | 25, 26 | 11-19 |
| 6 | 11, 25, 26 | 15-22 |
| 11 | 11, 15, 26 | 20-26 |
You'll get the best results when:
- WiFi uses channel 1 or 11 (these overlap Zigbee spectrum the least)
- Zigbee uses channel 25 or 26 (most resistant to WiFi interference)
- At least 3 meters distance between WiFi AP and Zigbee coordinator
If you're using WiFi on channel 6, you have it harder - it overlaps the entire Zigbee spectrum. Try switching WiFi to channel 1 or 11 if your environment allows.