Terminal & SSH Add-on
Terminal & SSH is one of the most useful add-ons for Home Assistant, which allows you to access the command line directly from the web interface and also remote connection via SSH protocol. Thanks to this addon, you can perform advanced system management, edit configuration files, install packages, debug problems and much more - all without the need for physical access to the device.
This addon combines two tools - a web terminal accessible directly in the Home Assistant interface and a full-featured SSH server for remote connection from any SSH client.
What can the addon be used for
The addon has several areas of possible use:
Configuration file management
- Editing
configuration.yamland other configuration files using editors like Nano or Vim - Quick syntax check using Home Assistant CLI command
ha core check - Viewing and editing automation files, scripts and templates
Debugging and diagnostics
- Monitoring logs in real time using
ha core logs -f - Checking the status of services and add-ons
- Testing network connections using tools like
ping,nmap,curl - Access to the database (if you use MariaDB or PostgreSQL addon)
Advanced system management
- Installing additional packages needed for your projects
- Managing Docker containers (if access to Docker socket is enabled)
- Setting up custom system modifications and scripts
- Access to hardware (audio devices, UART/serial ports, GPIO pins)
Home Assistant CLI
The addon contains pre-installed Home Assistant CLI (ha) - a powerful tool for managing Home Assistant directly from the command line.
# Examples of using HA CLI
ha core info              # Information about Home Assistant Core
ha core restart           # Restart Home Assistant
ha supervisor update      # Update Supervisor
ha addons list            # List of all addons
ha core check             # Configuration check
Installation
This addon is part of the official Home Assistant add-ons, so its installation is very simple.
Terminal & SSH addon is only visible to users with enabled advanced mode. If you don't see the addon, go to your profile (by clicking on your name in the lower left corner) and enable Advanced mode.

Installation steps
-
In Home Assistant, go to Settings → Add-ons → Add-on Store
-
Find the Terminal & SSH addon (you can use search)
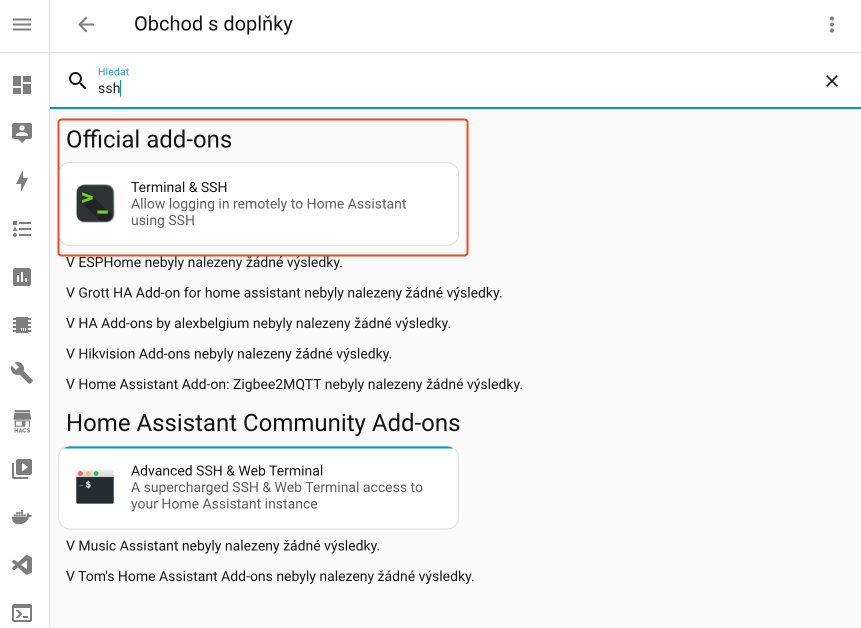
-
Click on the addon and then on the INSTALL button
-
Wait for the installation to complete
After successful installation, a page with information about the addon will be displayed.
Configuration
Before the first start, it is necessary to perform basic configuration of the addon. First of all, you need to set up the login method and possibly other options according to your needs.
Login setup
In the addon configuration in the Options section, you must choose the authentication method. You have two options:
1. SSH keys (recommended)
The most secure way to log in is using SSH keys. In the Authorized keys field, you insert one or more public SSH keys.
Example of public key:
ssh-ed25519 AAAAC3NzaC1lZDI1NTE5AAAAIAbCdEfGhIjKlMnOpQrStUvWxYz... user@laptop
If you don't have an SSH key yet, you can generate one:
On macOS/Linux:
ssh-keygen -t ed25519 -C "[email protected]"
On Windows (PowerShell):
ssh-keygen -t ed25519 -C "[email protected]"
The public key can be found in the file ~/.ssh/id_ed25519.pub (or %USERPROFILE%\.ssh\id_ed25519.pub on Windows).
2. Password (not recommended)
A less secure method is using a password. Turn off the Password option and enter a strong password.
Using a password is significantly less secure than SSH keys. The password can be stolen, guessed or intercepted. Use this method only if you cannot use SSH keys.
Additional packages (optional)
If you need to use specific tools in the terminal that are not installed by default, you can add them to the Packages section.
Examples of useful packages:
python3- Python 3 interpreterpy3-pip- Python package managergit- version control systemhtop- advanced process managertmux- terminal multiplexer
Network settings (for remote SSH connection)
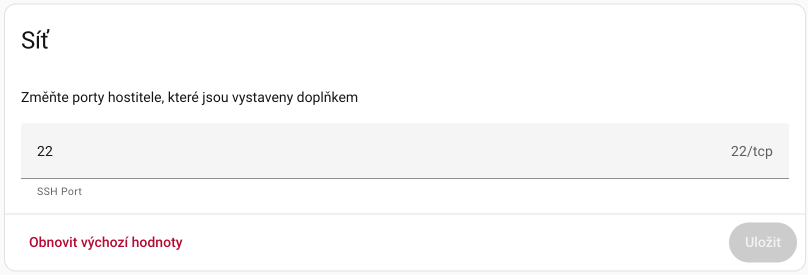
If you want to allow SSH connection from the local network or from another computer, you must set a network port.
Scroll down to the Network section and set:
- Port number - port
22is used by default, but you can also use another, for example2222or22222 - This port will be mapped from the host system to the addon
If Home Assistant is running in a virtual machine (for example on Proxmox), you may need to first enable the network port for SSH access. By default, remote SSH access is disabled for security reasons.
You can disable SSH access at any time by deleting the port number from the Network settings, saving the configuration and restarting the addon.
If you already have an SSH server running on port 22 on the host system, use a different port, for example 2222 or 22222. When connecting, you must then specify this port using the -p parameter.
Starting the addon
After completing the configuration:
- Click the SAVE button to save the configuration
- Go to the Info tab
- Click the START button
- Check the Log tab that everything went well
[17:43:49] INFO: Starting Web Terminal...
[2025/10/12 17:43:49:2492] N: ttyd 1.7.7-40e79c7 (libwebsockets 4.4.0-v4.4.1)
[2025/10/12 17:43:49:2493] N: tty configuration:
[2025/10/12 17:43:49:2493] N:   start command: tmux -u new -A -s homeassistant bash -l
[2025/10/12 17:43:49:2493] N:   close signal: SIGHUP (1)
[2025/10/12 17:43:49:2493] N:   terminal type: xterm-256color
[2025/10/12 17:43:49:2522] N:    /usr/lib/libwebsockets-evlib_uv.so
[2025/10/12 17:43:49:2526] N: lws_create_context: LWS: 4.4.0-v4.4.1, NET CLI SRV H1 H2 WS SS-JSON-POL ConMon IPV6-off
[2025/10/12 17:43:49:2530] N: elops_init_pt_uv:  Using foreign event loop...
[2025/10/12 17:43:49:2541] N: [vh|2|default||8099]: lws_socket_bind: source ads 0.0.0.0
[2025/10/12 17:43:49:2541] N:  Listening on port: 8099
s6-rc: info: service legacy-services successfully started
[2025/10/12 17:43:49:2763] N: [wsicli|0|GET/h1/connectivitycheck.android.com/([wsiSScli|0|ca]: lws_sort_dns: 2a00:1450:4014:80b::200e has no route out
[2025/10/12 17:43:49:3130] N: lws_system_cpd_set: setting CPD result OK
[17:43:49] INFO: Starting the SSH daemon...
Server listening on 0.0.0.0 port 22.
Server listening on :: port 22.
Using the web terminal
The web terminal is the easiest way to access the Home Assistant command line without having to install any additional software.
Access to web terminal
There are two ways to open the web terminal:
1. Via addon info page:
- Go to Settings → Add-ons → Terminal & SSH
- Click the Open Web UI button
2. Via sidebar (recommended):
- On the addon info page, enable Show in sidebar
- A terminal icon will appear in the left menu for quick access
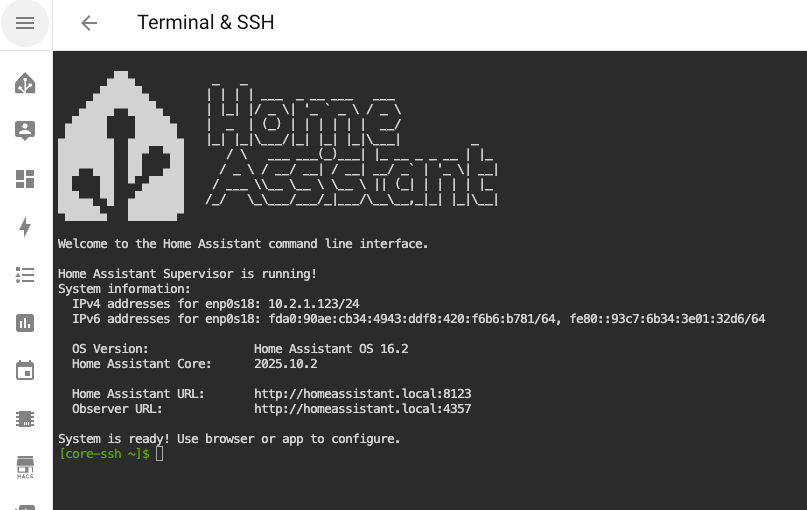
Working with web terminal
When you open the web terminal, you will see a full-featured command line running in Bash shell.
Copying and pasting text
The web terminal has a specific way of copying and pasting:
Copying text:
- Hold down the SHIFT key
- Select the text you want to copy with the mouse
- After releasing the left mouse button, the text will be copied to the clipboard
Pasting text:
- Press SHIFT + INSERT
Basic orientation
After logging in, you are in the home directory /root, from where you have access to important paths via symbolic links:
/config(alias/homeassistant) - directory with Home Assistant configuration/ssl- certificates for HTTPS/addons- local addons/addon_configs- addon configurations/backup- system backups/share- shared directory between addons/media- media files
# Display all available directories
ls -la ~

# Display the contents of the configuration directory
ls -la /config

# Edit the main configuration file
nano /config/configuration.yaml

# Check configuration
ha core check
Pre-installed tools
The addon contains a basic set of tools:
- Editors: Nano, Vim
- Version control: Git
- MQTT: Mosquitto client
- Audio: PulseAudio utils, ALSA plugins
- Bluetooth: BlueZ tools
- Other: tmux (terminal multiplexer), pwgen (password generator)
If you need additional tools like curl, wget, nmap, htop, jq or others, you can easily install them by adding them to the Packages section in the addon configuration.
# MQTT testing
mosquitto_sub -h localhost -t '#'

# Git operations
cd /config
git status

# Using tmux for persistent sessions
tmux new -s my-work
SSH connection from local computer
The web terminal is great for quick tasks, but for more advanced work or if you want to use your own tools and editors, it's better to use SSH connection from your local computer.
Finding IP address
If you don't know the IP address of your Home Assistant, you can find it in Settings → System → Network.
Or you can use hostname: homeassistant.local (if mDNS works in your network).
Connection from different systems
- macOS / Linux
- Windows PowerShell
- Windows PuTTY
Open Terminal and use the ssh command:
With default port 22:
ssh [email protected]
# or
ssh [email protected]
With custom port (e.g. 2222):
ssh -p 2222 [email protected]
# or
ssh -p 2222 [email protected]
With SSH key specification:
ssh -i ~/.ssh/id_ed25519 [email protected]
Windows 10/11 includes a built-in SSH client:
With default port 22:
ssh [email protected]
# or
ssh [email protected]
With custom port:
ssh -p 2222 [email protected]
Download PuTTY and:
- Launch PuTTY
- In the Host Name field, enter:
homeassistant.localor IP address - In the Port field, enter:
22(or your custom port) - In Connection type select SSH
- (Optional) In Connection → SSH → Auth set the path to the private key
- Click Open
Practical examples of using SSH
Quick configuration editing from local editor
If you have SSH access set up, you can mount the remote /config directory:
On macOS/Linux with SSHFS:
# Install SSHFS (macOS)
brew install macfuse
brew install gromgit/fuse/sshfs-mac

# Mount
mkdir ~/ha-config
sshfs [email protected]:/config ~/ha-config

# Now you can edit files locally
code ~/ha-config  # VS Code
nano ~/ha-config/configuration.yaml

# Unmount
umount ~/ha-config
Port forwarding for database access
If you have MariaDB addon and want to connect to it from a local database client:
ssh -L 3306:localhost:3306 [email protected]
Now you can connect your database client to localhost:3306.
Remote log monitoring
# Connect and monitor logs in real time
ssh [email protected] "ha core logs -f"
Task automation using SSH
You can create scripts on your local computer that perform tasks remotely:
#!/bin/bash
# backup-ha.sh - Script for creating HA backup

ssh [email protected] << 'EOF'
  ha backups new --name "automated-backup-$(date +%Y%m%d)"
EOF
Comparison with other addons
| Feature | Terminal & SSH | Advanced SSH & Web Terminal | VS Code |
|---|---|---|---|
| Web terminal | ✅ | ✅ | ✅ |
| SSH server | ✅ | ✅ | ❌ |
| Graphical editor | ❌ | ❌ | ✅ |
| Security audit | ✅ | ✅ | ❌ |
| ZSH shell | ✅ | ✅ | ❌ |
| Complexity | Low | Medium | High |
| Official addon | ✅ | ❌ (Community) | ✅ |
- Advanced SSH & Web Terminal - community addon with even more features (Mosh, SFTP, more options)
- Studio Code Server - if you prefer a graphical editor directly in the browser
- File Editor - simple editor for quick configuration edits
Summary
Terminal & SSH addon is an essential tool for anyone who wants to have full control over their Home Assistant system. Whether you need to:
- Quickly edit a configuration file
- Debug a problem in real time
- Manage the system remotely from the comfort of your computer
- Perform advanced tasks that are not available from the web interface
This addon will allow you to do all this - safely, quickly and efficiently.
Comments